Category Archives: West German

Defending Aulzhausen

The Kleinbach Valley, located southeast of Bremen, was renowned for it picturesque features. Pleasant streams meandered through the valley while small towns dotted the valley where the inhabitants were insulated from major autobahns and busy cities. Yet, all this was all about to change. In the late afternoon during the summer of 1983 the 31st Panzer Grenadier Brigade, itself part of the 11th Panzer Grenadier Division, had deployed across the valley. It’s task was to halt the advancing Soviet thrust which two days prior had pushed across the border.

Moving the brigade forward had resulted in losses due to air attacks, deep artillery strikes and of course mechanical breakdowns. As the brigade deployed its fighting formations were centred around three battalion sized units, each understrength. With a significant area to hold the brigade commander determined to conduct a flexible and mutually supporting defence. A key component of this flexible defence was the centre battalion, the 312th Panzer Grenadier (PG) Battalion. This would reinforce the battalions to the north (311th) or south (313th) as required. It was in the south of the deployment area the West German position was strongest, in part because it centred on the very defensible town of Aulzhausen. A panzer grenadier company was allocated to its immediate defence while the remaining two companies of the 313th PG Battalion deployed to the south of the town. Arguably the weakness in the defensive position of the battalion was to Aulzhausen’s immediate north. Here only a token defence could be established. However, the brigade commander was confident his reserve battalion could block any Soviet advance here should it be required.

Elements of the 313th PG Battalion deployed on a wooded hill south of Aulzhausen

Opposite elements of the 57th Guards Motorized Rifle Division, commanded by Major General Oleg Sychevich, moved forward to their start lines. The division had already been heavily engaged the previous day. Now, as the warm afternoon sun filled the valley, it would be sent forward again. Sychevich’s orders were clear, a breakthrough must be achieved at all costs. The breakthrough would be achieved by a two phase attack. Phase One would see two understrength motor rifle regiments moved forward in a concentrated force and attack the southern sector. The attack would overwhelm the enemy and draw in the West German reserves. Once the first phase was complete Phase Two would begin. This would see the release of the 57th Tank Regiment which would breakthrough in the north.

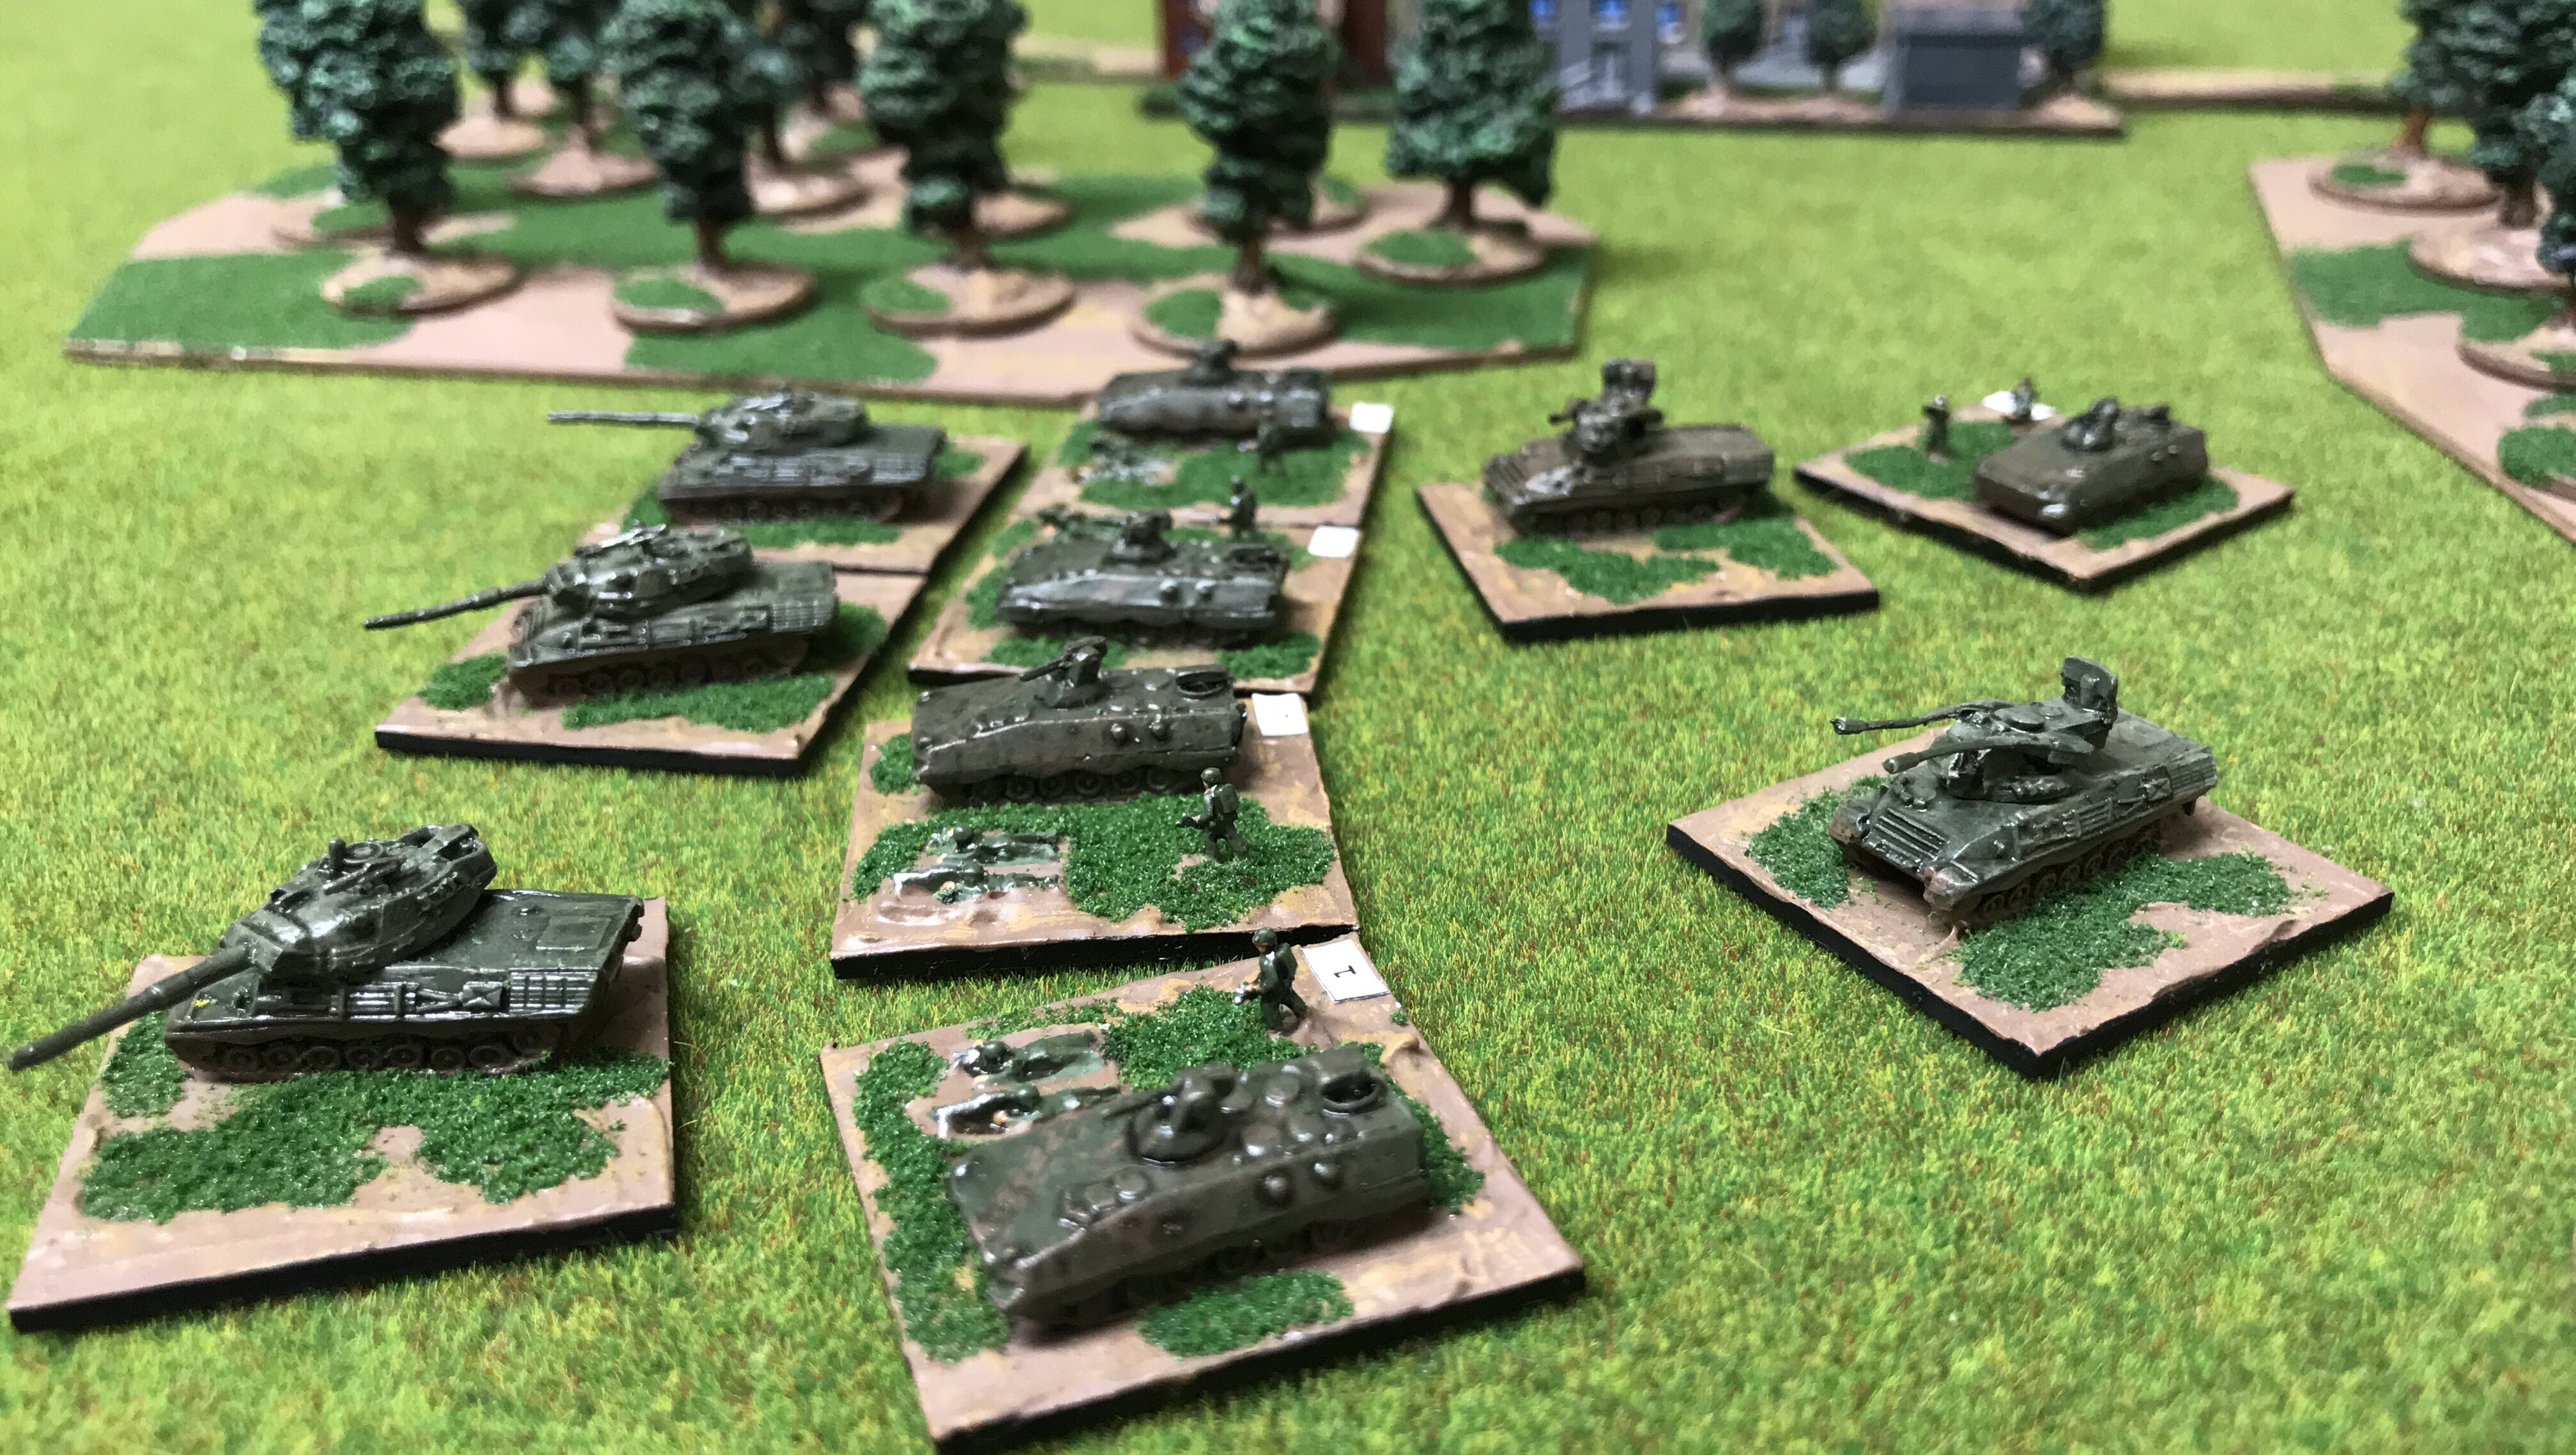
To achieve Phase One the 174th Guards Motor Rifle Regiment (MRR), primarily equipped with BMPs and supported by T-64B tanks, was to engage forces to the south of Aulzhausen with one battalion sweeping north attacking rear areas forces reconnaissance had detected previously. To 174th MRR’s immediate right was the 1st Battalion of the 170th Guards Motor Rifle Regiment, this time equipped with BTR-60PBs and more T-64B tanks. This battalion would reinforce the main effort south of Aulzhausen. Extending further north was an additional battalion the 170th MRR. However, this battalion was held in immediate reserve from where it would act as flank protection or local exploitation force. Supporting the advancing battalions were the 122mm regimental artillery battalions of each regiment, along with one 152mm divisional artillery battalion.

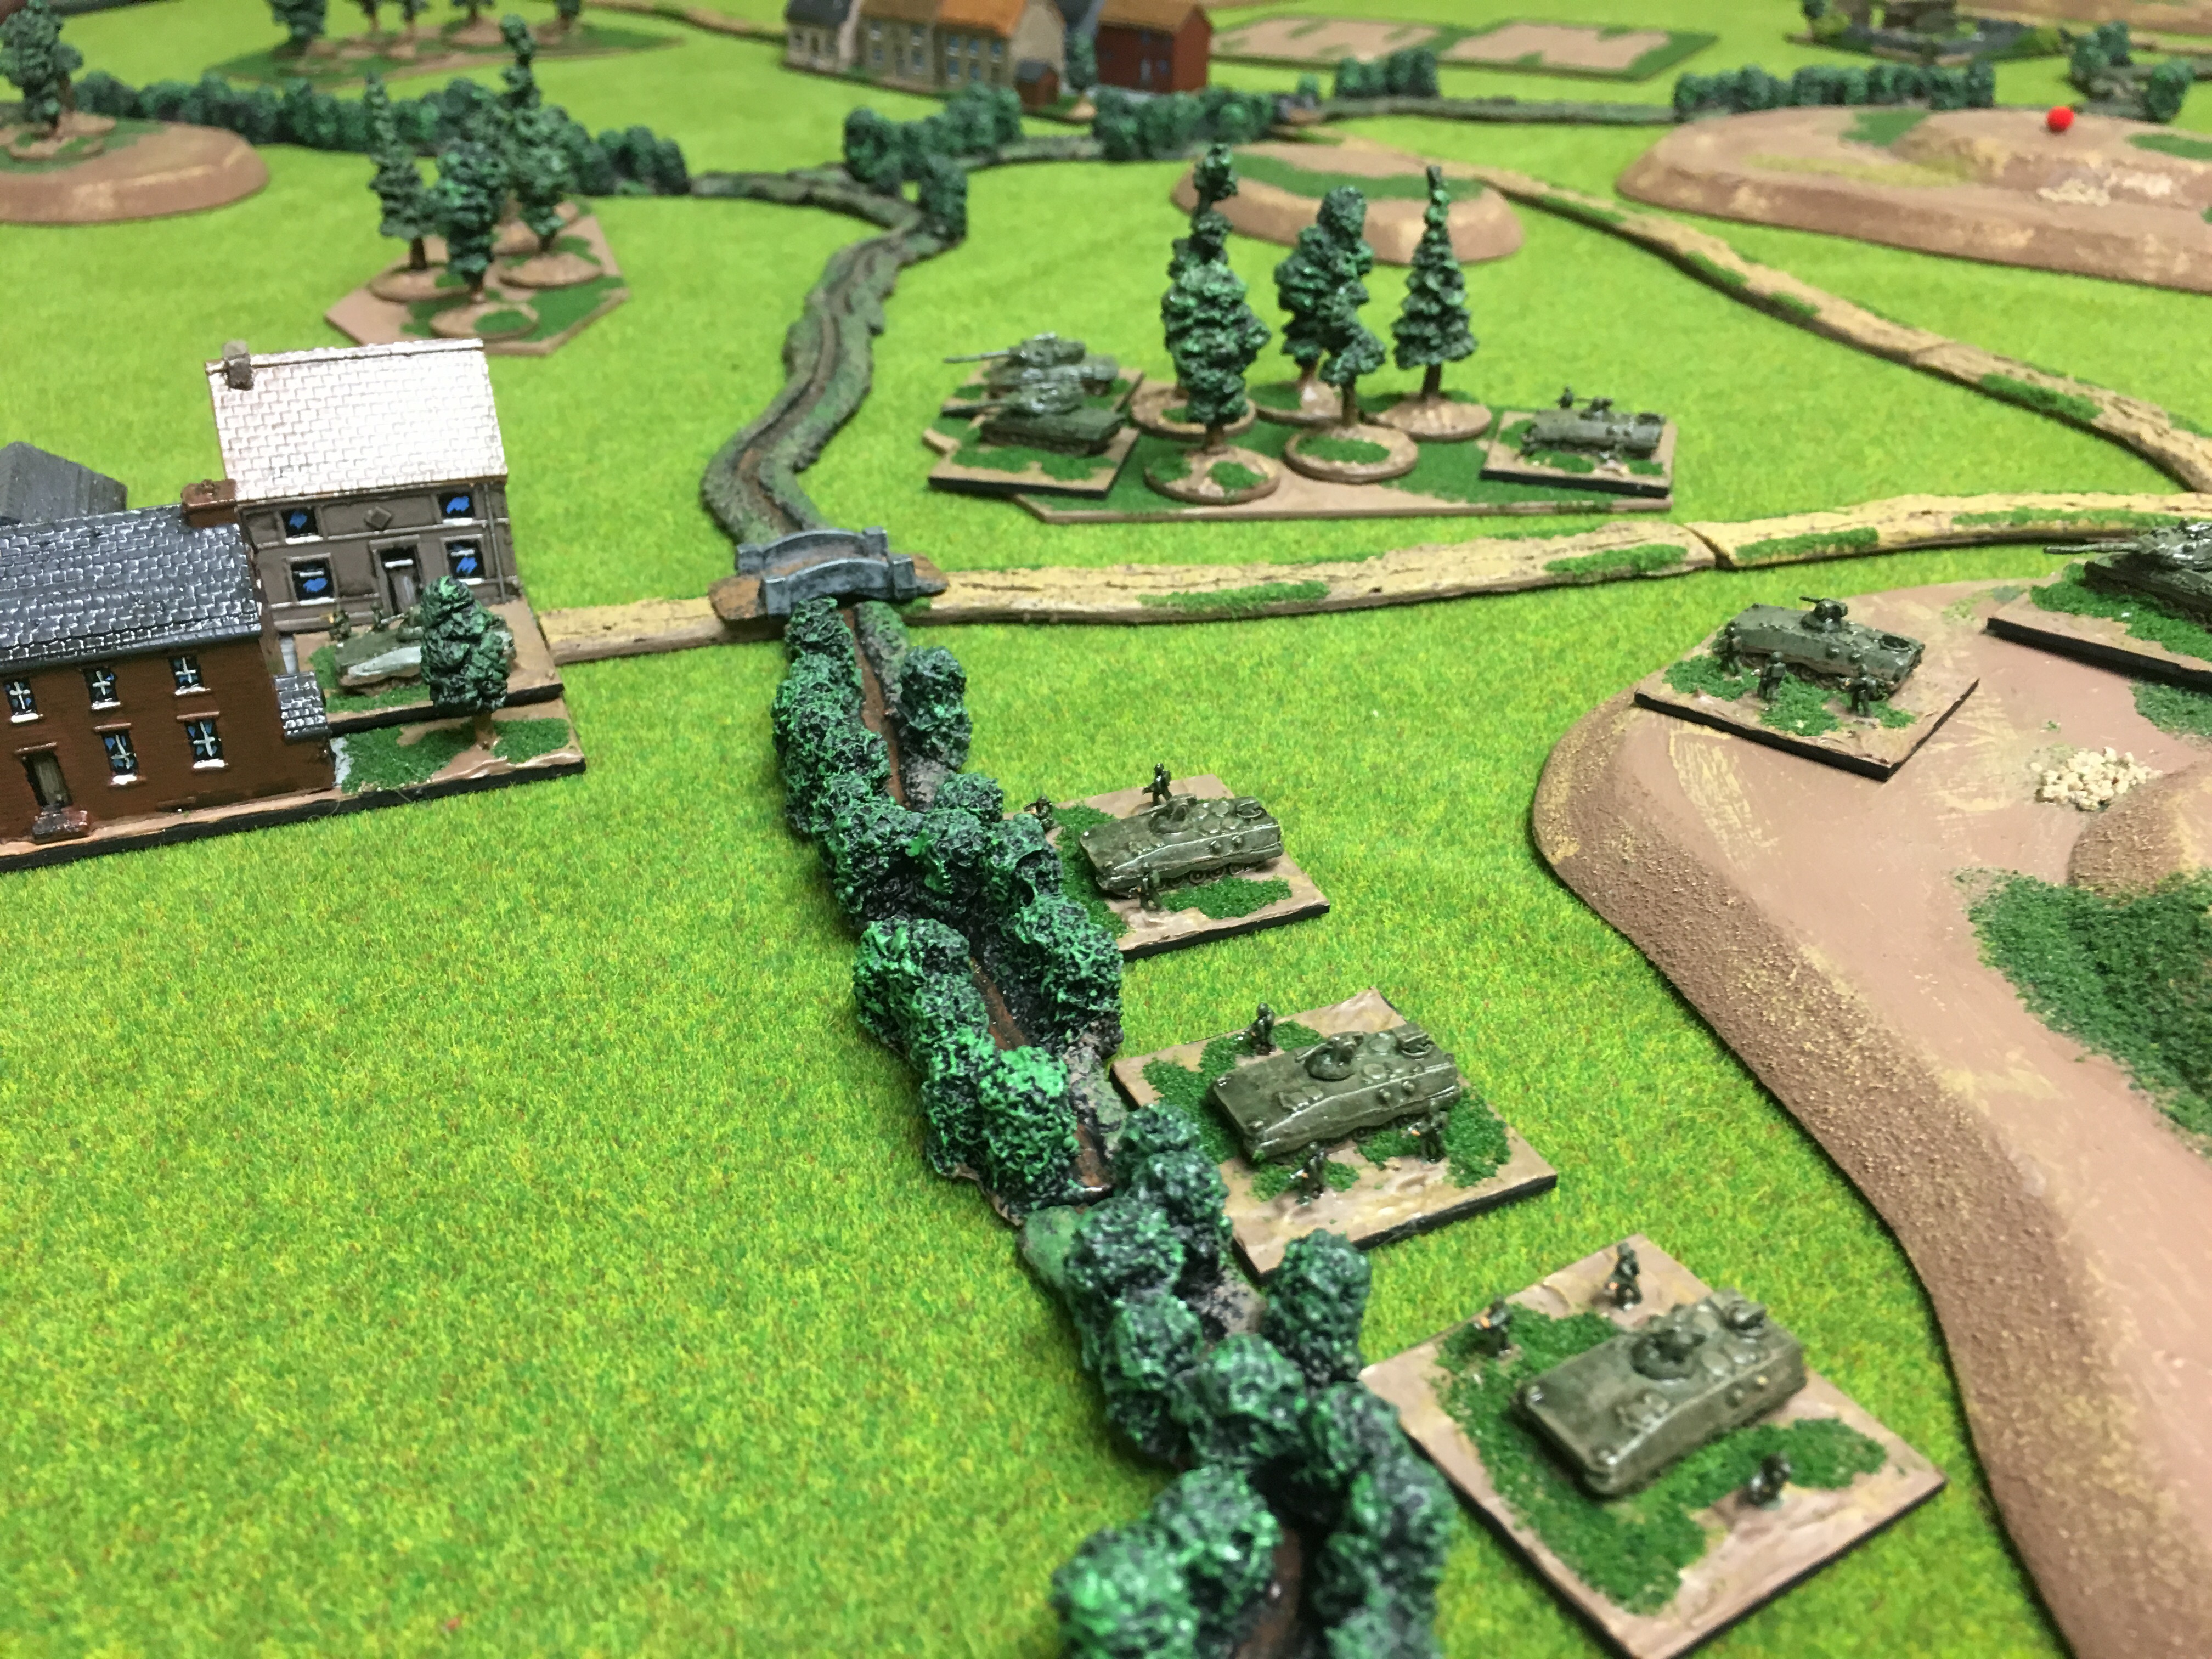
First to be engaged were elements of 1/170th MR Battalion when several T-64Bs, of the supporting tank company, were engaged at long range by Leopard 1A1A1s deployed in concealed positions on a wooded hill. Adding the West German defence were several infantry platoons which utilised their Milan ATGWs against advancing BTRs. However, no sooner had the West Germans revealed their positions than Soviet forward observers began to screen the advance with a series of smoke screens using regimental 122mm artillery battalions and the battalions organic 120mm mortars.

While the 1/170th Battalion was heavily engaged to its front, the the BMPs of the 1/174th began to flank the position. Firing from a series of short halts the T-64Bs, along with the various smoke screens, enabled the Soviets to slowly regain the initiative. Across the line BMPs pressed forward.

1/174th Battalion manoeuvre to the flank of the Germans visible in the distance

Reinforcing the attack was the 2/174 MR Battalion. This battalion conducted deep flanking movement. The battalion was soon advancing on the West German rear. Fearing the advancing BMPs and supporting armour the West German mortars and integral flak elements began to fallback. The Soviet advance was gaining ground.

The 2/174th Battalion advances in a deep flanking movement against the German right flank

Reports coming into Sychevich’s were however causing concern. The advance had been delayed and casualties were mounting. Authorisation was given to Brigadier Sutonovich, commander of the 170th MR Regiment (BTR), to commit his second battalion, the 2/170th. It would advance directly on Aulzhausen and reinforce the attack.

2/170th MR Battalion is committed to the attack

Now four Soviet battalions were moving against a single West German battalion. With overwhelming pressure the West German 313th Panzer Grenadier Battalion would surely break.

A general view with 174th MR Regiment advancing from the south (left) and other forces from the east (right)

In support of the German brigade was the brigade’s organic M109 artillery battalion. However, the artillery fire plan had been hastily prepared, no doubt due to the recent deployment of the brigade. It was therefore unsurprising that a series of artillery fires had mixed results. While some Soviet platoons suffered casualties in general the results were below that was expected. Worse, divisional counterbattery assets were unavailable to counter the Soviet artillery concentrations.

The situation in the centre – the 1/170th MR Battalion’s casualties are increasing

As the 1/174th MRR Battalion pressed the West German flank an additional West German Panzer grenadier company were detected. Again Soviet artillery fires were used in screen the advance while BMPs and T-64Bs concentrated overwhelming force in limited areas.

1/174th MR continues to press the attack uncovering further German defensive positions (top left)

Despite the overwhelming Soviet concentration the German positions were holding, or at least it appeared that way to Major General Oleg Sychevich, safe in his divisional headquarters.

A view as three Soviet battalions advance with Aulzhausen visible centre right

Yet from the West German perspective the situation had in fact become critical. Determined to relieve the pressure on the 313th PG Battalion German formations were actively moving south.

Elements of the 311th PG Battalion move south, each battalion had a mix of Marders & M113s

From the north the 311th PG Battalion moved against the right flank of the Soviet thrust and in the process brushed aside the remnants of a Soviet Reconnaissance Battalion. Simultaneously, from the northwest, the 312th PG Battalion moved to block the Soviet flanking movement.

Elements of the 312th PG Battalion move southeast and begin to deploy facing south

The next engagement would see advanced elements of the 312th PG Battalion engage the 2/174th MR Battalion, itself fast approaching its first objective without loss.

The 2/174th MR Battalion moves rapidly forward as West German rear units scatter.

The mood in the West German Brigade Headquarters was lifting. The position around Aulzhausen was still secure and Soviet casualties were mounting, especially on two battalions. But it must be remembered that this was only Phase One of the Soviet plan. Now Major-General Oleg Sychevich turned to his staff. “Comrades, the enemy has stripped the northern sector of forces. Order the 57th Guards Tank Regiment forward. We have our breakthrough.”

Alas, for us we had to call time on our evening game. It was clear the situation in the southern sector was stalling for the Soviets. However, in the north uncommitted elements of the 57th Guard Motor Rifle Division would advance in to a major gap in the West German line – or at least that is what the Soviet histories would record.

Our game was developed with the Scenario System with the situation based on a Soviet Hasty Attack with the Soviets, commanded by two players, opting to reinforce their attack with an Option A. Unfortunately, all the players were somewhat rusty with the rules so a clear decision was not reached in our game window. That said, it was almost certain the Soviet attack had stalled and West German reinforcements would stabilise the situation. Our game focussed on the what is referred above to “Phase One”. A hypothetical “Phase Two” was not part of the scope of our scenario, but is obviously plausible as the West Germans countered the Soviet attack by moving their forces south.

As to the miniatures they are all from my own collection and are from the Heroics & Ros 1/300th range. Terrain is a mix of Irregular Miniatures trees, Timecast buildings and various homemade items.

Spots on your Leopards

In years gone by I’ve tended to find myself using Soviets and typically found myself facing my regular opponent’s British. However, of late I’ve managed several games where I’ve used West Germans. It’s been an enjoyable change and as we have had the games in sequence it has allowed some evaluation of what’s worked and what hasn’t. Indeed, across the last three games the West Germans have found themselves conducting a hasty attack, advancing in an encounter, and last night facing a massive Soviet deliberate attack. This mix has offered plenty of variety in itself.

Further, both my opponent and I have been experimenting with very different force combinations. When conducting the hasty attack I opted for Leopard 2 as the armoured component, the first time in many years where I’ve used Leopard 2s. In the past I have found the Leopard II too restrictive in a three battalion list. This was especially so when facing enemy infantry where the the low anti-infantry factor of the Leopard 2 was particularly frustrating.

In the second game, above and below, I switched from my normal three battalions to just two battalions to face massed T-80s in a fascinating encounter game. Again using Leopard 2s both my opponent and I were struck by the power of these tanks, though possibly him more than I, which was pleasing.

In last night’s encounter I dropped back to Leopard 1s and effectively just two manoeuvre battalions. I was supported by a weak dismounted security battalion but they clung to the confines of a town desperately calling in artillery fires and dodging incoming artillery shells.

Anyway, this time the West Germans faced a massed Soviet deliberate attack, where my opponent selected an reinforcements (an Option B) and what seemed like half the Soviet armies heavy artillery assets. Thank goodness I had some Gepards to drive away of his Hinds and some Phantoms to give Ivan something to think about!

My opponent has likewise has used plenty of variety. First Naval Infantry without any armour. This was then followed by a T-80 Tank Regiment and more recently elements drawn from two understrength Motor Rifle Regiments.

All this has reminds me of how important changing you force structure is. If you have the opportunity, and some additional models, give it a try. Your games will have plenty of variety which has to be a good thing. In the meantime I’m going to continue to count spots on my Leopards, be they one or two, and perhaps seeing how many Jaguars I can use, among other things…

Forming a Panzer Grenadier Brigade

I’ve always been somewhat surprised that the West Germans are infrequently seen in these parts. Especially as the West German formations formed the backbone of NATO armies by the 1980s. Continuing with my occasional posts on forming armies this article looks at forming a Panzer Grenadier Brigade for use in the Scenario Generation System.

Now, I suspect the use of West Germans formations under the Scenario Generation System is reduced by the points system. In particular West German formations are relatively expensive due to the use of IFVs. A contrast to the American M113 or British FV432 combat team which is relatively inexpensive. My West Germans were my first NATO army under Modern Spearhead and they remain an interesting, and I feel, capable army. As is the norm here I based my West Germans around 1982. The two lists I will present here are based around Panzer Grenadier Brigades and I feel provide a reasonably balanced force structure. However, rather than provide a list I hope a few of you find a little inspiration.

A Panzer Grenadier Brigade has four basic battalions. A Panzer Battalion, two Panzer Grenadier Battalions and a Mixed Battalion. The last having no HQ under peace conditions. Each battalion comprises three companies. These three companies can be cross-attached or operate without cross-attachment.

Let’s begin by looking at the armoured options. The Panzer Battalion comprises three companies and excludes an infantry component unless through cross-attachment. At the moment I have Leopard 1A2, Leopard 1A1A1 and Leopard IIs in my collection which allows me to model several different formations. For now I will focus on the Leopard 1s and will look at the Leopard 2 in another article.

The Leopard 1 went through several upgrades and for my purposes the Leopard 1A1A1 is the most common in 1982. It has many of the physical characteristics of the Leopard 1A5 allowing me to use the excellent Heroics & Ros Leopard 1A5 casting to represent the Leopard 1A1A1. Above, Leopard 1A1A1s supported by a company of Marder equipped panzer grenadiers. A Brigade HQ, represented by an M577 command stand, can be seen in the rear.

The Leopard 1A2 was produced as part of the 5th batch of Leopards. It was not upgraded during the main upgrade program. As a result, and most notably, it didn’t receive the add on turret armour. The model I have are, I believe, from Skytrex. These models were gifted to me several years ago by Steve Weiss a SH/MSH gamer in New York as part of an “moderns aid package”. Historically the Leopard 1A2 were mainly deployed in the 6th Panzer Grenadier Division. As such they often exercised with Danish forces. Below Leopard 1A2s, supported by a panzer grenadier company in M113 APCs, cross a small stream.

Each Panzer Grenadier Battalion comprised two companies mounted in Marders while the third is in M113s. Cross attachment, by company, is particularly important to achieve combined arms and I almost always base my battalions on a mix of companies. That said, as each platoon contains Milan a degree of independence can be maintained and a Panzer Grenadier Battalion could operate without panzers. One particular strength these battalions is the Marders. The Marder IFV, being a true mechanised infantry combat vehicle, provides considerable protection for the infantry from enemy artillery fires. This is especially so when under Soviet 122mm fires. In addition the combat factors, a result of the infantry, vehicle and ATGW systems, provide a capable system weapons system in 1982. In contrast the M113 mounted companies provide less offensive and defensive power but have a lower points cost.

In my view a critical part, and sometimes overlooked part of these Panzer Grenadier battalions, is the M113 mounted with a 120mm mortar. These indirect fire weapons provide each battalion with a degree of organic fire support. Useful, and almost always available, the are useful in suppressing enemy infantry. However, being self-propelled they are less prone to counter-battery fires, though do remember to move them frequently!

The fourth battalion is the Mixed Battalion. It comprises a panzer company and two panzer grenadier companies in Marders. Unlike the Panzer Grenadier battalions it lacks a mortar section and unless mobilised an HQ platoon. I believe that elements from the Brigade HQ form the headquarters, though details are conflicting. I have decided to represent this HQ by a Marder element.

Specialised anti-tank systems were a critical part of the West German force structure. Each brigade had one company. Some Brigades fielded the Jaguar 1 armed with the HOT ATGW system, which had mostly replaced the earlier Jaguar armed with ATGW SS11. Other brigades fielded a company of Jagdpanzer Kannone. I must admit my personal favourite is the old and increasingly ineffective Jagdpanzer Kannone which retained a 90mm gun. The 90mm guns were sourced from decommissioned M47 tanks and the vehicle has a number of similarities to the excellent, in WWII terms, Jagdpanzer IV.

Above, Jaguar 1s deployed along a woods edge, while below a company of Jagdpanzer Kannones deployed in ambush in field and woods. Many Kannones would be upgraded to Jaguar 2, armed with TOW, while others would soldier on in reserve formations until 1990.

Other core components of the brigade include the brigade’s own artillery battalion. Equipped with the excellent M109G with its improved howitzer with a range of 18,000m is effectively an M109A1. Self-propelled and held in brigade support it can be called in reasonably easily by fighting stands and recon elements. Divisional assets include additional artillery systems in the form of FH-70 towed guns and 110mm rocket battalions. Both are able to support with fires into the battle area. However, the FH-70 is useful for deep fire missions against enemy artillery or air defence systems. Very useful if your opponent plans to deploy towed artillery systems.

West German formations, unlike some NATO allies, had a solid anti-aircraft arsenal. Each division comprises specialist man portable SAM as well as Gepard self-propelled gun systems. This is further supplemented by Roland SAM at Corps level. Below, Gepards provide support for elements of a Panzer Grenadier Battalion.

Fixed wing air support has an ability to quickly overcome an enemy concentration. As importantly it can strike at any part of the brigade battle area. I usually ensure a Forward Air Controller is present, but when points are restricted a reconnaissance stand, an HQ and even fighting stands can request support.

Below, relatively inexpensive Alpha Jets overfly Luchs reconnaissance elements. These light attack aircraft can be armed with rockets, bombs or Improved Conventional Munitions (ICM). Consideration should be given to the weapon load. For example if the enemy is likely to be on the offensive ICM can be more useful than rockets.

However, to achieve success the enemy air defences must be reduced. The obvious way to do this is via artillery strikes on located radar SAM systems. However, Phantom fighter bombers can also be used. Their avionics and countermeasures are useful and potentially allow the use of weapons such as smart bombs to suppress enemy missile systems. Subsequent attacks can then be made by other aircraft armed with more traditional weapon loads.

The PAH-1 helicopter, armed with HOT, can be a useful weapons platform to countering enemy armour and for targeting AA systems allowing fixed wing support to be more effective. Like the fixed wing aircraft I tend to operate these as options in the list. This forces my opponent to consider his air defences in both attack or defensive postures, without me having to always commit to using a specific system each game.

Having described a few of the elements available I will now provide some sample lists which I hope provide some inspiration. You will note some companies are under strength, representing casualties. There are a couple of variations from the official TO&E, I will cover these off in future posts.

The Attack List is the most self explanatory. I see it being used hasty attack scenarios and for encounter situations, when the Scenario System selects this list. I don’t believe it is useful for or the West Germans in general should attempt a deliberate attack. It contains three manoeuvre battalions with reasonable indirect fire support. The Panzer Battalion could be used massed but more typically one or two companies are allocated out combined arms battalions. An under strength Jaguar company provides heavy ATGW support while a range of artillery is available. A range of options include fixed wing air support, additional artillery for counter-battery fires or air defence suppression. Care should be made when allocating resources to battalions so as the overall attachment limits are not exceeded. Of course the brigade is not well suited to frontal engagement, so try and use manoeuvre to gain advantage, forcing your enemy to redeploy. The sample Attack List can be found here.

The Defend List is more complicated and with fewer points more difficult to achieve meaningful combined arms. In defence the three battalions are thin on the ground and each is limited in armour. Unlike the previous list armour is already attached with one battalion of the brigade presumed to have been deployed elsewhere. The Mixed Battalion is small and should act as a mobile reserve reinforcing the other battalions. This not withstanding careful deployment of the fighting stands and support weapons will be required. Often a brigade commander will be tasked with a difficult situation or be on the offensive. In these situations the options can be selected to bolster the defence, disrupt the enemy or add teeth to the fighting battalions. Options include air support designed to attack advancing enemy vehicles, additional AA systems and additional artillery. The Option B is specifically design for the spoiling attack scenario where a commander conducts a preemptive attack before an opponent can launch a deliberate attack. This provides reinforcements, additional artillery and most importantly additional mechanised AA systems. The sample Defend List can be found here.

Hopefully this short primer will have been of use and just perhaps you will be tempted to deploy some West Germans to stop the WARPAC invasion…

Achtung Panzer!

Three days had passed since the invasion began. During these desperate days both NATO and WARPAC formations had suffered heavy losses and both were committing reserve formations, or in the case of the Soviets, follow-on formations. Generalmajor Hans-Henning von Sandrart, commander of 11th Panzer Grenadier Division, had allocated one of his brigades, the 32nd Panzergrenadier Brigade, to hold the left flank of his divisional room. Opposite, his Soviet counterparts were committing elements of a reserve Motor Rifle Division, moved west prior to the offensive. Now, elements of this fresh division were advancing in a hasty attack on the West Germans.

The commander of 32nd Panzergrenadier Brigade, Ludwig Esebeck, had under command three battalions. They were the 311th Panzergrenadier Battalion, the 312th Panzergrenadier and the 313th Panzergrenadier. Each comprised three companies one of which was of Leopard 1A1A1 tanks. In direct support were various AA systems and the brigades artillery battalion. Available for counter battery fires was a battalion of M107 self-propelled artillery.

The brigade’s operational room was considerable, especially for an understrenth formation. Divisional intelligence expected the initial Soviet formations would comprise two Motor Rifle Regiments supported by artillery and fixed wing aircraft operating in close support. Based on this scenario, and with limited resources, Esebeck opted to deploy two battalions forward on a key ridge with a company of each battalion holding flank positions.

Above, the main ridge flanked by a town on the left and a village on the right.

The brigade’s third battalion, the 311th, would hold the brigade’s left but would deploy considerably further back. Likely routes of advance were covered and each battalion had local reserves. However, should the enemy advance along an unexpected route, Esebeck determined his small battalions would operate in a flexible defence. Following standard doctrine each would be prepared to reposition to reinforce another.

Below, the general situation with the Soviets entering from the left. The German left flank is in the right foreground.

Soviet forces were soon on the move and advanced German forces reported several Soviet tanks battalions supported by BMPs, along with BTR mounted infantry moving against the 32nd Brigade’s left flank. Indeed, as reports came in from advance positions it was soon clear that an entire Soviet Tank Regiment, comprising T-55s, T-62s and BMPs, was advancing at speed. This regiment was supported by significant portions of a BTR Regiment. It seemed the intelligence officers were mistaken in their assessment!

Below, the Soviets advance with a tank regiment in the foreground. The BTR battalions are just visible in the distance and are themselves supported by tanks and ATGW systems and self-propelled artillery.

Below, elements of the 311th Panzergrenadier Battalion prepare to engage the Soviets. The small village of Gerbertshofen can be seen on the left, complete with a garrison of a single panzergrenadier platoon.

The advancing Soviets Motor Rifle battalions were first to be engaged when Panzergrenadiers in Gerbertshofen requestedfire support from the brigade’s 155mm artillery. A series of accurate fires destroyed a company of advancing infantry. This was soon supplemented by direct fire from supporting Leopards.

Below, the Soviet attack presses forward. Gerbertshofen has now been reinforced in an attempt to prevent a direct attack. Casualties on the German Panzers are now mounting as the Soviet armour engages. While German artillery fires continue to cause heavy casualties on Soviet infantry. However, without a dedicated artillery observer the fires are not always concentrated falling on three seperate Soviet battalions.

While the Soviet attack clashed with Panzergrenadiers and Leopards around Gerbertshofen, the battalion’s left flank began to fall back towards higher ground in an effort to further protect the battalion’s flank. Below, a Marder equipped company can be seen in its revised position. On the hill Gepard AA remain vigilant. The red marker denotes a game objective.

It had been apparent for some time that the 311th Battalion was under heavy pressure. As a result Esebeck ordered the 312th Panzergrenadier Battalion to move to support it. This was to be completed in two phases to prevent additional Soviet formations attacking and securing key positions in the centre and right. In turn the 313th Panzergrenadier Battalion would reposition to a more central position.

Above, 312th Panzergrenadier Battalion conducts its second phase move. 313th Battalion, partly visible in the top right, will next reposition on the ridge. German tactical flexibility here was extremely important and each order change was successful despite Soviet radio jamming missions. On the extreme left elements of a Soviet BTR battalion can be seen deployed in a covering position to protect the Soviet left against a flank attack.

Above, Soviet armour prepares to advance over the a stream, with the intent of overwhelming the 311th Battalion and breaking into the German rear. The village of Gerbertshofen can be seen and is still in German hands. The Soviet plan required this village to be taken allowing supplies to be bought up for the exploiting Soviet tanks.

Below, another Soviet tank battalion moves forward. A number of Soviet battalions had reached the end of their command arrows. Now, German radio jamming missions added to the Soviet command problems. At this point the 311th Panzergrenadier Battalion was almost at breaking point. A concerted Soviet effort in fading light would have been devastating.

However, 312th Battalion had itself now moved on to the high ground to the rear of 311th Battalion. Once completed the Brigade’s position was stabilising, though it remained fragile.

At this point, with light fading, the Soviet attack began to slow. Clearly, the Soviet commander was in a strong position and the use of massed armour had clearly pressed the German defence to breaking. The 311th Panzergrenadier Battalion was significantly outnumbered and only the flexibility of German forces to reposition allowed the position to be maintained. Soviet artillery was both limited and ineffective, in stark contrast to German artillery fires. However, the Leopards of 311th Panzergrenadier Battalion, available only in company strength, stood no chance against the concentrated deployment of so many Soviet tanks. Achtung Panzer indeed!

Panzers at Innsdorf – 1982

As I reorganise my websites it seemed a shame that many of the battle reports would be lost so in the interests of keeping one or two of the classics I thought I would repost a couple. This one, Panzers at Innsdorf, seemed a good place to start…

The recent Soviet offensive had stalled and in one sector, which had not been fully consolidated by Soviet second line formations, West German forces were ordered to undertake a limited probing attack. The engagement used the Modern Spearhead rules while the scenario was generated using the Scenario Generation System. A portion of the battle can be seen below with the Soviets advancing from the right.

The West German forces were centred around a 13th Panzer Grenadier Brigade from 5th Panzer Division. The brigade was understrength and comprised two Panzer Grenadier battalions, the 131st & 132nd and the 134th Panzer battalion. These battalions were formed into composite battalions each with a panzer company, and reinforced by AA and recon elements. The West German commander’s staff completed a hasty assestment of the situation which would form the basis of the brigade’s plan. They were aware of one Soviet battalion around 3km from the FEBA already with further battalions, comprising some two regiments, likely to reinforce it. It was expected the reinforcements would operate on each flank, in an effort to seize multiple objectives, with the largest thrust on the German right. The formations were suspected to be armour heavy with significant artillery and SAM support. Based on this assesment the West German commander issued the following orders.

The 131st PG Battalion was to advance in the centre of the area of operations and hold the centre and halt attacks from the right flank. These attacks were expected to be armour heavy. This battalion was reinforce by light AA and the regiment’s Jagdpanzer Kanone company. The 132nd PG Battalion was to advance on the left flank and probe the enemy defences 3km distance. This battalion probe was to be covered by the Regimental Recon company. This battalion was also to act as the brigade’s mobile reserve. It was expected the Soviets here would be on the defensive and light opposition would be encountered initially. Finally, the 134th Pz Battalion was to conduct a deep flanking movement and attack the rear of any advancing Soviet formations and the flank of the defending battalion. This battalion could expect close air support and would receive close AA cover from a Gepard platoon. The brigade’s M109s were available for indirect fire support for all battalions and a battalion of FH-70s were available for enemy SAM suppression and counter-battery fires. Finally, division provided further AA protection for the brigade by the allocation of a number of tracked Roland systems.

The Russians undertook a general advance with two regiments, heavy in armour, advancing across a broad front. This included the German left flank where the already deployed BTR battalion immediately advanced to secure a wood to it’s front. Above this battalion can be seen engaging the 132nd West German PG Battalion. With an inadequate recon screen 132nd PG Battalion suffered heavy casualties despite its heavy artillery support from M109 and FH-70 artillery. The FH-70 proving particularly effective, at least initially, in the counter battery role.

Meanwhile in the centre the 131st PG Battalion took up defensive positions for the expected attacks in the centre and from the far right. Above, Lopard 1A1A1s and Marders can be seen deployed. The Battalion and Brigade HQs were in the town to the left rear. Additional troops were deployed in other terrain including the Jagdpanzer company. With the enemy having secured the high ground, and the 132nd PG under heavy pressure, a series of air strikes were called in to neutralise Soviet forces on this high ground. This included attacks by Phantoms as shown below. However, having been unable to suppress heavy Soviet SAM systems the Phantoms were unable to press home their attacks. This meant that the 131st was now effectively pinned and therefore prevented from supporting the 132nd PG.

With a rapidly deteriorating situation the 13th PG Brigade commander was faced with a difficult situation. The 134th Pz Battalion had been significantly delayed in it’s flanking movement and had still not arrived. The 132nd PG Battalion advance had stalled and was suffering heavy casualties forcing it to break contact. While the 131st PG Battalion was holding its position this position was now clearly compromised. Further, with enemy SAM screens remaining unsuppressed any significant air support would be limited. Reluctantly the order was issued for the battalions to break off the probing attack and fall back, at least for the moment…