Rock of the Marne – 1983

One of my regular wargaming opponents recently suggested a Modern Spearhead game, specifically he was keen for a rules refresher. As I was providing the miniatures for both armies it seemed the perfect opportunity to deploy the first of my 1980s Americans on the table, having completed two battalions last year.

M1 of the 3rd Infantry Division during Reforger ’82

What follows is a brief description along with a few photos of the game. I hasten to add it isn’t really a battle report. Given that the game was designed to refamiliarise my opponent with the rules it wasn’t surprising that we didn’t complete the game, time disappearing rather quickly.

Our scenario was set in early 1983 and found a Soviet Motor Rifle Regiment (MRR) conducting a breakthrough following recent successes. Two American battalions, drawn from the 3rd Infantry Division, nicknamed “Rock of the Marne”, moved to block the Soviet advance.

2nd Battalion of the 244th Motor Rifle Regiment advance

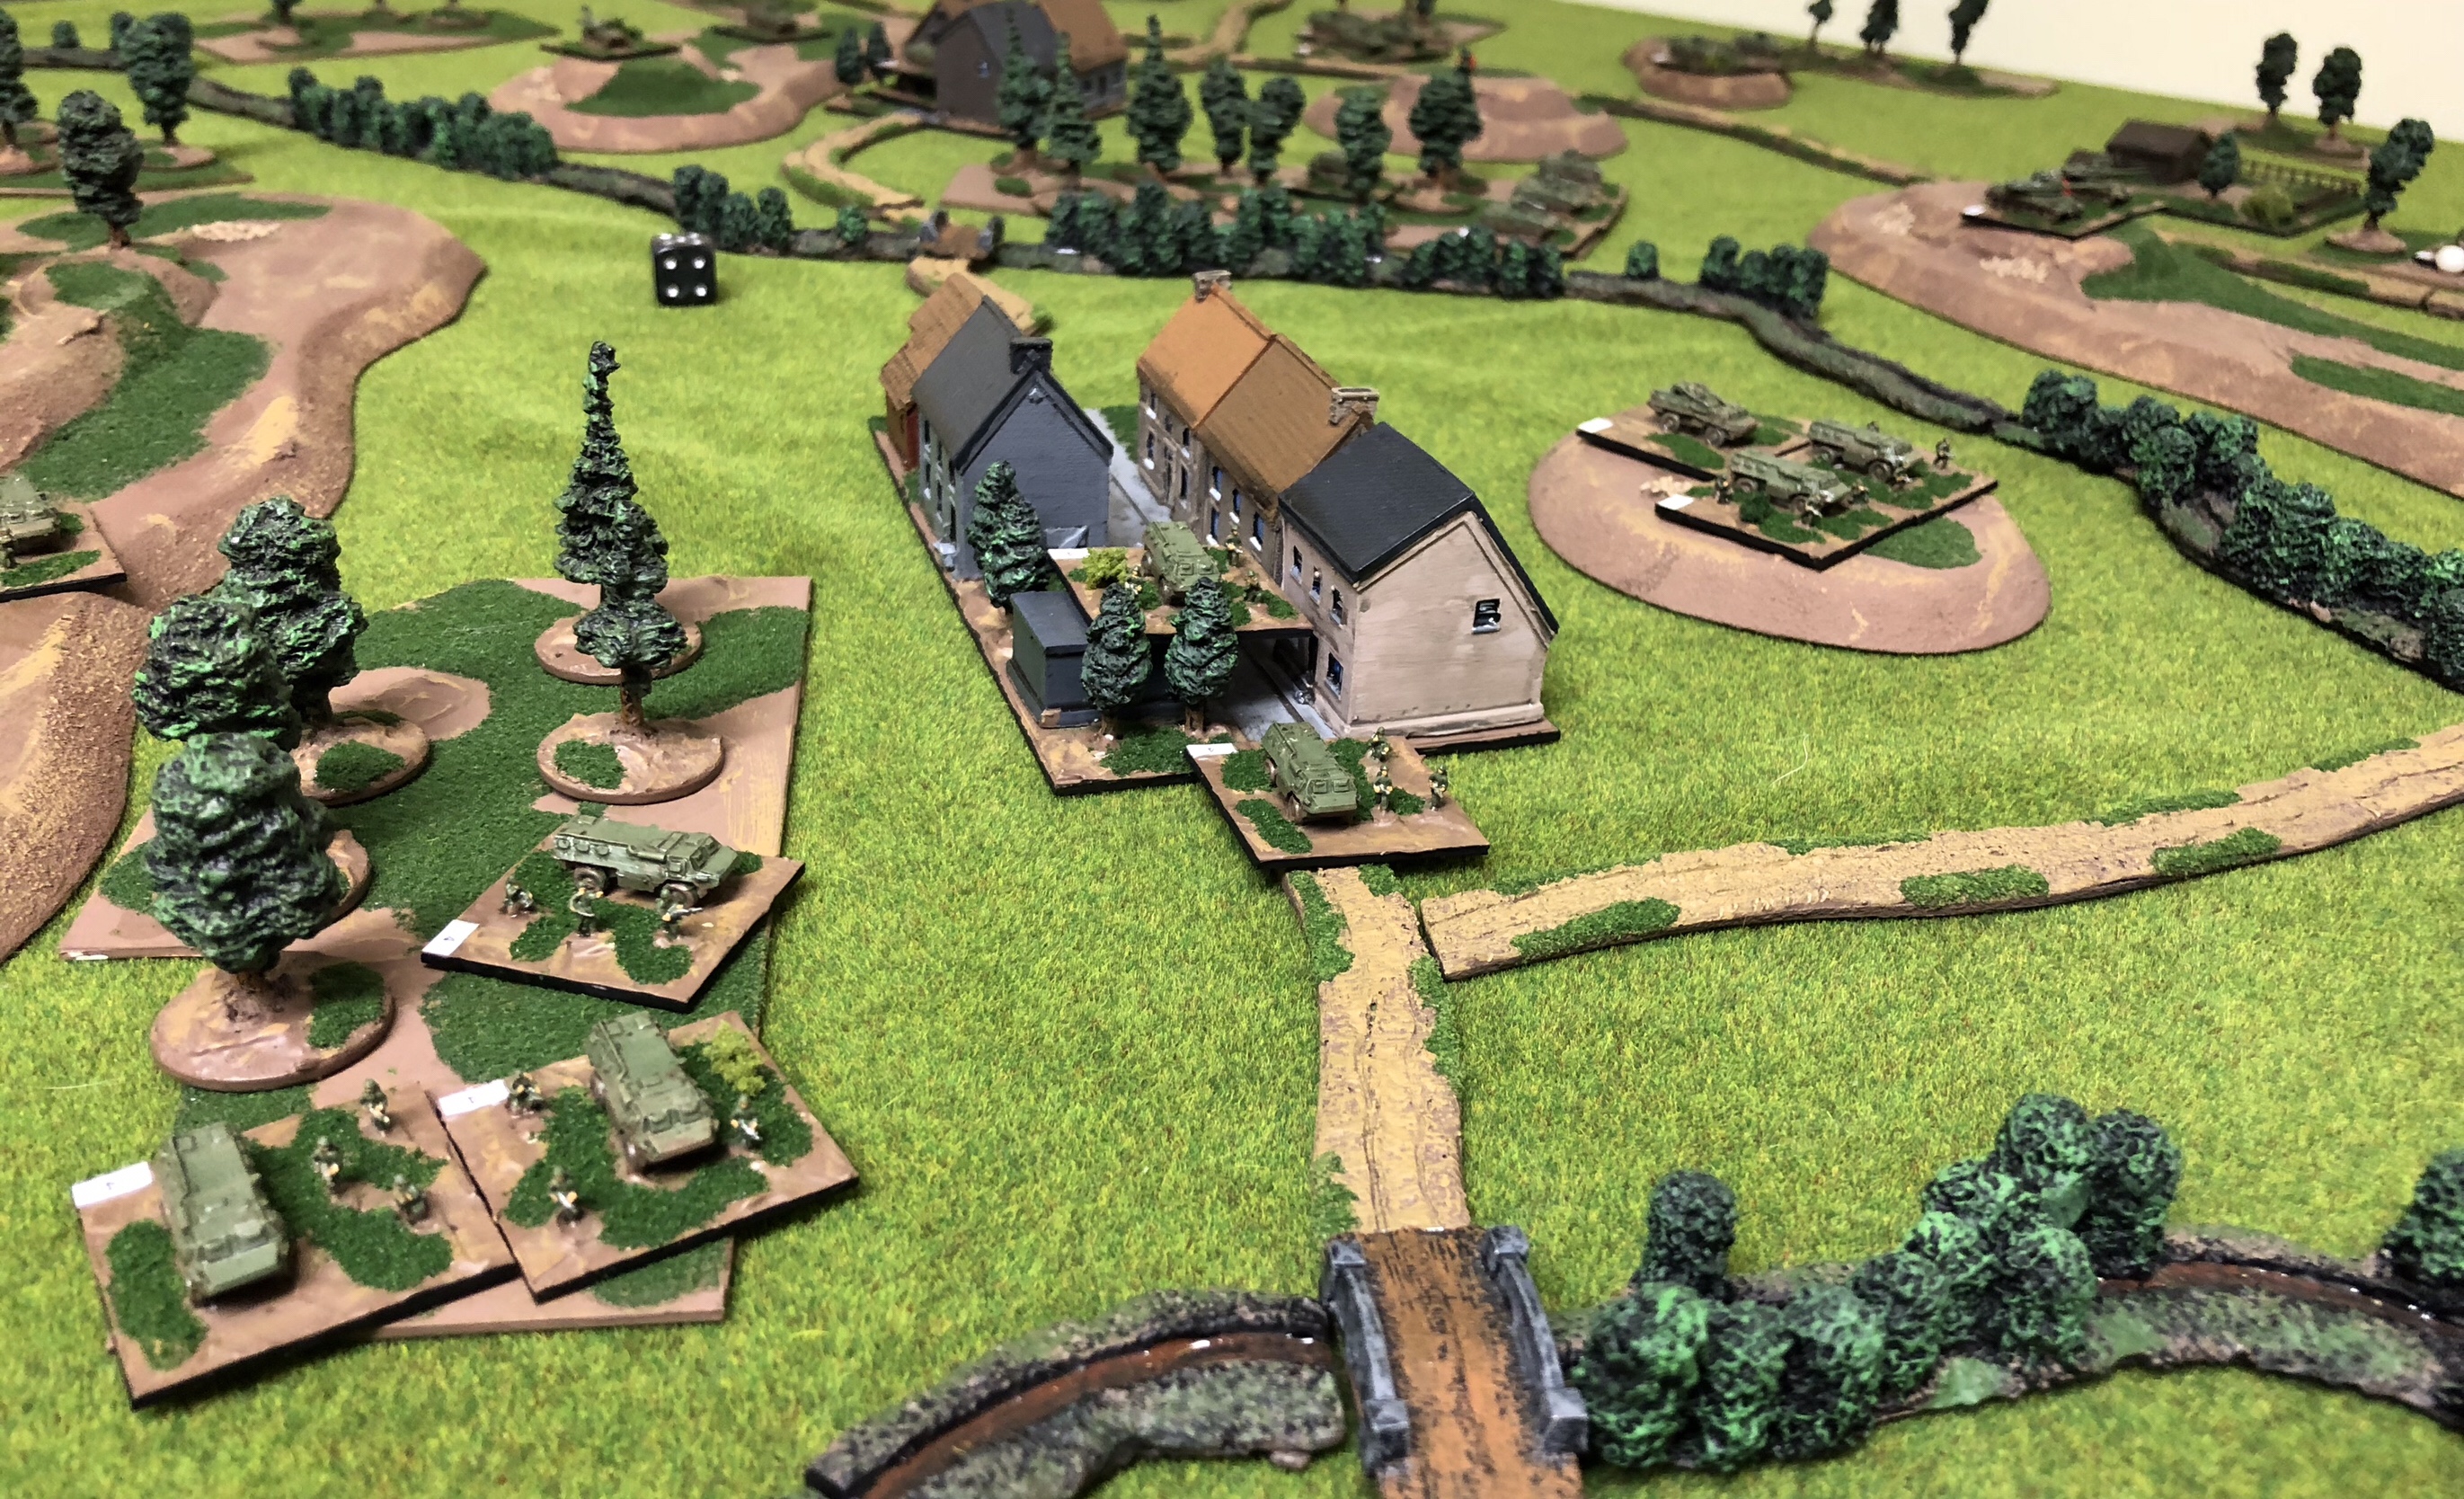
The 2nd Battalion of the 244th Motor Rifle Regiment (2/244th), part of the 27th Guards Motor Rifle Division, were ordered west to secure a small town before moving northwest to secure a ridge. Simultaneously support assets, including mortars and air defence elements, deployed in support. To the immediate south was the 1st Battalion. Operating independently was the 3rd Battalion, having been ordered to conduct a flanking manoeuvre to the north.

The 1/30th Mechanised Infantry Battalion

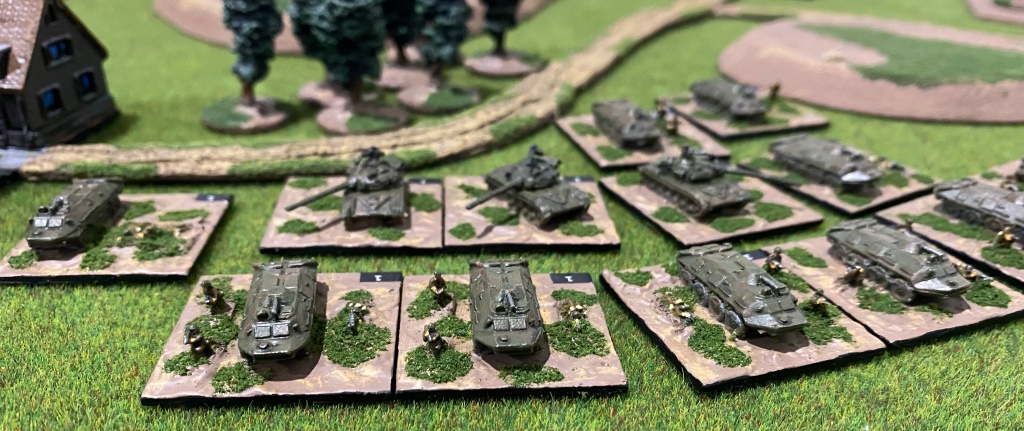
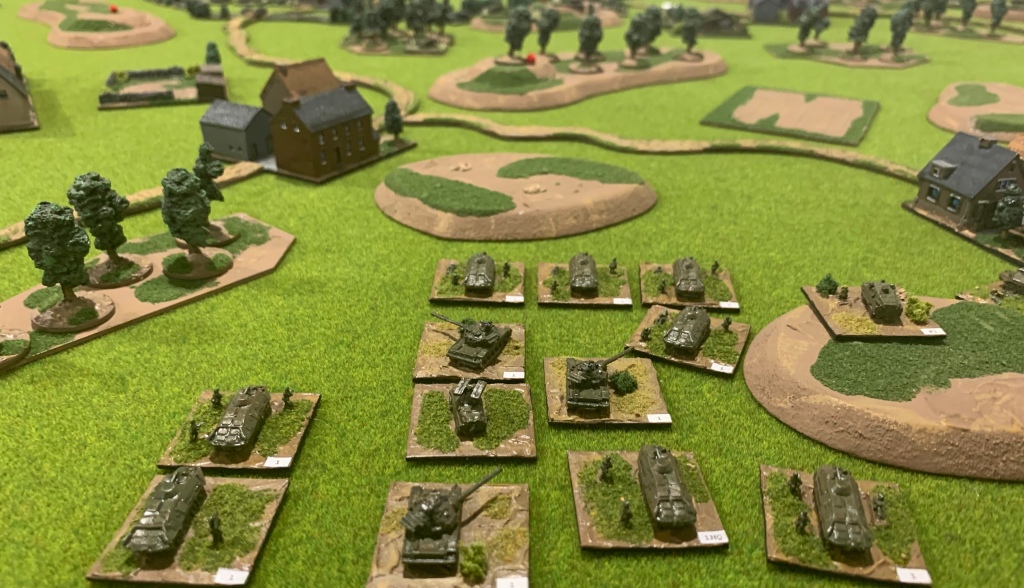
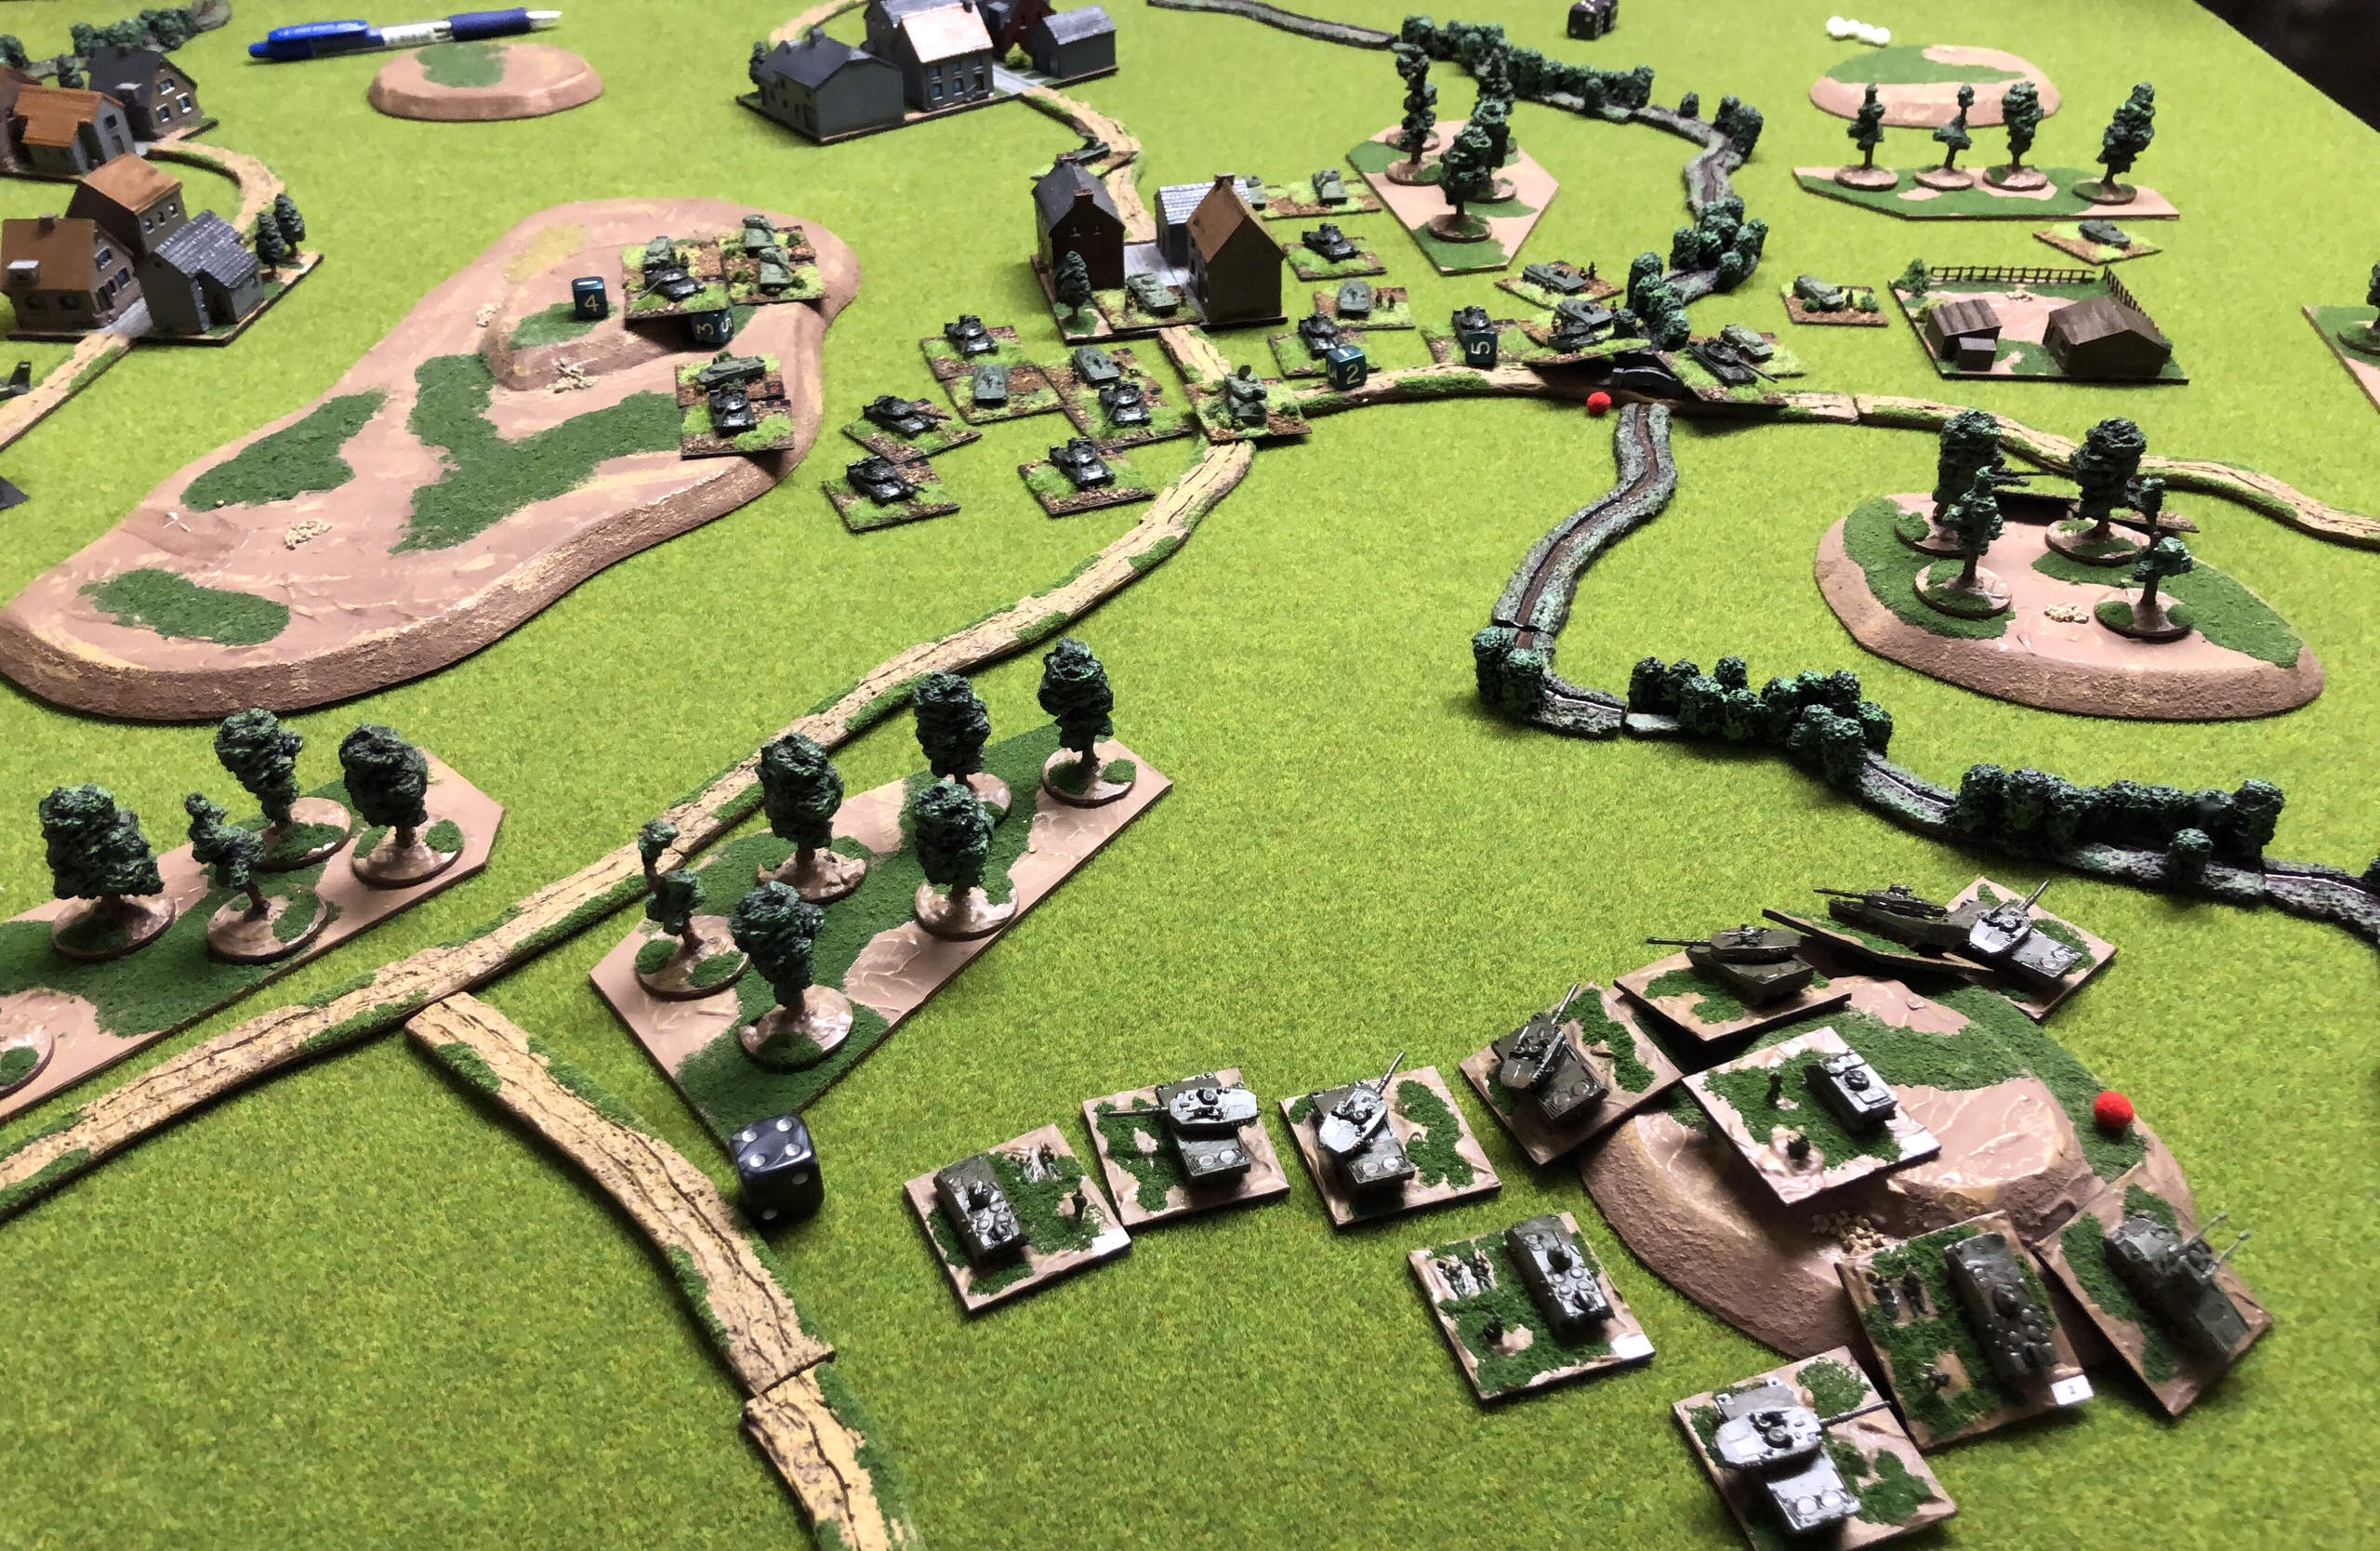
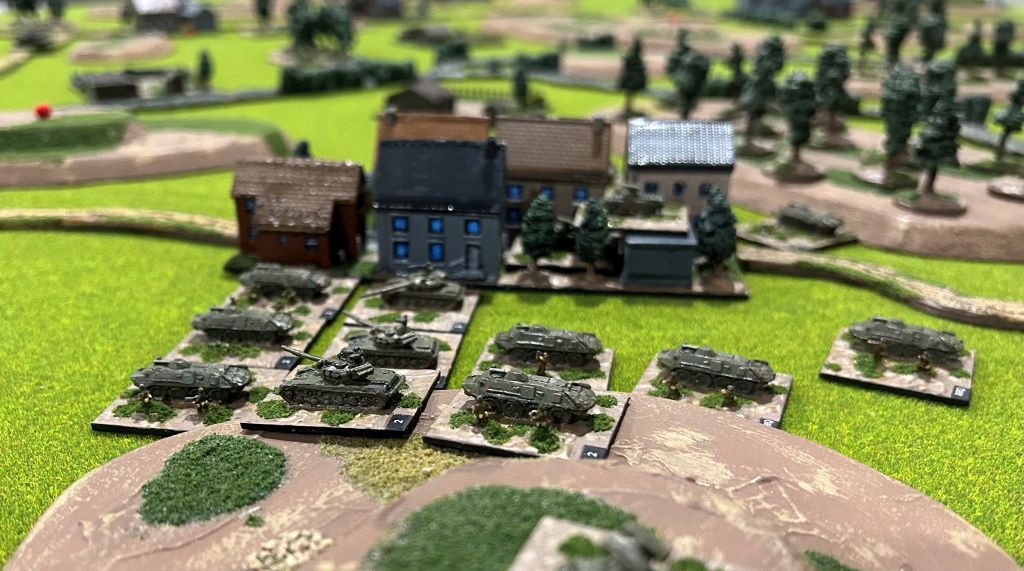
The American 1/30th Mechanised Infantry Battalion moved over relatively open terrain in the centre of the area of operations. The battalion allocated one of its mechanised infantry companies to the 2/64th Armoured Battalion and received a M1 company in its place. The M1 company is visible leading the battalion. A M113 platoon is in immediate support as is a FAO and two platoons of M901s. Following on is a reserve infantry company and various HQ and anti-aircraft elements.

Another view of the 1/30th Mechanised Infantry Battalion

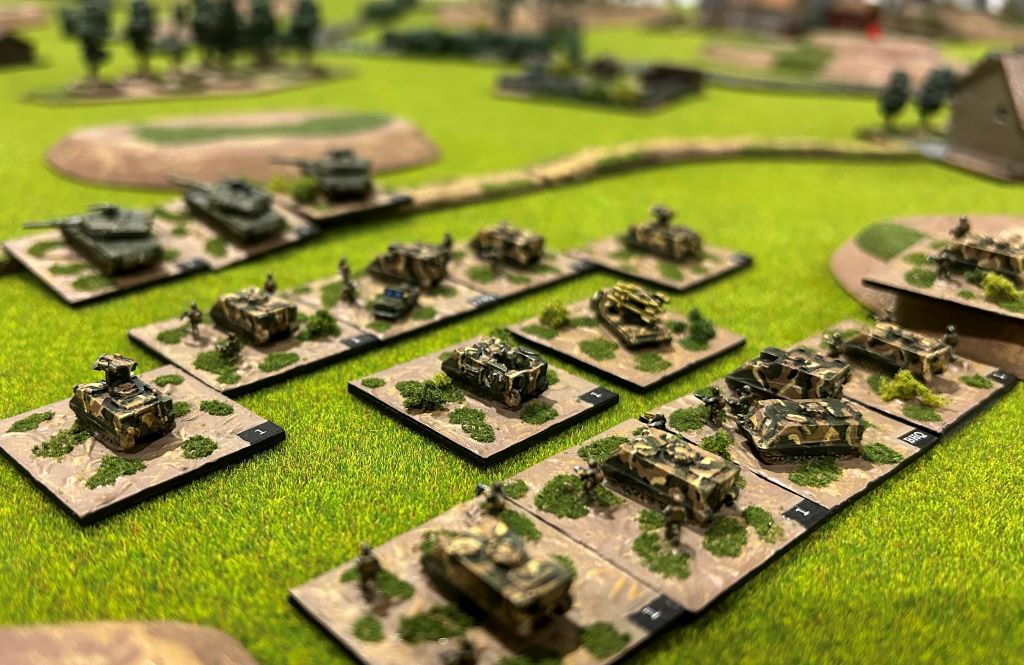
To the south of the 1/30th was the American 2/64th Armoured Battalion. This battalion was armour heavy with seven tank platoons, having lost one platoon earlier, but has an infantry company, noted previously, in support. The constrained terrain has created a bottle neck. Indeed, Soviet intelligence did not expect an armour heavy battalion to operate in the more restricted southern sector of the battlefield.

The 2/64th advances, restricted by terrain

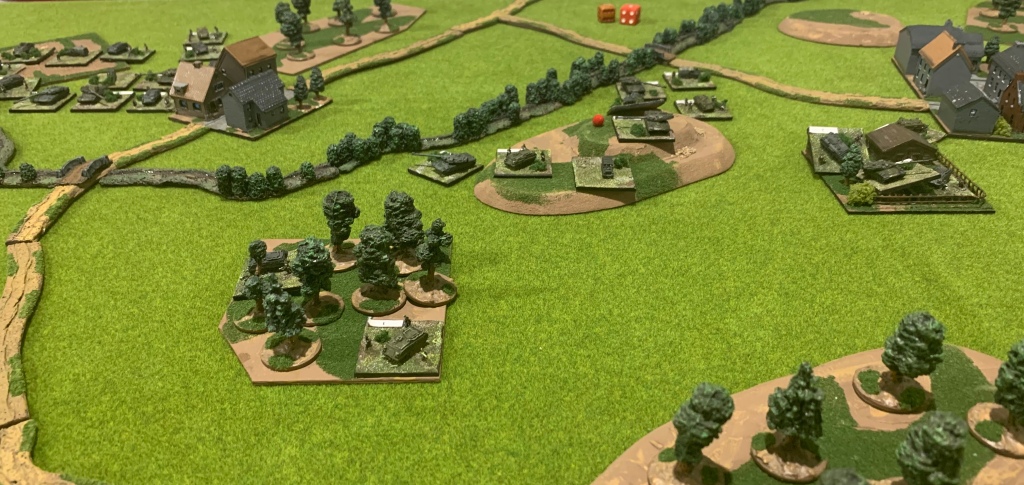
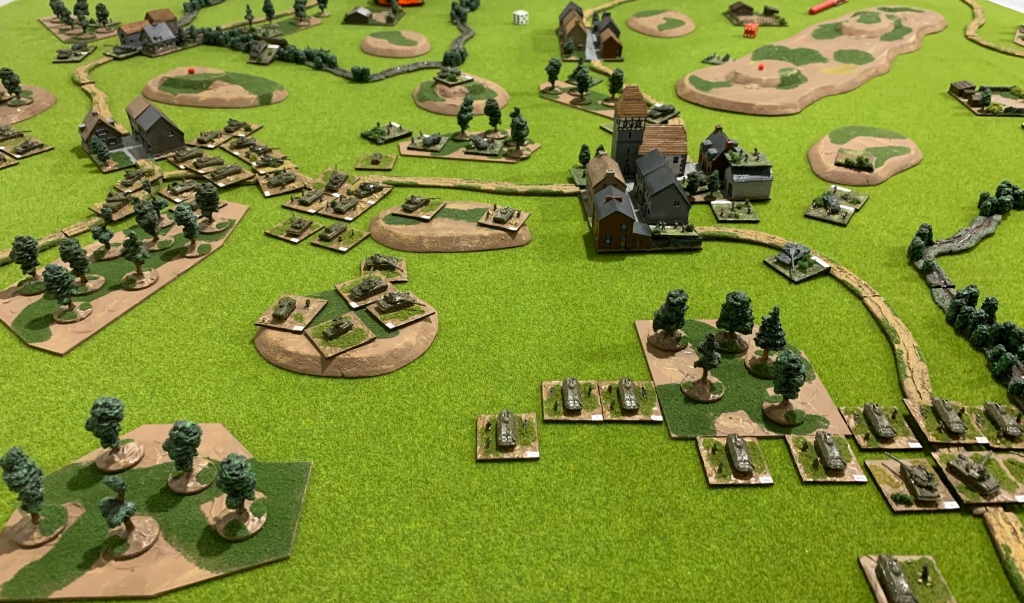
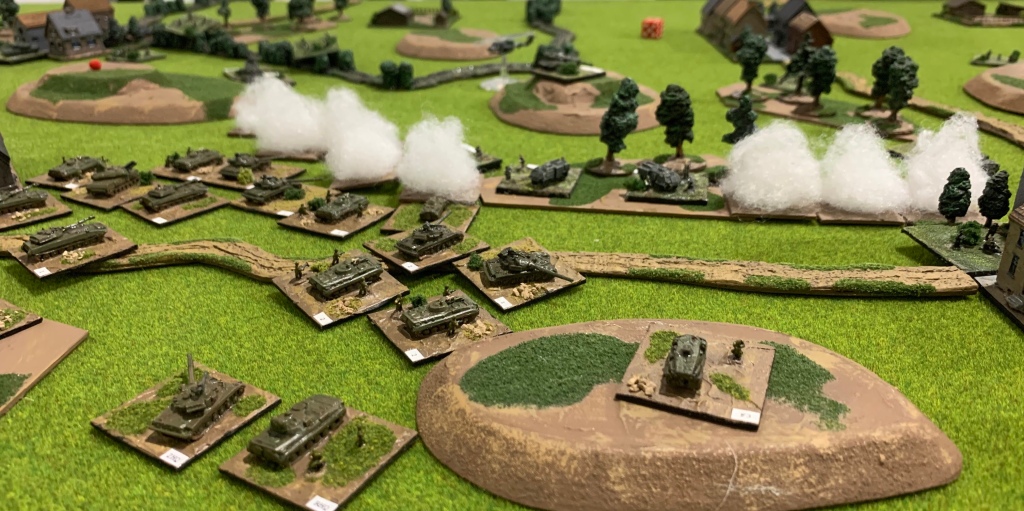
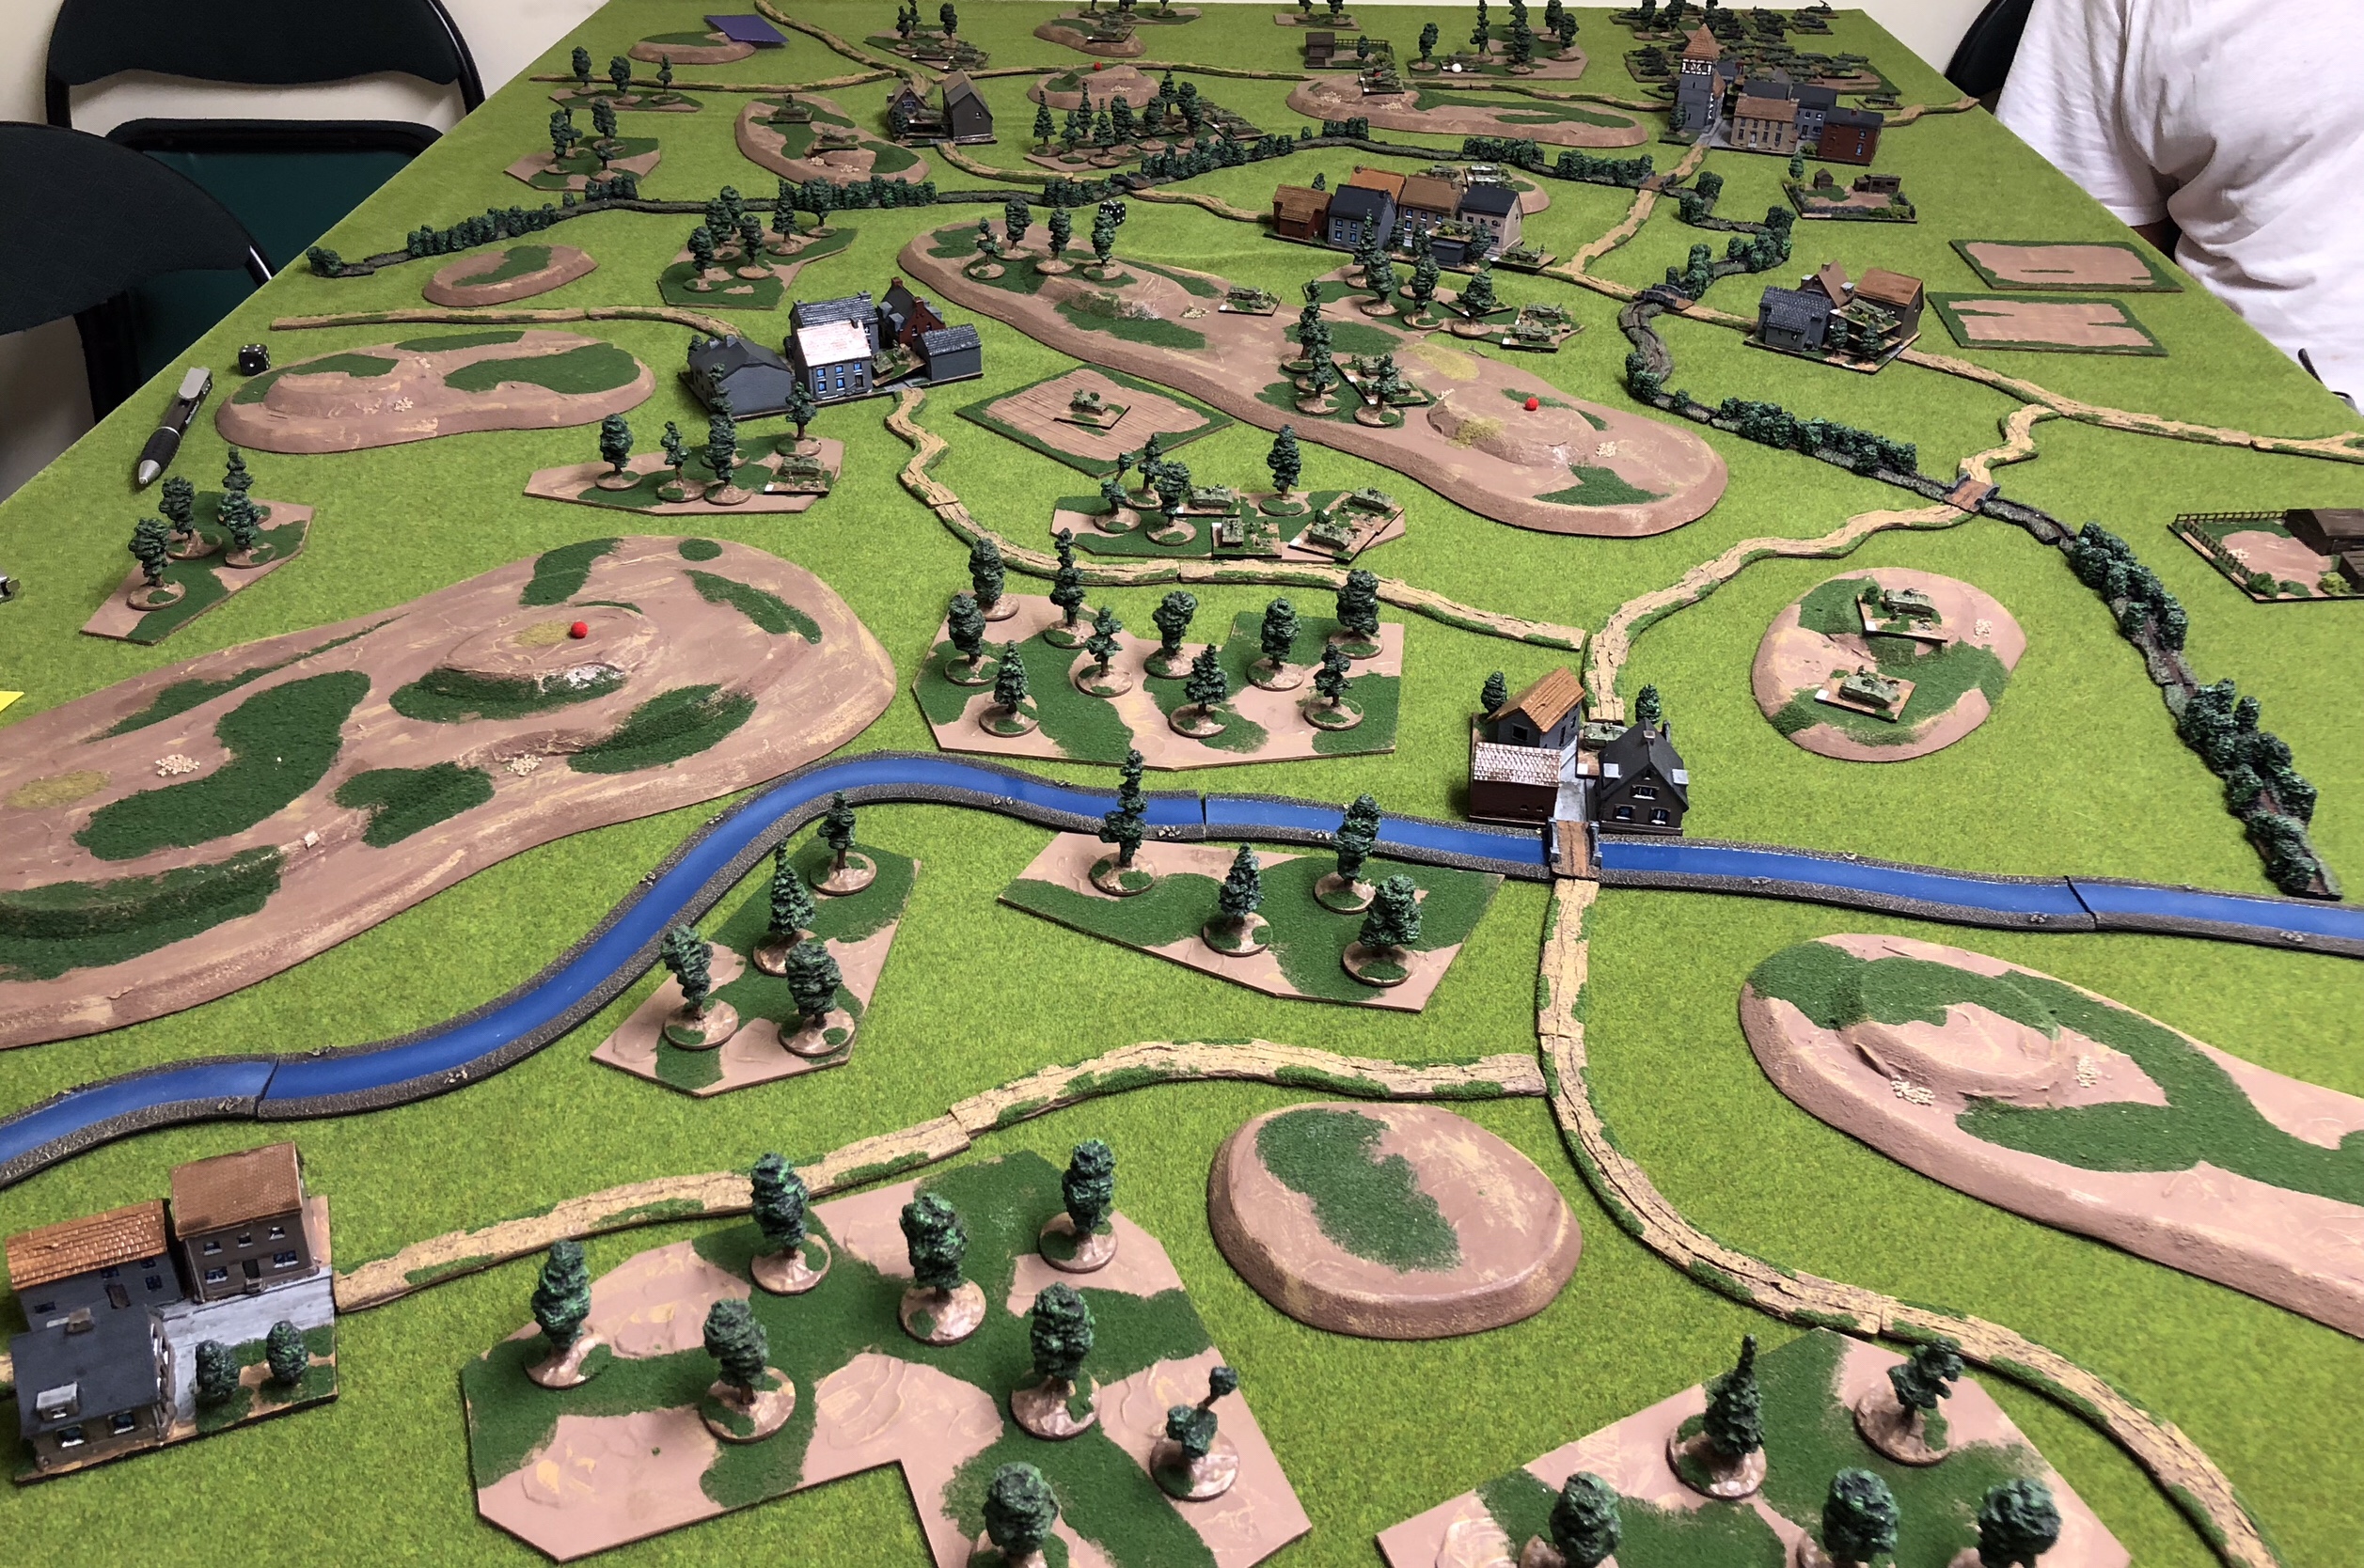
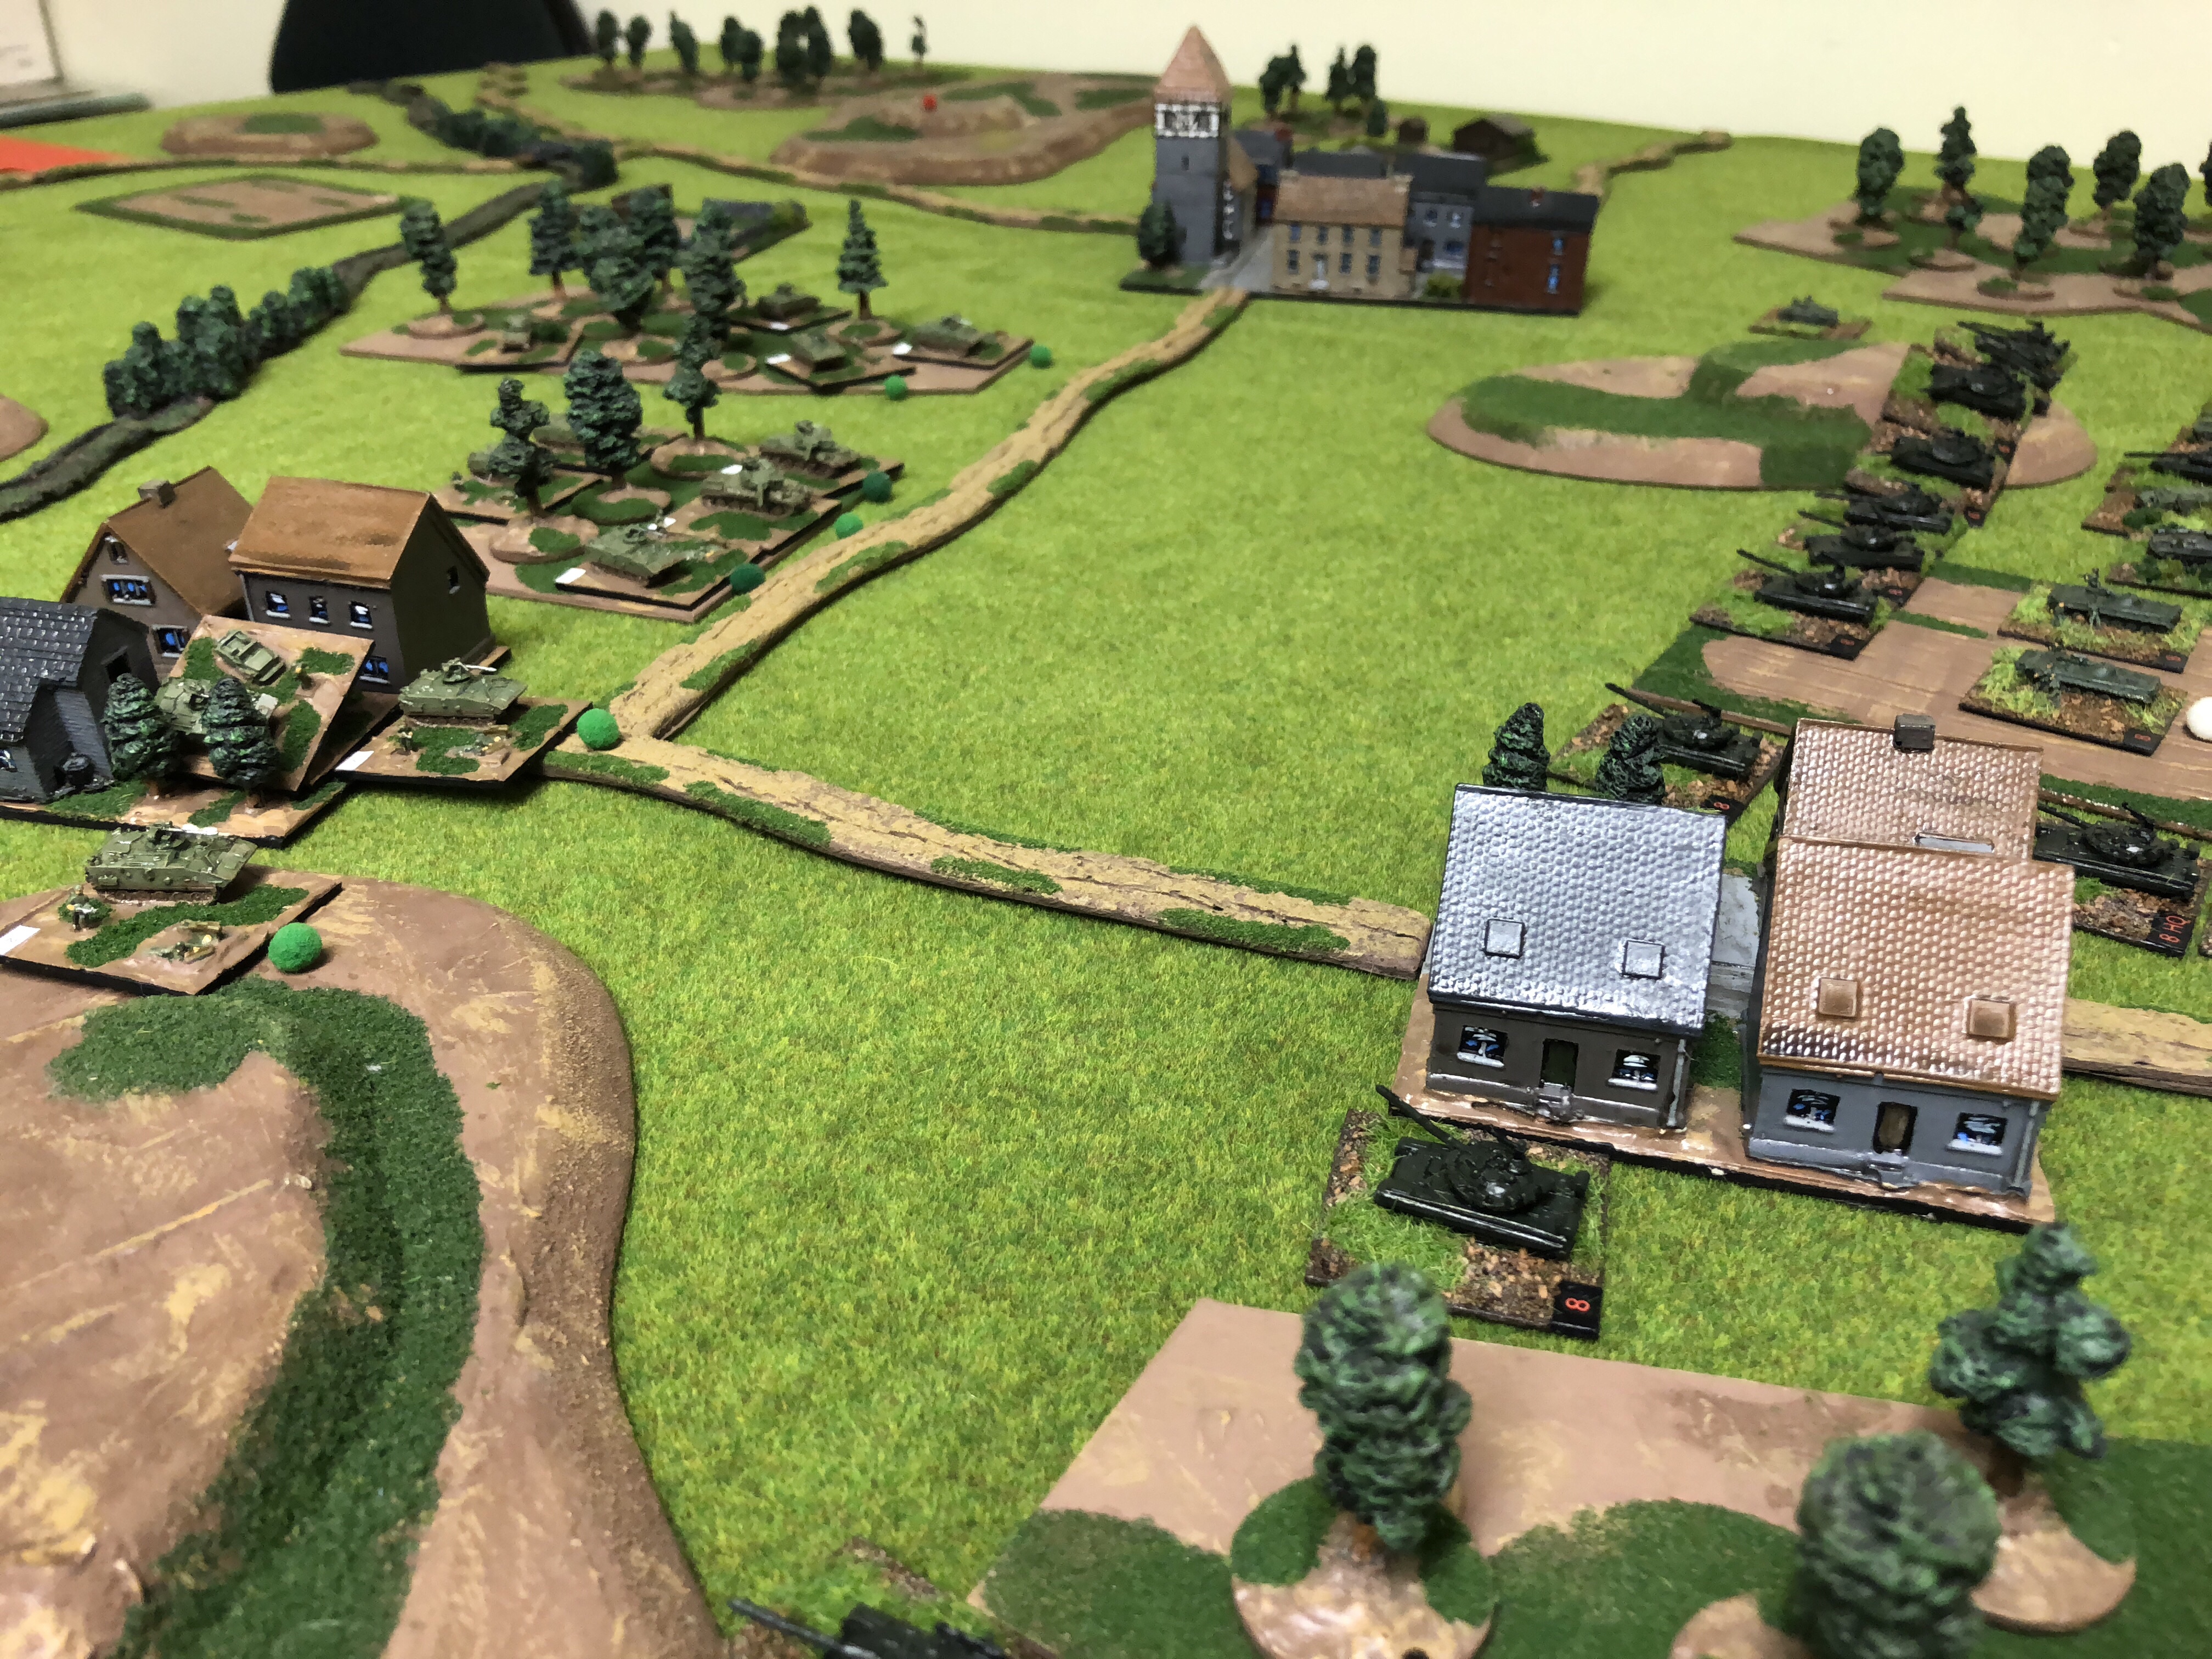
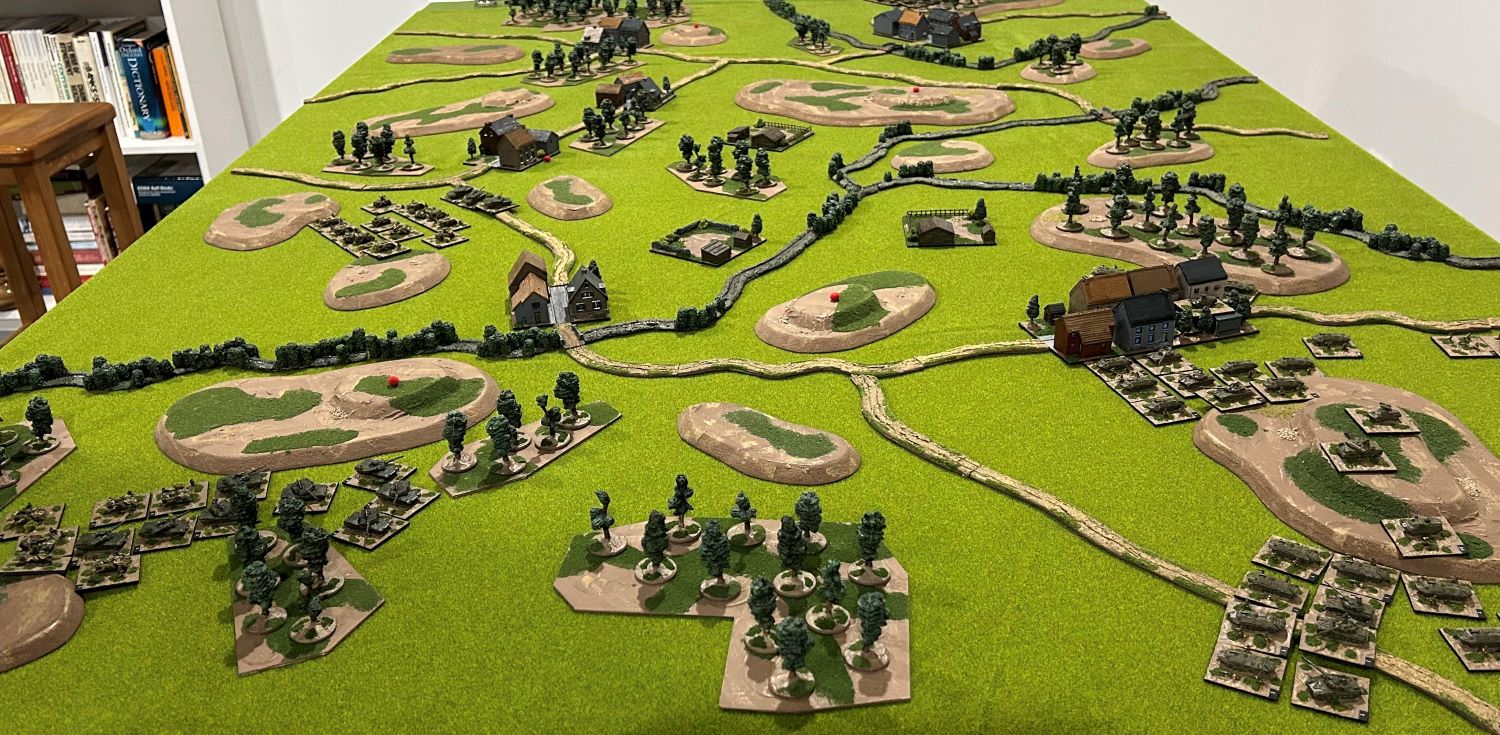
Below, a general view of the area of operations. The two American battalions are visible advancing from the left while the two Soviet battalions are advancing from the right. As noted previously the Soviet 3/244th Motorised Battalion is some distance to the north having been ordered to conduct a flanking movement. As such it is not currently visible.

A general view of the battlefield from the south

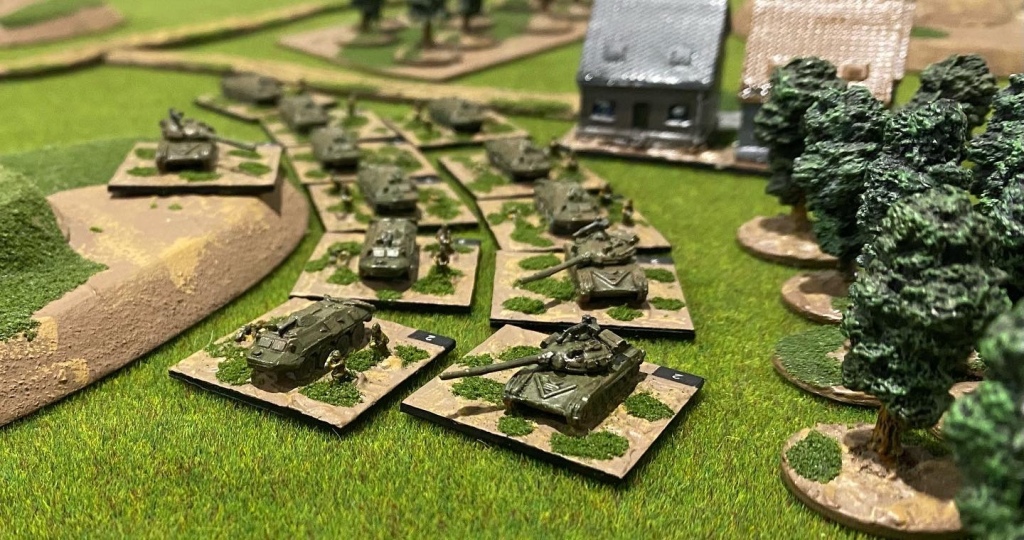
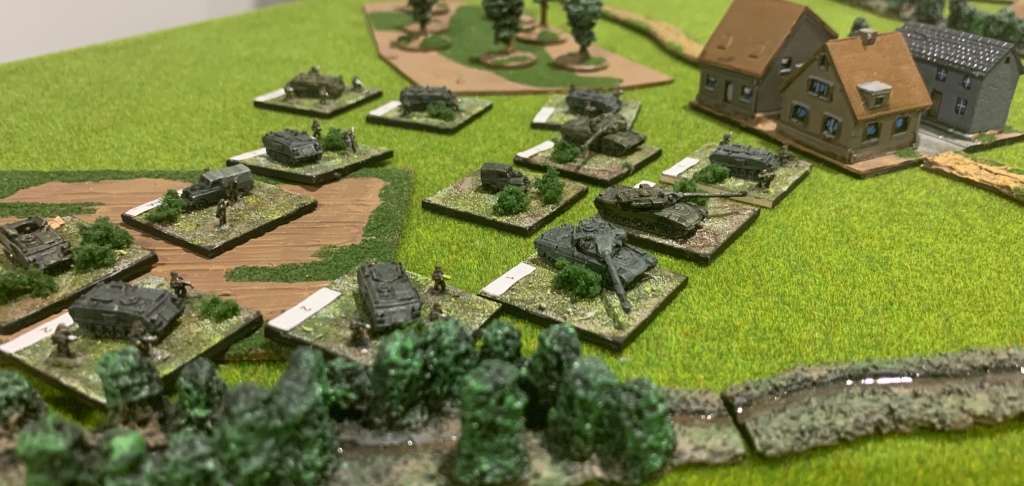
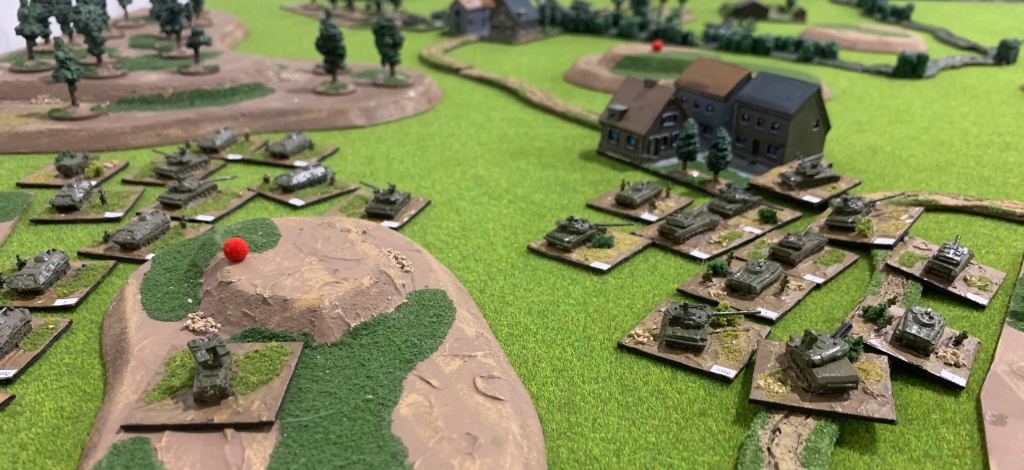
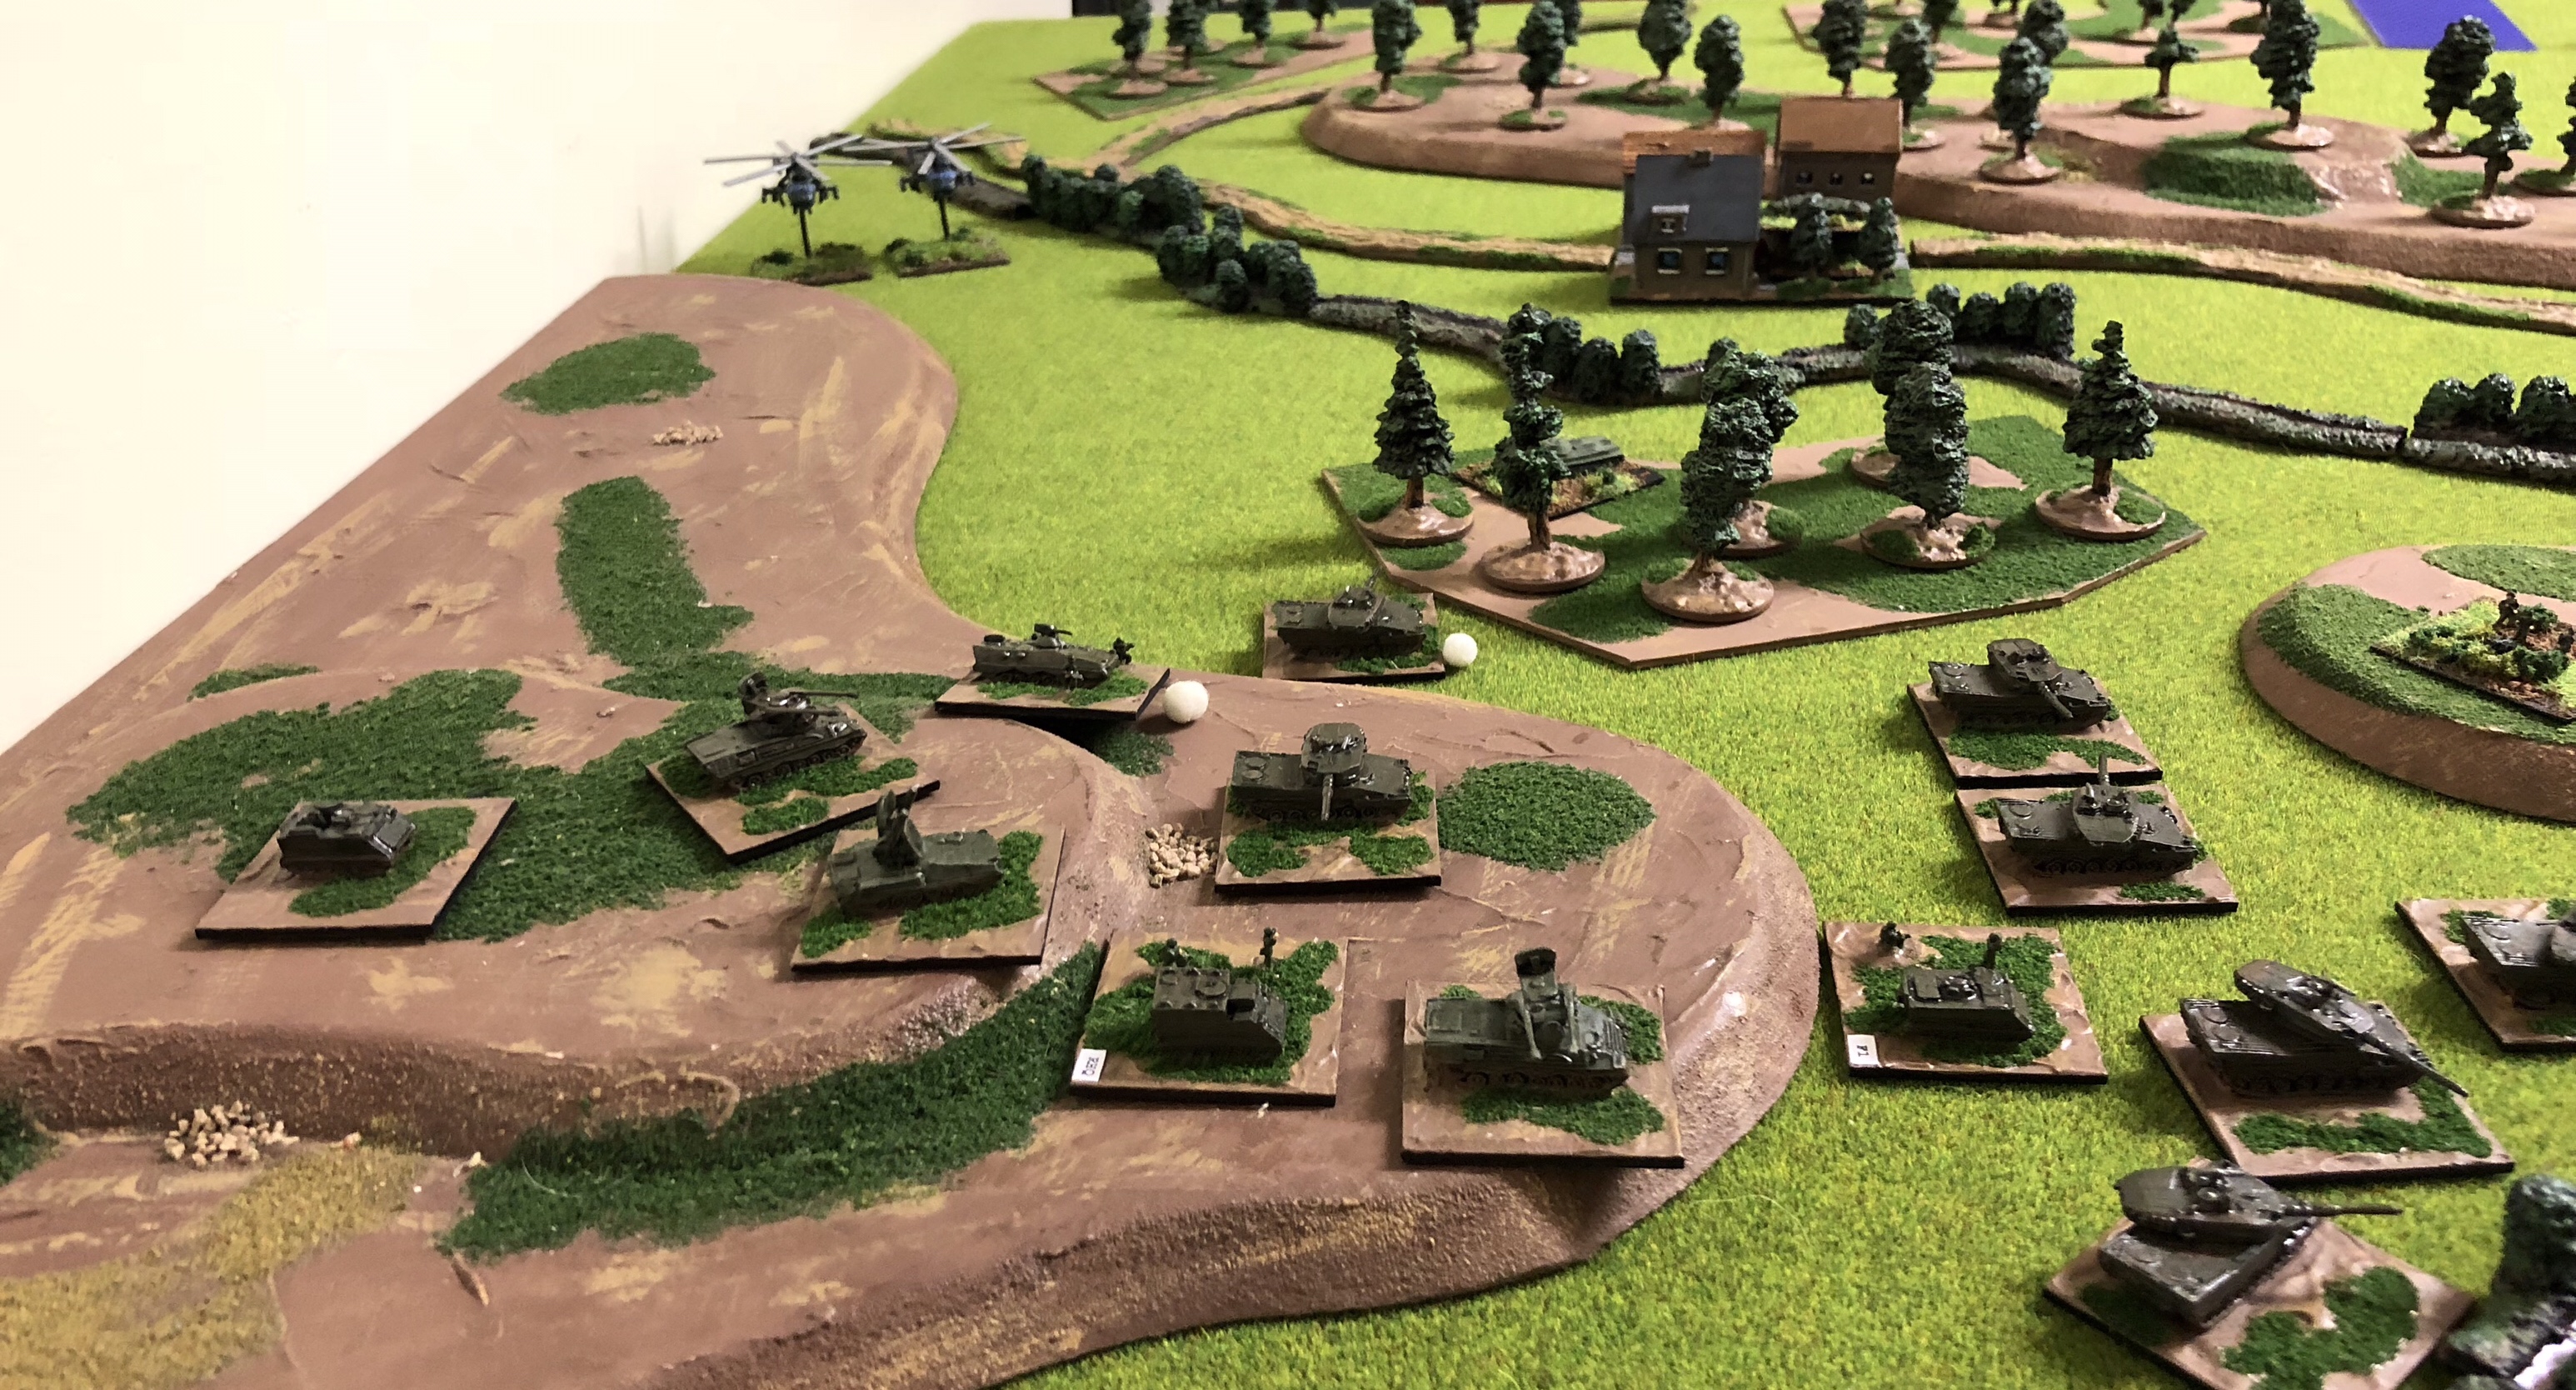
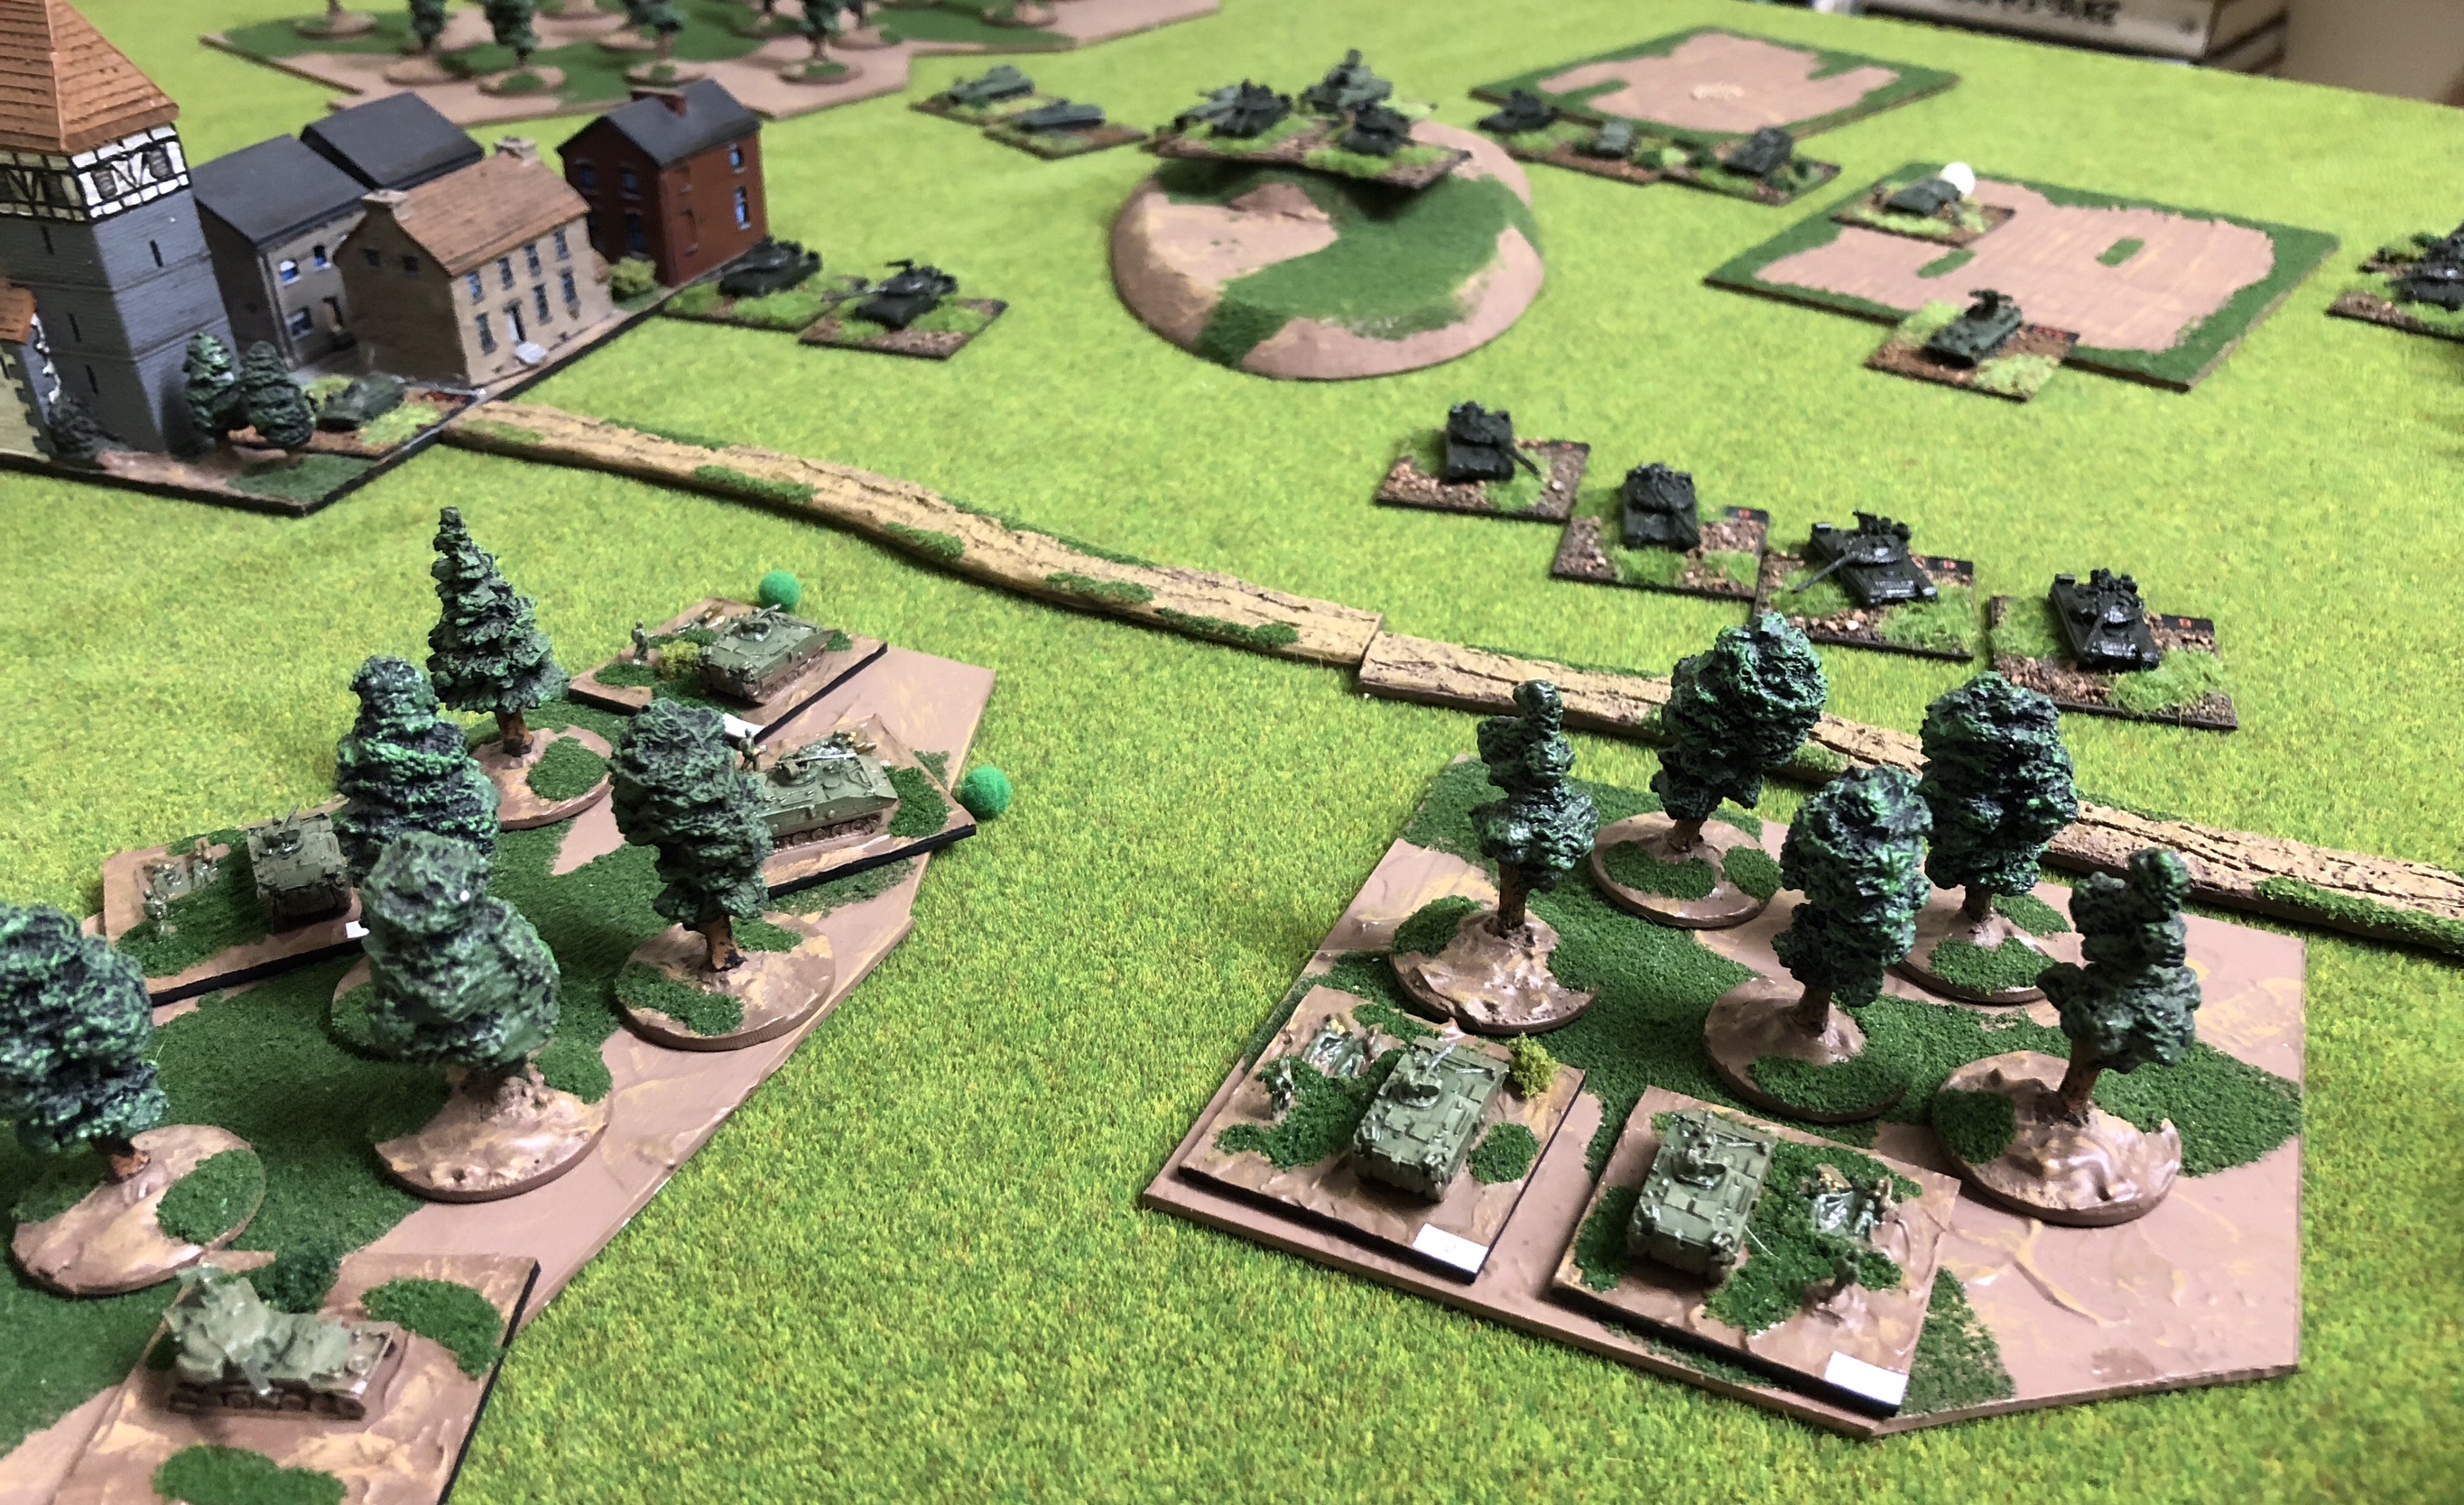
Below, the situation as two Soviet Motor Rifle battalions, visible in the foreground, near the advancing 2/64th Armoured Battalion just prior to contact.

The Soviet battalions converge

As the Soviets push forward their communications are degraded by American electronic warfare actions. Simultaneously, advanced BTRs and T-64B platoons are engaged by lead M1 tank platoons. Fortunately due to the constrained nature of the terrain the number of M1s engaging was restricted.

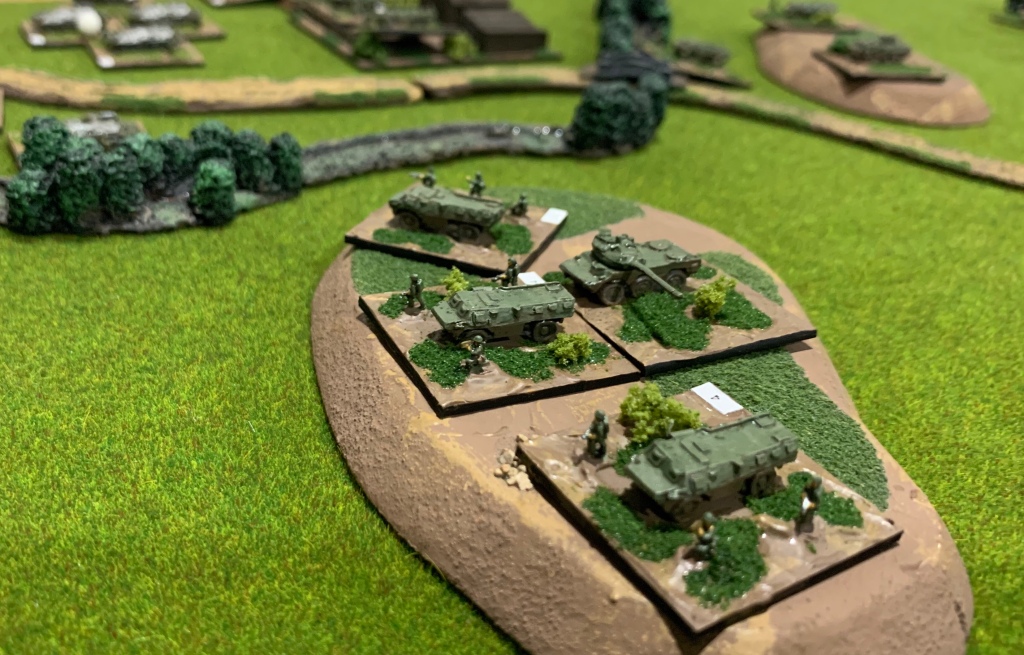
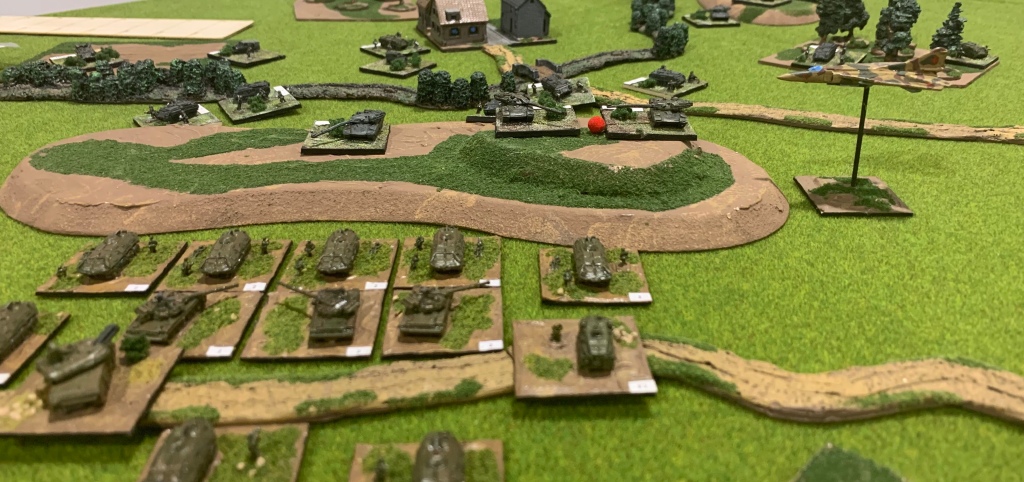
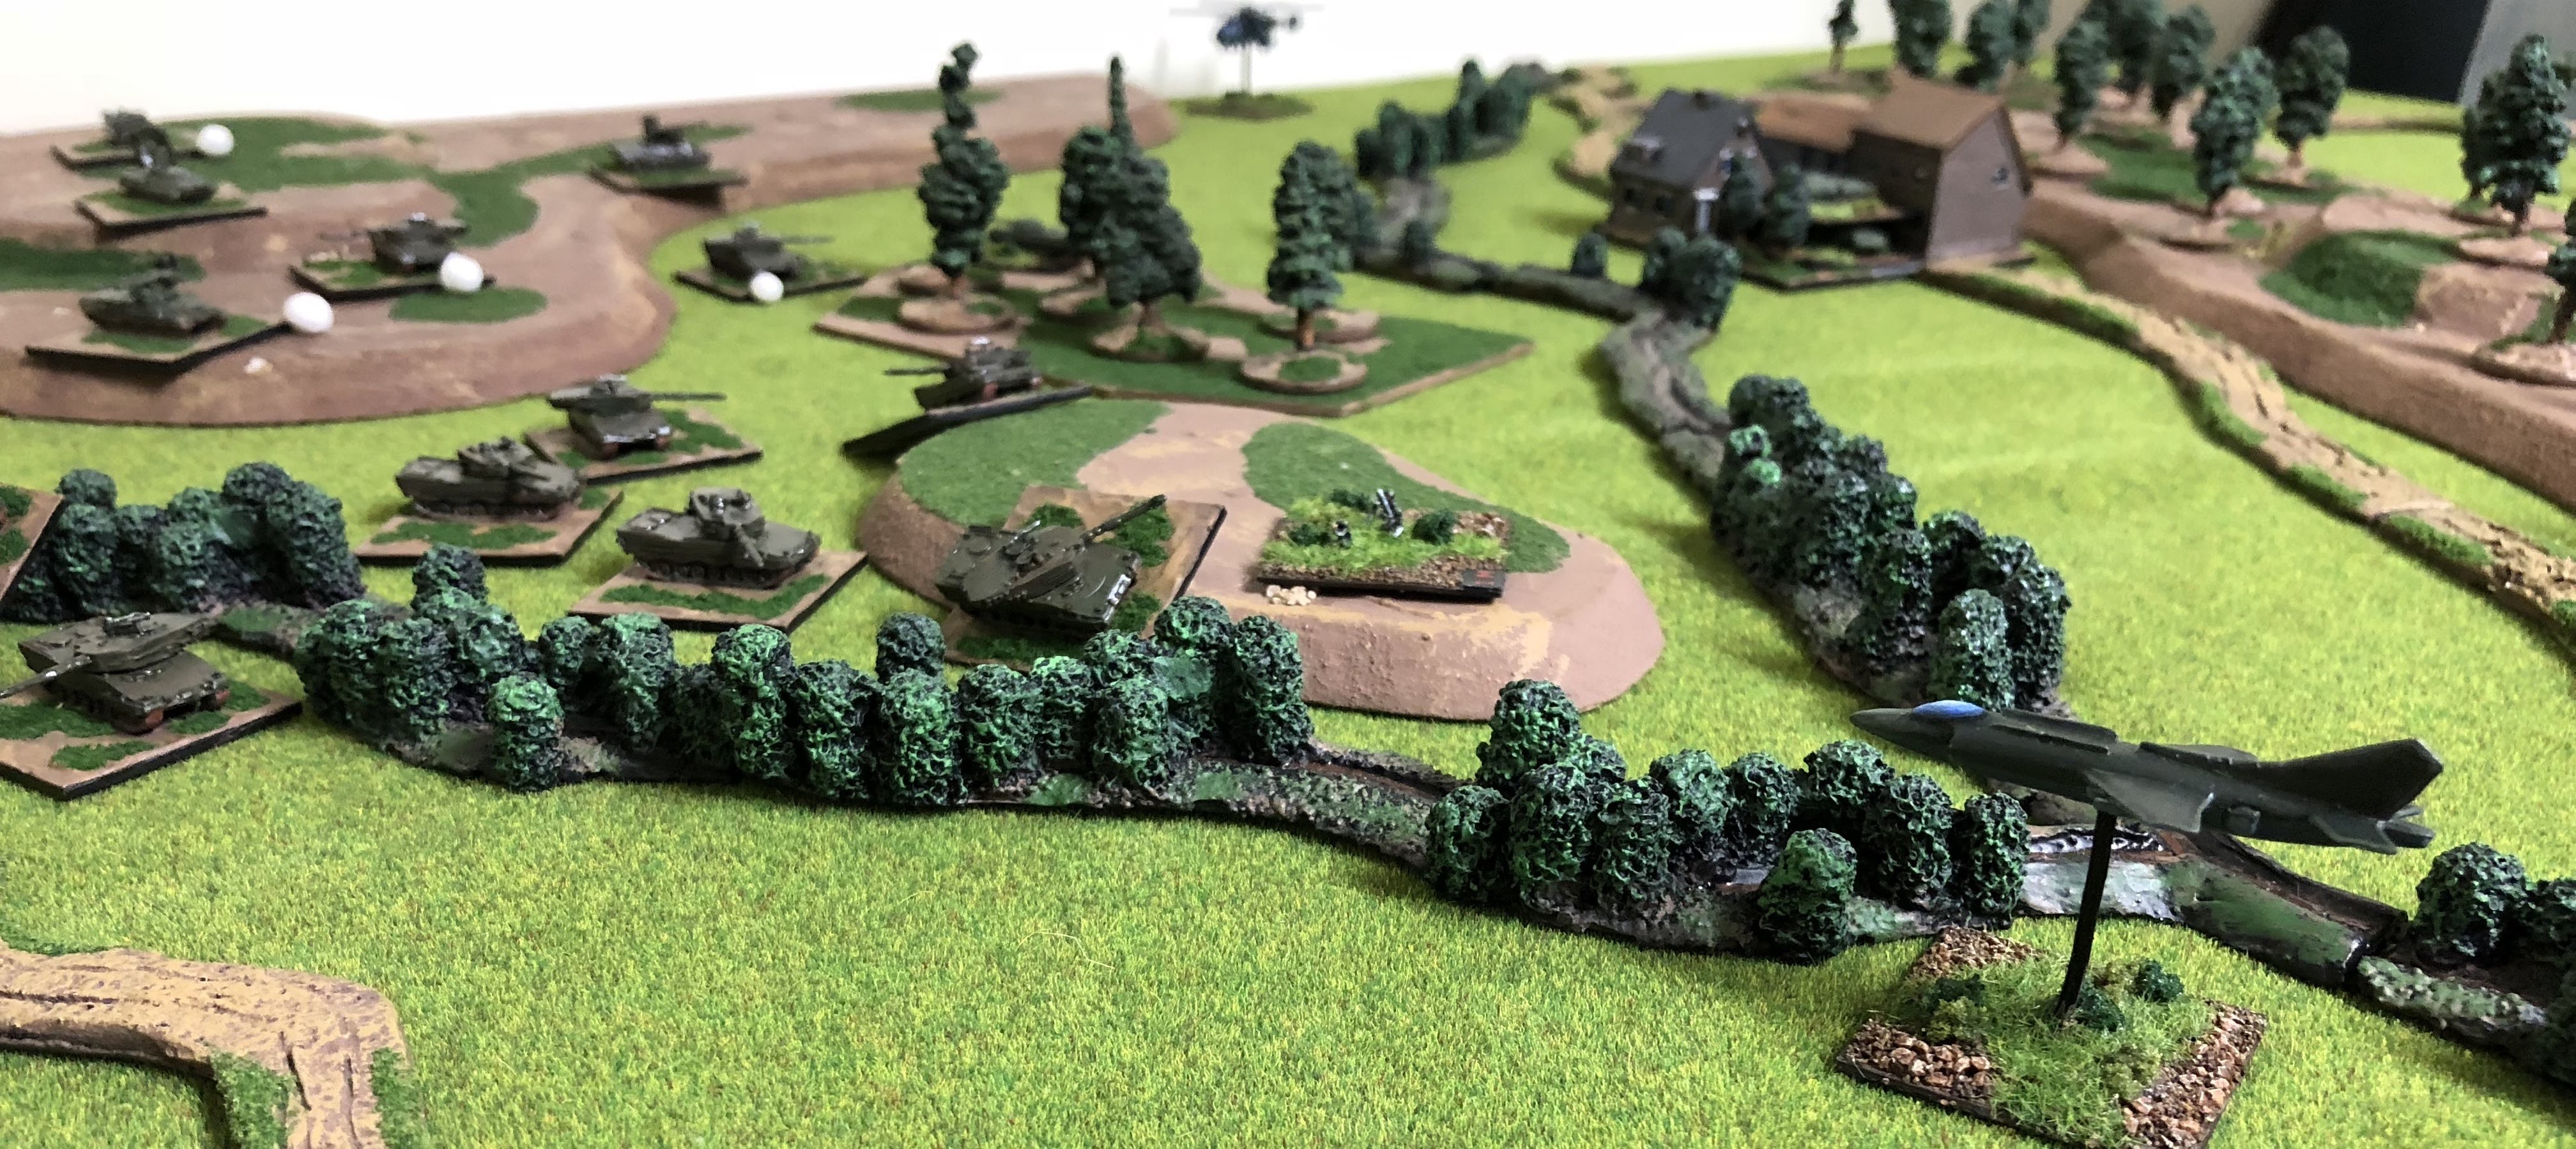
The Soviet Regimental commander now orders two mechanised companies of the 1/244th Battalion to advance through the woods while the battalions T-64Bs engaged the M1s at long range. Simultaneously T-64Bs of the 2/244th engage another American tank platoon, visible below, advancing northwest of a low ridge a different axis.

Soviet armour engages the Americans

Soon Soviet artillery began to open fire which resulted in a thick smoke screen which reduced the ability of American armour to engage. Alas, American M110’s allocated to counterbattery fires, quickly locate one of the Soviet 2S3 artillery battalions and begin to suppress elements of the battalion.

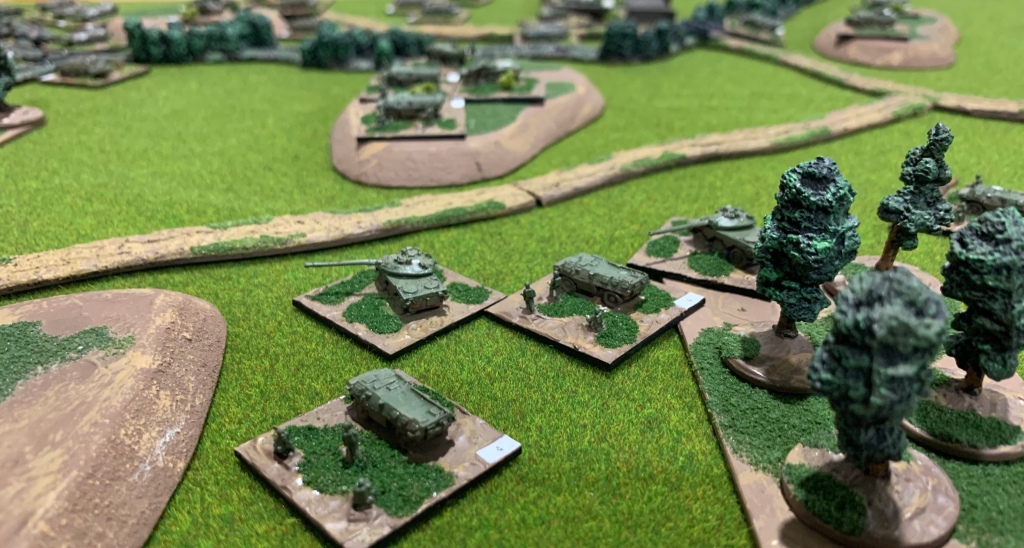
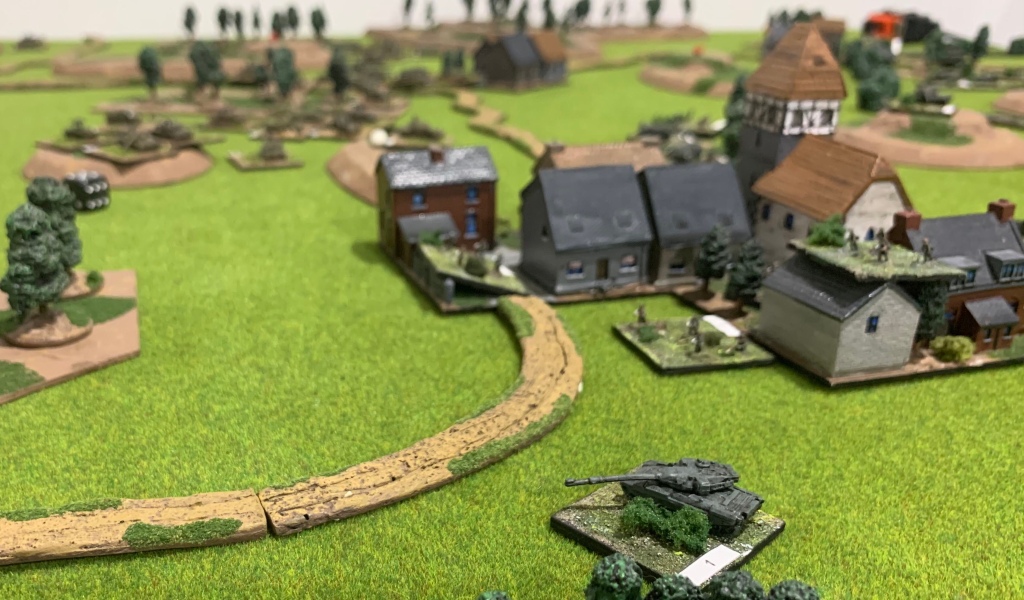
With the American 2/64th now engaged the second American battalion, the 1/30th, began to reposition moving in a south-easterly direction. The 1/30th moves forward with three M1 platoons leading the advance. Beyond the stream is the already engaged Soviet 2/244th battalion.

The American 1/30th Mechanised Battalion

With smoke obscuring visibility the Soviet battalions engaged against the American 2/64th were finally able to reorganise. Soon one M1 tank platoon had taken heavy casualties which blunted the American appetite for advance. Interestingly, neither the American or Soviet commanders wished to secure the low ridge separating their battalions. Doing so would have exposed them to stationary fire from enemy tanks.

Despite the improving situation to the front alarm at the Soviet Regimental HQ was growing as reports of the advancing 1/30th Mechanised Infantry Battalion. Should pressure be applied from two directions the regiment’s position would be untenable.

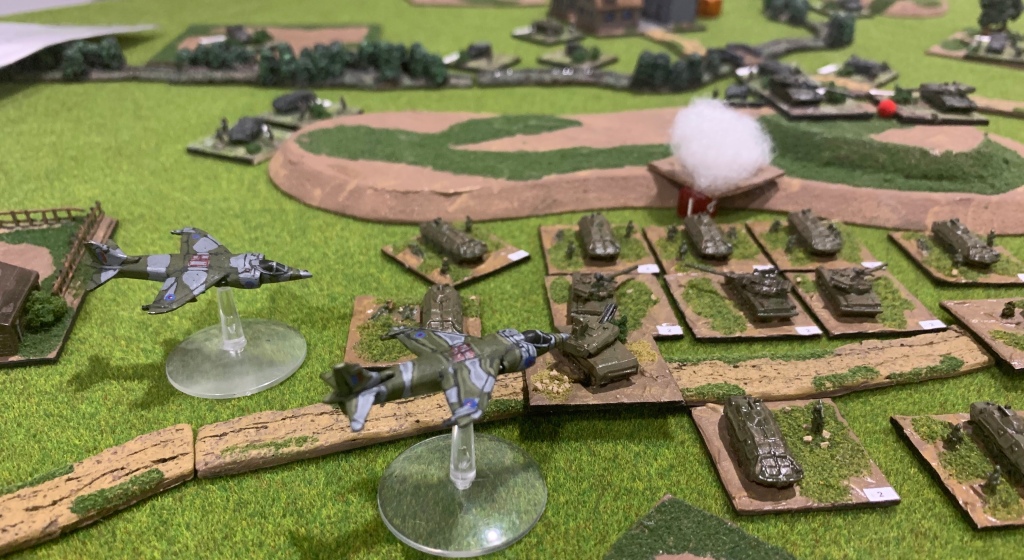
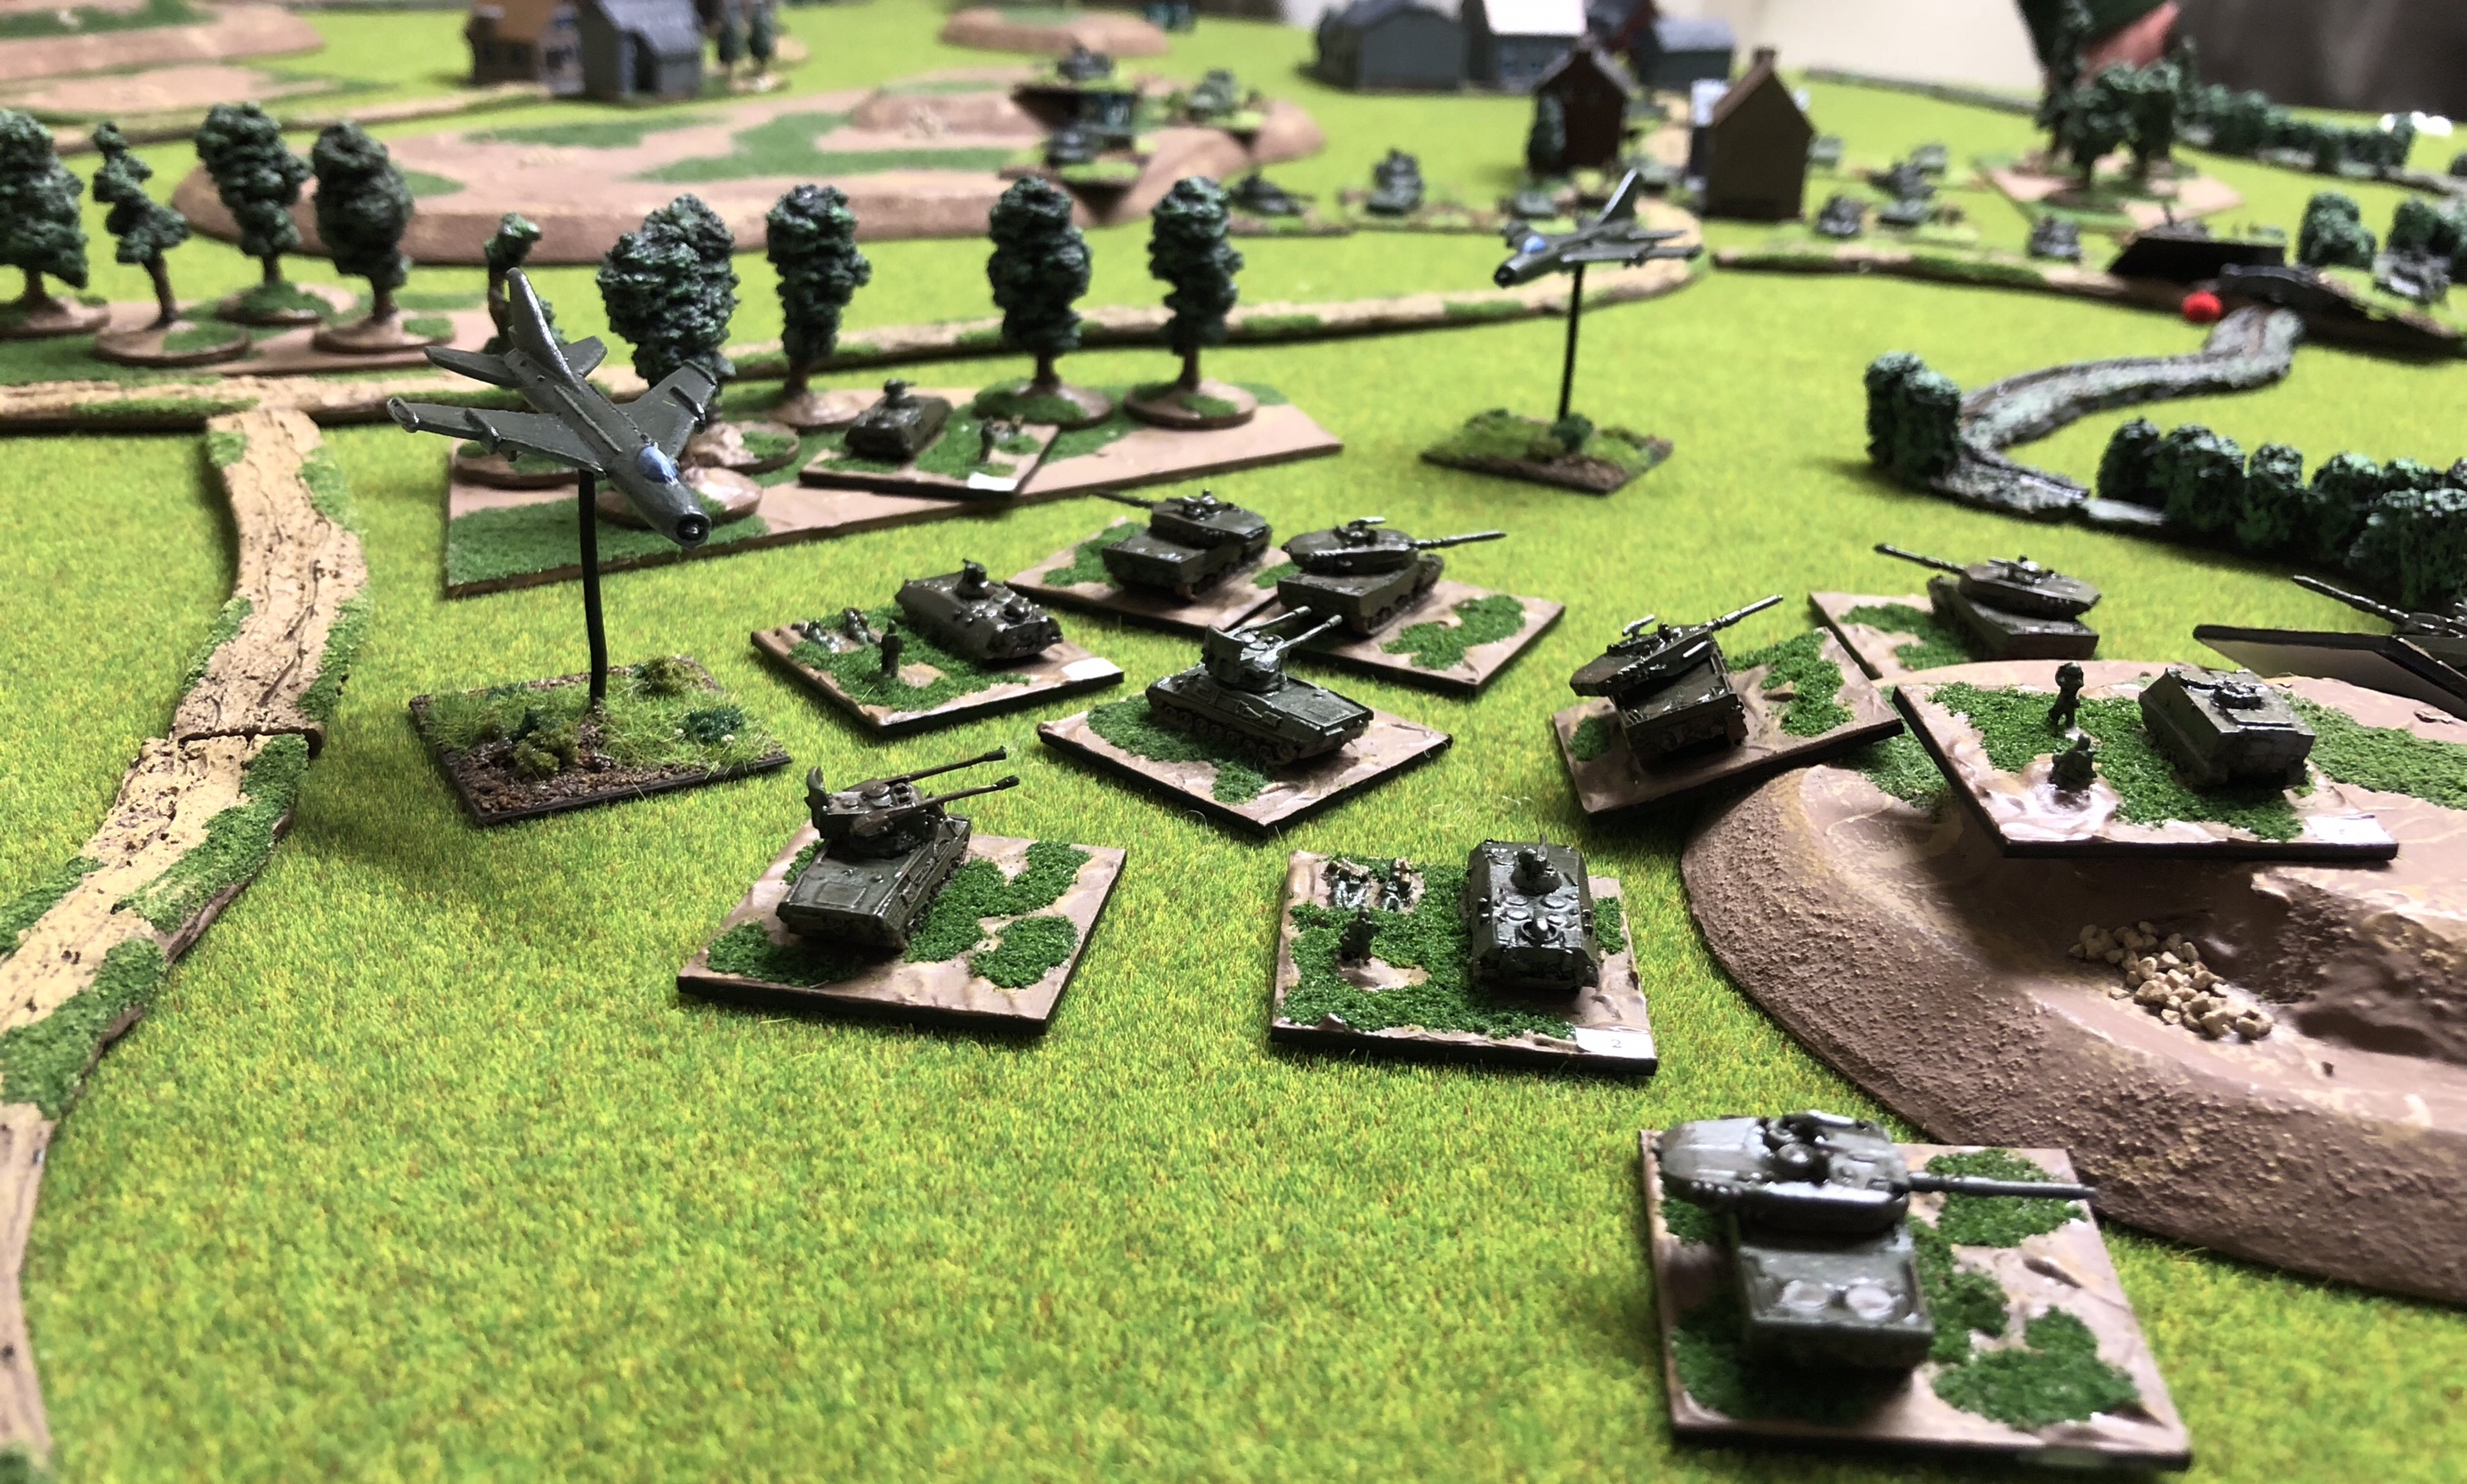
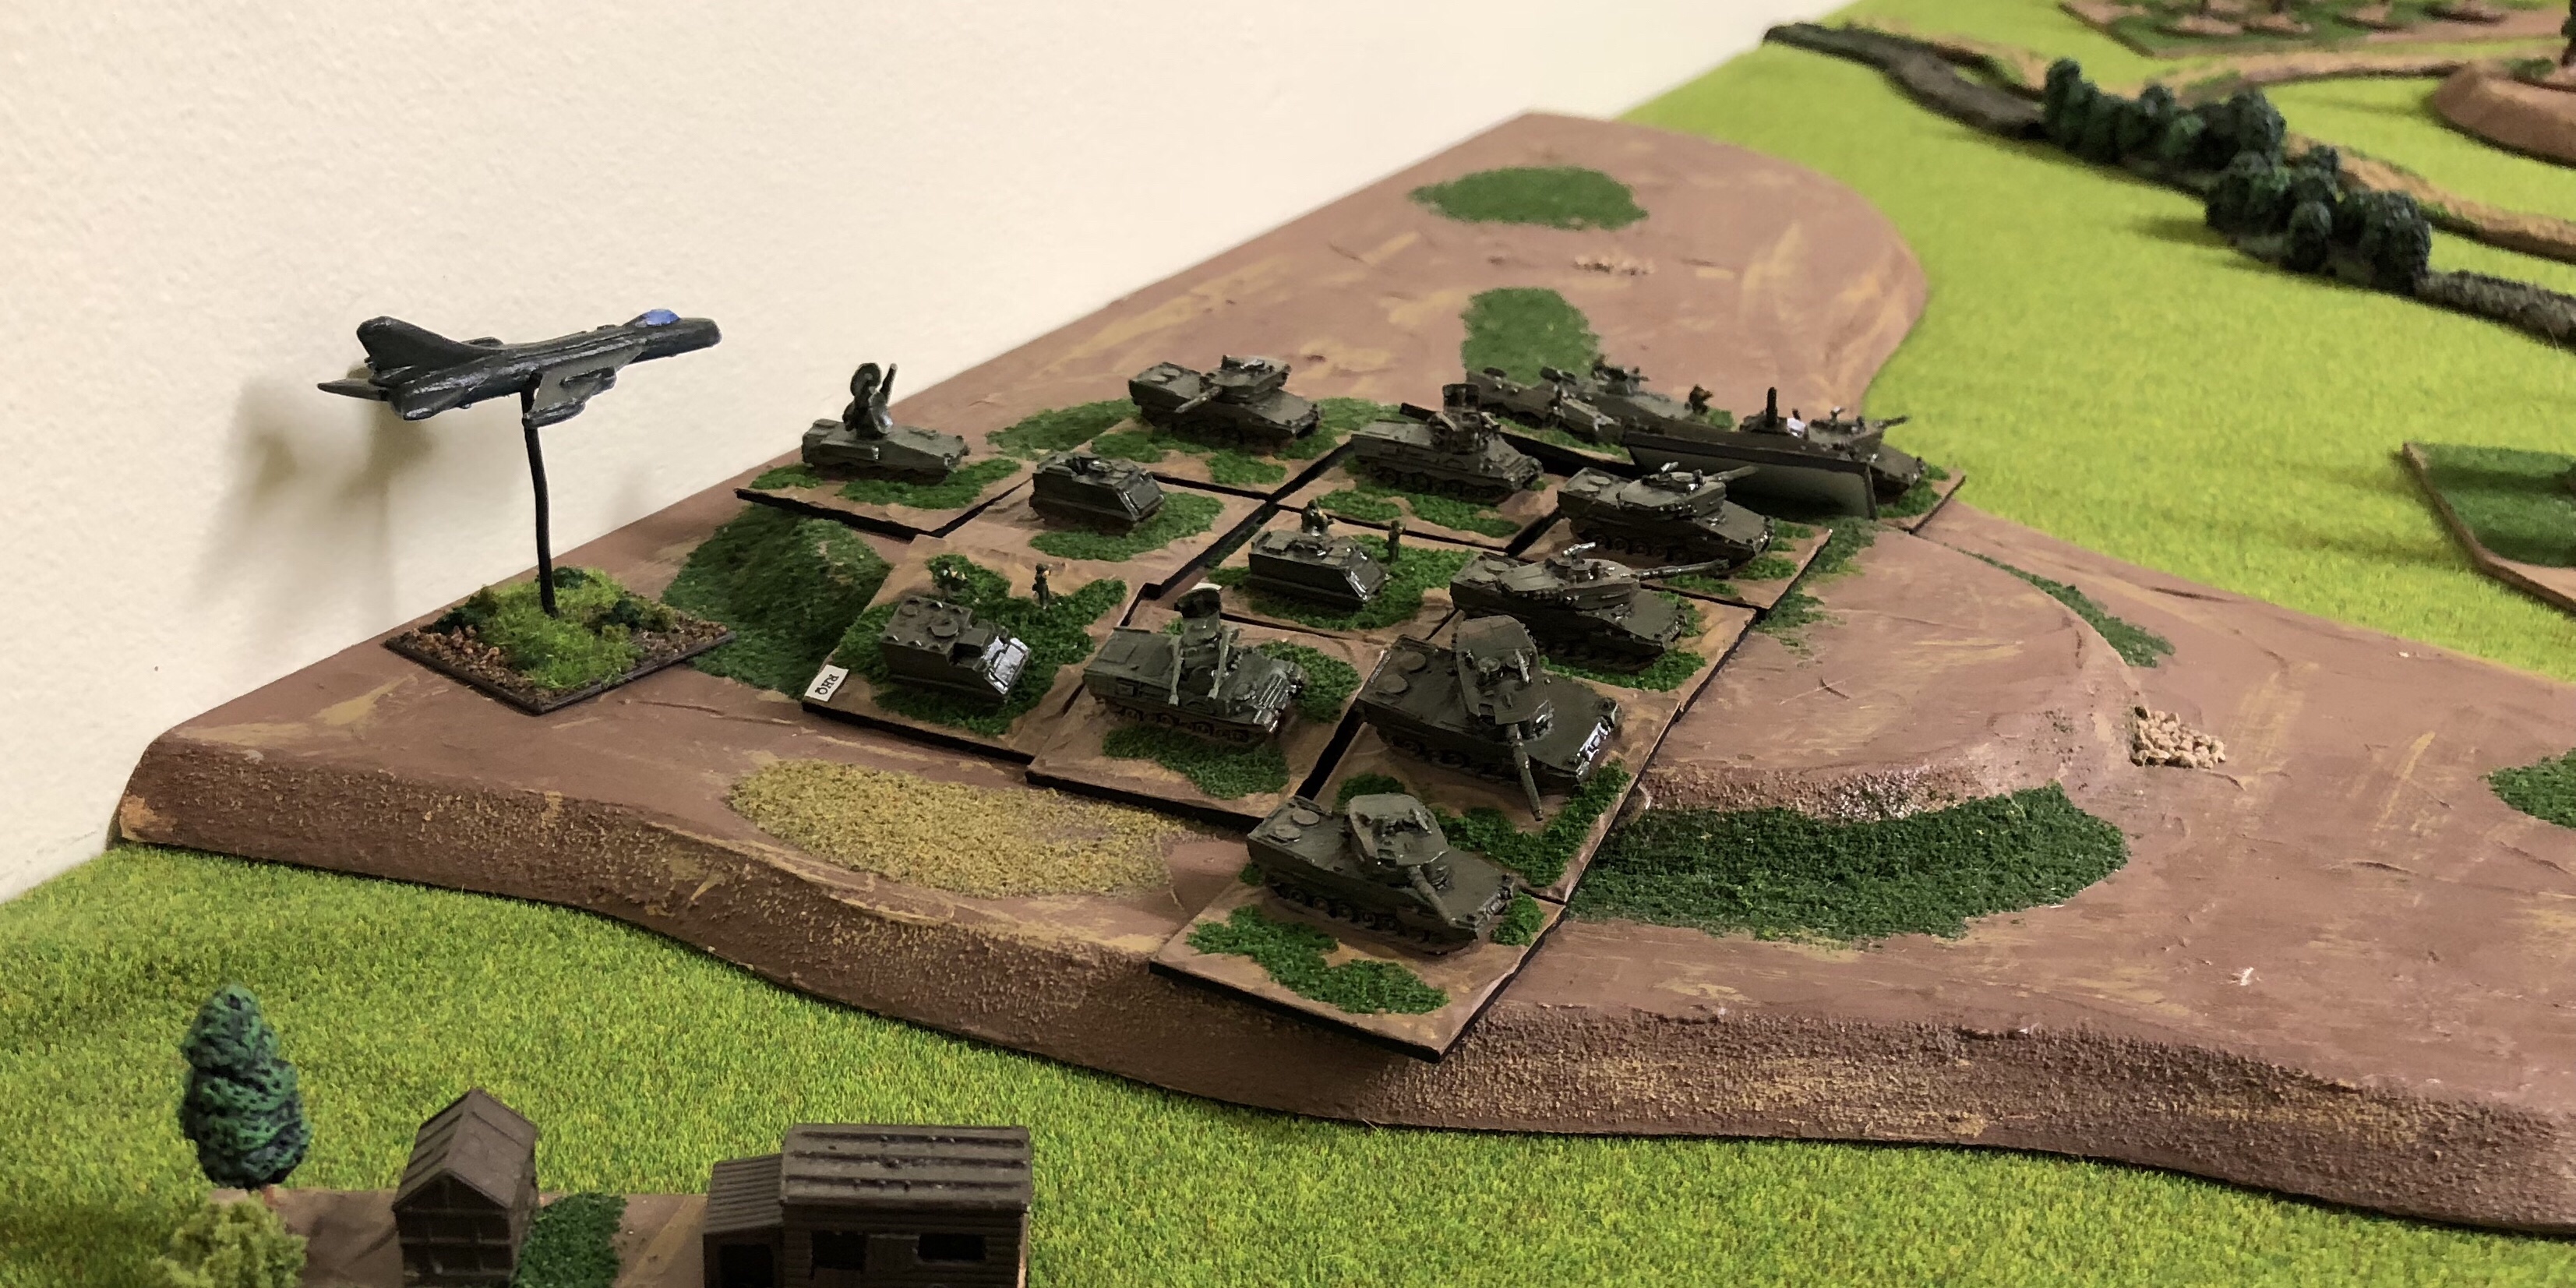
Determined to regain the initiative, but with dusk fast approaching, Soviet airstrikes were requested – despite American air defence assets not being neutralised. Unfortunately for the Soviet commander the first request was unsuccessful, frustratingly so as at the time American air defence assets were at the point relocating. Soon however another request was approved and two flights of MiG-23s swept low over the frontline.

One flight of MiGs was forced to abort when engaged by Chaparral but the second flight delivered a deadly attack with improved conventional munitions.

MiG’s make their attack runs

The Soviet pilots delivered a devasting attack and as they exited the area an American armoured company was left burning behind them. Combined with previous losses the advance of the 2/64th had clearly been blunted.

Unfortunately time was against us and at this point we had conclude our game. The engagement had however certainly served its purpose as a rules refresher. As to the results the 2/64th had taken heavy casualties yet there was no doubt the Americans maintained the initiative. With the 2/64th still pinning the bulk of the 244th MRR and 1/30th advancing on the flank of the hard-pressed 244th MRR a tactical withdrawal by the Soviets was clearly required.

As to the scenario, it was developed using our scenario generation system with both commanders using defend lists supplemented by a Option A reinforcement. The Americans, commanded by my opponent, selecting a counter-battery option with limited additional air defence assets. The Soviet commander meanwhile had opted for a Option A which included two flights of MiG-23s and one flight of SU-7s, the latter not being used. As to the miniatures they are all Heroics & Ros and are from my collection.

British Army of the Rhine

I have for some time been meaning to post the TO&E for the British Army of the Rhine (BAOR). They are a popular formation with local wargamers, yet they have a confusing organisation and during the 1980s underwent a series of reorganisations while simultaneously receiving new equipment throughout the course of the decade.

British Chieftains during a Modern Spearhead game

The original TO&E was compiled by Jake Collins. However, with his website going off line some years ago I have, with his permission, reproduced it here. In addition while reformatting the document I have edited some aspects using “Armies of NATO’s Central Front” by David Isby and Charles Kamps.

The document can be found in the TO&E section of this website, or directly here. I trust you find it of interest and it is useful if you are forming a British contingent for the Cold War.

Revisiting the Soviets

Recently, while taking a stocktake, I was struck by the fact my Cold War Soviets aren’t as visually pleasing as I would have liked. In part this is because my basing has been refined over the years. Something needed to be done, it was time they visited the workshop.

First to visit the field workshops was the BTR Motor Rifle Regiment. I’m sure I have two BTR regiments, but for the life of me I could only find one. Anyway, in due course the BTRs were rebased and the infantry repainted.

A BTR battalion with supporting T-64B tanks

The attached tank battalion was reformed and together with ATGWs and anti-aircraft systems the regiment is ready for operations.

A second BTR battalion advances – another posed propaganda photo

Next to visit the workshops was the BMP Regiment which followed a similar process.

A BMP battalion with supporting tank company

However, as part of the refurbishment I decided to remove the BMP-2s from the battalions. I found it far too confusing using two types of BMP in one battalion. Like the BTR regiment the tanks are T-64s.

The same BMP battalion viewed from a different angle

In addition to the fighting battalions and regimental supports, various divisional assets also passed through the workshops. These included reconnaissance, artillery and additional anti-tank assets, such as these T-12 100mm anti-tank guns.

T-12 100mm anti-tank guns

In all some 137 stands have now been refurbished, next are two tank regiments. However, they will need to wait until the divisional commander approves their release. Hopefully it won’t be too long.

Conducting a Hasty Attack

There seems to be some interest in a recent post I made on Twitter regarding a Modern Spearhead game played on a very small table. I thought it worthwhile expanding briefly on the game here.

As regular readers will know we normally play reinforced brigade level actions. However, for this game my I wanted an introductory game for a player who wasn’t familiar with Modern Spearhead, though he was familiar with the Spearhead rules in general. Now, we use the ground scale of 1” to 125m which in the alternate scale in Modern Spearhead means movement and ranges are reduced. For example a main battle tank is visible moving in the open at 12” and something like BMP or T-64B moves around 8” per turn, or less if moving and firing. This provides plenty of manoeuvre room on a 1.8m x 1.2m table.

This time I wanted to reduce the forces involved so we could focus on the process of combat. After some thought I decided on a small Soviet Hasty Attack, from march column, against a single NATO battalion deployed in defence. With just one defending battalion I opted for a table just 24” wide and 36” deep. That equates to an area 3km wide by 5km in depth. With such a small table we must assume that all the normal manoeuvre, so critical in a typical game has occurred off-table and now the clash occurs.

While I initially considered using West Germans I eventually opted for a French infantry battalion, some three VAB companies, supported by the battalion’s mortar company. This was bolstered by a two additional support companies to introduce different weapon systems. In particular a company of AMX-10RC and two VAB ATGW platoons. Off table was a Roland SAM system and a weak artillery battalion of just two batteries of F3 self-propelled guns with a handful of fire missions. The French commander deployed in three areas. In the centre an infantry company with an AMX-10RC platoon on a hill. On the left the remaining two AMX-10RC platoons with two infantry platoons deployed in a wood. On his right, withdrawn somewhat, another infantry company was deployed around a farm complex. Further back two VAB ATGW platoons armed with HOT provided additional anti-tank support.

Below, a view of the French centre showing an infantry company supported by a platoon of AMX-10RC armoured cars.

The Soviets comprised two BTR-60PB battalions, each with an attached tank company, though without AA as I was trying to restrict the multitude of Soviet weapons systems the Soviet commander needed to contend with. The frontage was such that only one battalion could attack at a time, which meant of course the second would likely be the follow on force. This aligned to my original concept of the advanced elements of a Motor Rifle Regiment deploying for a hasty attack.

These battalions were screened by the remainder of the Divisional Reconnaissance company, now understrength. They were supported by the off table the Soviet Regimental artillery battalion (122mm D-30) and very limited support from an understrength 2S3 152mm Battalion. Finally, there were two sorties of two Su-7 Fitters available. I felt these elderly aircraft were not going to unbalance the scenario too much.

The Soviet commander focussed his advance down the left flank where much of his initial battalion was screened by a stream from the French centre. Clearly he expected the enemy to be astride the more central road, which they were!

As you would expect the advance was led by reconnaissance elements. However, despite his best efforts some Soviet platoons, advancing more centrally, were engaged by the French centre with Milan and AMX-10RCs with predictable results causing some initial consternation. This provided a good example of the strengths and weaknesses of ATGWs. With some BTRs burning, but with the Milan firing posts detected, Soviet divisional artillery assets were tasked with a bombardment of the French centre. However, this artillery was limited as the same guns were needed for the suppression of French SAM systems (off table).

On the Soviet left the advance made good progress with the outnumbered French company initially holding its fire, with the exception of the battalion 120mm mortar, until the advancing Soviets entered the dedicated ATGW platoon kill zone, this being held back behind the infantry on high ground. Once engaged by the combination of small arms and HOT missiles the Soviets began their expected artillery fires, though these were however limited by French artillery targeting command and control assets. Below, the French right in the foreground is under some pressure.

However, the farm position on the French right was compromised and under with it under heavy attack likely to succeed the Soviet second battalion was released. It was soon apparent that this battalion would follow the first battalion before likely breaking out and outflanking the French centre. As this second battalion moved forward it crossed a portion of the French centre and in so doing suffered casualties.

Yet, with the French right collapsing the French commander was forced to relocate his uncommitted company on the left. Below, it can be seen advancing.

Moving from its concealed position the company commander was expected to flank the Soviets. Unfortunately, as the company moved forward it was attacked by three Su-7 Fitters (one model) using conventional bombs.

Unfortunately, with our gaming window at an end we had to call time. However, the tactical exercise had provided an excellent game. It involved several of the rules I had hoped to introduce. These included electronic warfare, counter battery fires, ATGWs, air support. An ideal combination for the new player. Despite all these extras the complexity didn’t distract the Soviet commander from his focus on delivering a reinforced battalion level attack. As such it provided an excellent introductory game. I think the scenario warrants further refinement after which I will place it on line, including some suggestions for playing it as a solo game.

Advance to Speilhofen

Igor Korabelnikov, commander of the 242nd Guards Motorized Rifle Regiment, sat on the side of his BTR-60 command vehicle surveying the scene before him. The 1st battalion of the regiment was now moving passed his headquarters. In all the regiment contained over 100 BTR-60PB combat vehicles, which of course were divided amongst the three motor rifle battalions. The regiment also contained a tank battalion of T-64B tanks. As was the doctrine these were allocated by company to each of his three motor rifle battalions. Some 100m away there was a roar, Igor glanced slightly to the side as several T-64s accelerated and in the process produced a puff of engine smoke as their drivers pushed the 40 ton monsters forward. For a moment Igor pondered how many of these machines would be burning on the battlefield by nightfall.

The position to the division’s front, his regiment’s area of operations, was believed to be held by a single enemy battalion in a generally central position, though it was expected to be reinforced. His orders were clear, the regiment was to advance and seize two areas of high ground and a town, all ideal blocking positions should the enemy counterattack. It seemed a difficult task, knowing how determined British resolve had been in the area recently. However, he hoped the support assets allocated by division would assist. Yet the afternoon was disappearing quickly. Time was critical, especially if reconnaissance reports were to be believed.

The 1st Battalion (1/242nd) was to advance in the centre to seize a wooded ridge some 1000 metres in length where it would deploy in a blocking positions opposite reported enemy positions. The 3/242nd was to advance on the right, it’s final position was more open but if the reconnaissance was to be believed the enemy was not yet in the area. Therefore the battalion should be able to seize several defensive positions before the slow moving enemy could reach the area. Finally, 2/242nd would conduct a flanking movement on the left, thus avoiding a large wood. They would then advance gaining a low ridge running from the southwest to the northeast, known as Speilhofen ridge. Again enemy forces were likely to be delayed and then further slowed by a stream, but here speed was critical.

As noted earlier Korabelnikov had been allocated several fixed wing and rotary support assets and it was with the 2/242nd he placed the air ground controller. To enable the interdiction of the MiGs he was assured that artillery fires on enemy air defence radar would be prioritised.

It wasn’t however until 6pm that the various elements of the regiment crossed their start lines and pressed forward. In all cases the battalion commanders were soon reporting delays. To the north 3/242nd was reporting that a stream was slowing the advance, while in the centre the BTRs were slowed by the undulating ground.

Above, a portion of 1/242nd advances in the centre while below in the north 3/242nd is delayed by a stream.

Even in the south the advance of 2/242nd was behind schedule with cornfields and rutted farmland slowing the BTRs.

Below, the general situation clearly showing the advance of 2/242nd, visible in the foreground. Speilhofen ridge can be seen ahead of the battalion, while the town of Speilhofen is on the right. In the distant right centre elements of 1/242nd can be seen advancing on their objective, a wooded ridge.

Despite the delays the centre the advance by 1/242 Battalion would successfully achieved its objective, and without enemy interference. Though the battalion commander reported enemy artillery fires on open ground to their south of the ridge. This was latter found to be an artillery delivered minefield dropped in an area that the British believed would be a Soviet route of advance.

Above, the battalion advancing from the right. An area of minefields is visible near the slopes of the wooded ridge. A British battalion is deployed on the left.

1/242 Battalion would eventually secure its objective and successfully deploy along the wooded ridge line. From here enemy infantry in a wood 400 yards were observed and FV432s in the open some 1700m distance, as is illustrated below. The latter was successfully engaged by self-propelled 2S3 artillery fires. Reports later identified the target as the British Brigade Headquarters!

Around the same time enemy air defence radar was detected operating near the battlefield. Soon after divisional 152mm artillery fires were authorised, silencing the enemy radar. It was later confirmed the radar was part of a forward deployed Rapier SAM system.

From reports compiled after the action both combatants were active in attempting to shape the battlefield using electronic warfare. Clearly the Soviets were focussed on locating air defence radar. After this threat was neutralised Soviet efforts focussed on disrupting radio communications. British efforts meanwhile more focussed on jamming Soviet air defence radar.

In the north the advance by 3/242nd was however poorly executed. The ground here was more open and the battalion commander failed to consider this when making his dispositions. His headquarters and the allocated Regimental ATGW Company, secured one area of high ground. Other assets deployed in nearby woods. However, his third company and supporting tanks were pushed too far forward.

While securing this dominating spot height the company was engaged by a Chieftain company causing heavy casualties and the loss of the high ground. Some enemy mechanised infantry were detected supporting their armour. This was engaged by the regiments D-30 artillery, but in the process the D-30 battalion was itself silenced by British counter battery fires.

Above, 3/242nd advances, while below the now over extended battalion is engaged by enemy.

Meanwhile, in the south, the regiment’s main effort was being made, the seizing of Speilhofen ridge, which was also the focus of a British mechanised battalion. Below, the British battalion advances on Speilhofen ridge from the northeast.

Normally two Soviet battalions would have been allocated to the task of securing such an important feature, but only one was of course available. Acknowledging this division allocated additional resources. The attached air ground controller was authorised to request fixed wing air support and, should the situation require, rotary wing attack helicopters in the form of Hind Mi-24s. As will be recalled the battalion, the 2/242nd conducted a flanking movement and arrived in the area of operations as planned. The battalion moved in a generally northwesterly direction approach the ridge line from the southeast. Some minor elements were detached to secure the town of Speilhofen which sat due east of the ridge and provided views of a portion of the area north and west of the ridge.

It was this detachment that was first to identify enemy elements advancing on Speilhofen ridge from the opposite side. Alerted to the threat the Soviet battalion halted its advanced and deployed for action.

Advanced elements of the British battalion, having failed to detect the Soviets, advanced on to the ridge. One squadron of Chieftains, some 12 in number, crested the ridge supported by just a platoon of infantry in FV432 armoured personal carriers. Before them an entire Soviet battalion awaited.

The Soviet artillery observer was prompt and the full force of a 152mm artillery battalion fell on the enemy infantry with predictable results. Then several MiG-23s began their attack runs on the ridge line. The MIGs were armed with cluster bombs and with no enemy air defences present, the enemy Blowpipe teams to far back, the air attack seemed certain of success. Below, the MIGs begin their attack run against British tanks on Speilhofen ridge. The model represents three actual aircraft.

However as the jets climbed the Chieftains remained operational, a result of all attack rolls being a one!

Now it was the turn of the Soviet infantry and armour. The Chieftains were engulfed in ATGW and tank fire. Several vehicles were destroyed but certainly not all, actually just one model!

For the next 20 minutes the ground forces engaged in a deadly exchange until around 9pm when, with light fading, enemy aircraft were detected. The first attack was by Harriers armed with anti-radiation missiles. Fortunately the aircraft allocated to this task were forced to break off, yet the battalions problems were far from over. Attacking low and at speed a further group of Harriers, this time armed with unguided rockets. The pilots came in with great skill but the air was too thick with missiles. As a result the enemy rockets failed to find targets.

Meanwhile the ground battle continued. The Chieftains now in hull down positions continued to ply their deadly business and with darkness intervening a company of T-64Bs were burning.

While firing spasmodically continued both commanders at this point determined to break-off the action. The British were reluctant to press their advantage on the Soviet right. While on the bloody Soviet left the burning T-64s provided a reminder of the deadly efficiency of British gunnery. Yet the British commander, or at least the deputy brigade commander as the Brigade HQ had been previously destroyed, determined to retire while a new air defence umbrella was established.

This ended our engagement which was a clear draw. The scenario was generated using the Scenario Generation System, with both players conducting an encounter scenario using their Defend Lists. The complete failure of the Soviet air strike, as well as that of the British Harriers, was clearly frustrating to both players, though for different reasons. The use of artillery to deliver mines was intriguing, though in this case unsuccessful. Yet, luck aside it was clear that both commanders needed to look carefully at refining their basic tactics. Both had failed in several areas. Fortunately the only casualties were those of miniature models.

The miniatures illustrated are all 6mm models from Heroics & Ros range. The Soviets from my collection the British from Robin’s.

Pudkin’s Legacy

It was 48 hours since the division crossed the border and, like some other divisions, Major General Yuri Snesarev‘s 94th Guards Motor Rifle Division had encountered strong opposition. However, a gap in the enemy frontline had been located. Indeed, if the reports from the Divisional Reconnaissance Battalion were to be believed the battles of the previous day had been so successful that a rupture of the BAOR line had been secured. Now ahead of the 94th Guards was a British infantry formation and likely poorly supported by tanks.

Snesarev let his deputy divisional commander Tikhon Sergeev complete his briefing, pondering the situation in his mind. The enemy positions have been detected in the centre around the town of Lutterhausen and stretched north. The advanced elements of the division would advance from the south of Lutterhausen swinging elements from two regiments in a generally northwesterly direction, behind the town, to secure the long ridge that stretched several kilometres from the northwest of Lutterhausen. The primary formations were two tank battalions from the 74th Tank Regiment. These were to be supported by two BTR Battalions from the 288th Motor Rifle Regiment. One BTR Battalion, the 1/288th, would secure a holding position in the south west on the left of the 74th Tank Regiment. The second, the 2/288th, would be held in reserve directly east of Lutterhausen for flank protection. Yes, it made sense.

Above, the town of Lutterhausen, before the Soviet advance. The town itself was of no military significance, unlike the ridge to the rear.

But was the position a trap, or had the British commander by positioning forward really left his position vulnerable to a flanking attack? How would he reinforce his flank? Surely the British ability to move reserves forward would surely be restricted by such a forward defence?

His thoughts however were interrupted by the movement of the divisional political officer. Damn him, Snesarev thought, his anger rising. If it wasn’t for weasels like Boris Pudkin he could take more time for further reconnaissance. Pudkin was relishing his role and today it was Pudkin, and the unstated threat that his presence provided, that was driving the new push despite Snesarev‘s misgivings. Regaining his composure Snesarev focussed on the briefing. Sergeev was now all but completed and within minutes the orders group had broken up, commanders returning to their respective units.

It was late in the afternoon when the T-64Bs, BMPs and BTRs crossed the start line there advance made good time, despite the terrain that now funnelled the advancing units into narrow defiles. This was most noticeable on the left where the BTRs and T-64s of the 1/288th we’re particular restricted by woods and rising ground. It was of course not long before reports were filtering in to Divisional Headquarters.

Above, the 1/288th Motor Rifle Battalion are visible on the left and 1/74th Tank Battalion on the right.

Below, 2/74th Battalion advances. The battalion comprised some 30 T-64B tanks and was supported by a BMP company as well as Regimental AA assets.

The first enemy report was from the centre, near Lutterhausen, two platoons of Chieftain heavy tanks were detected advancing, some eight in number. One was advancing from the northwest and the other platoon on the potentially exposed right flank of the 74th Tank Regiment.

Above, a British Chieftain platoon advances from concealed positions on the Soviet right flank. Deployed in penny packets the Soviet commanders did not fully appreciate the threat, at least at first.

Yet, the 2/74th commander was quick to react. The British tanks, increasing in number and now supported by Milan teams deployed in a wood to the battalion front, plied their deadly trade with skill.

The enemy tanks were particularly effective, while the Soviets reply was not. Fortunately the enemy ATGW teams were less effective. Despite this several T-64s were soon destroyed. It was not long before several BMPs were hit by advanced artillery rounds fired from off table FH-70 towed guns. The situation was quickly deteriorating.

About 8pm, in an effort to stabilise the Soviet right flank, the reserve battalion, the 2/288th was committed. The BTRs pushed directly west towards Lutterhausen, their attached T-64B company adding significantly to their offensive capability. This attack focused on a British localised counterattack on the 2/74th Tank Battalion’s right flank. The British here were quickly overcome.

Above, the general situation in the centre. The two tank battalions of the 74th Tank Regiment are in the centre and left. The BTR reserve can be seen advancing in the right foreground.

On the Soviet left the advancing BTRs of the 1/288th Battalion were, as noted previously, delayed. When finally released from the confines of the advance they spilled out on to a plain dominated by rising forested ground to the southwest and the village of Stendorf to the north. As the battalion deployed more T-64s erupted in fireballs, curtesy of yet more Chieftains moving east towards Stendorf. The battalion deployed as best it could, yet again the enemy had gained the initiative.

Below, the village of Stendorf in the centre foreground. The 1/288th Battalion comprising BTR-60PBs and T-64Bs are on the left, while on the right elements of the 74th Tank Regiment are visible. In the distance an understrength British battalion prepares to engage the 1/288th Battalion.

Meanwhile to the right the 1/74th Battalion was heavily engaged. The advancing battalion, squarely in the centre and the Soviet main effort, had been restricted by the a large wood and the small village of Stendorf. As the battalion emerged on to the British right flank of the defenders around Lutterhausen the battalion was engaged by a further Chieftain platoon held in ambush on a spot height some 1500 metres distant. Unable to locate the enemy and partly obscured by a hasty British smoke screen Soviet casualties quickly increased. The battalion commander was clearly panicked, Snesarev made a mental note. The commander would clearly need to be replaced.

To add to the debacle around 8pm British Lynx helicopters added their weight to the battalion’s discomfort. Their TOW anti-tank missiles being deadly in their execution.

Above, the situation in the centre where the 74th Tank Regiment is heavily engaged.

Soviet ZSUs were moved forward, having been delayed by the chaos of the constrained advance. However, the situation continuing to worsen. Finally around 9pm two massive Soviet smoke screens engulfed the area. The aim being to prevent further Soviet casualties.

No fewer than two Soviet 152mm artillery battalions smothered the area in smoke. Yet if this wasn’t sufficient this was supplemented by direct fire by the 122mm guns of the 2S1 battalion attached to the 1/74th Battalion.

Above, the Soviet advance by the 74th Tank Regiment stalls. Both smoke screens are visible.

As darknesses’ veil enveloped the battlefield Snesarev’s attack had clearly failed. However, Snesarev concerns were not simply the burning vehicles and stalled advance. Clearly the fault rested with the divisions political Officer, Comrade Pudkin. His interference was intolerable and the result would be his legacy. How could Snesarev free himself from the interference of this amateur, without himself ending up in Siberia?

The scenario was of course developed with the Scenario Generation System, with the Soviets conducting a Hasty Attack. Unfortunately the game was not complete when time was called. However the outcome was clearly a bloody Soviet defeat with Soviet forces falling in to a well considered trap. Miniatures were from my own and my opponent’s collection with all miniatures from Heroics & Ros.

Spots on your Leopards

In years gone by I’ve tended to find myself using Soviets and typically found myself facing my regular opponent’s British. However, of late I’ve managed several games where I’ve used West Germans. It’s been an enjoyable change and as we have had the games in sequence it has allowed some evaluation of what’s worked and what hasn’t. Indeed, across the last three games the West Germans have found themselves conducting a hasty attack, advancing in an encounter, and last night facing a massive Soviet deliberate attack. This mix has offered plenty of variety in itself.

Further, both my opponent and I have been experimenting with very different force combinations. When conducting the hasty attack I opted for Leopard 2 as the armoured component, the first time in many years where I’ve used Leopard 2s. In the past I have found the Leopard II too restrictive in a three battalion list. This was especially so when facing enemy infantry where the the low anti-infantry factor of the Leopard 2 was particularly frustrating.

In the second game, above and below, I switched from my normal three battalions to just two battalions to face massed T-80s in a fascinating encounter game. Again using Leopard 2s both my opponent and I were struck by the power of these tanks, though possibly him more than I, which was pleasing.

In last night’s encounter I dropped back to Leopard 1s and effectively just two manoeuvre battalions. I was supported by a weak dismounted security battalion but they clung to the confines of a town desperately calling in artillery fires and dodging incoming artillery shells.

Anyway, this time the West Germans faced a massed Soviet deliberate attack, where my opponent selected an reinforcements (an Option B) and what seemed like half the Soviet armies heavy artillery assets. Thank goodness I had some Gepards to drive away of his Hinds and some Phantoms to give Ivan something to think about!

My opponent has likewise has used plenty of variety. First Naval Infantry without any armour. This was then followed by a T-80 Tank Regiment and more recently elements drawn from two understrength Motor Rifle Regiments.

All this has reminds me of how important changing you force structure is. If you have the opportunity, and some additional models, give it a try. Your games will have plenty of variety which has to be a good thing. In the meantime I’m going to continue to count spots on my Leopards, be they one or two, and perhaps seeing how many Jaguars I can use, among other things…

Air Defence Suppression

A fascinating aspect of Modern Spearhead is the integration of both land an air elements within the same battlefield space. Much of the detail of these air operations is of course subsumed into the mechanics of the rules. As a result only a portion of the technicalities are considered and then these only when they directly impact ground operations. This short article looks at the basics of air defence suppression in Modern Spearhead.

I am a particularly convinced of the value of fixed wing air support. A successful strike even by a small number of aircraft can result in significant enemy casualties, ideally of high value targets. For a defender this can be critical as aircraft can target anywhere in the battlefield area, potentially delivering a critical blow to the attacker. For the attacker swift support by fixed wing aircraft can quickly overwhelm a difficult defensive position or disrupt a counterattack.

img_1019

Of course your enemy will likely have invested in air defence systems and will include either all, or at least part, of the following:

  • Battalion level assets which typically include light man-portable surface to air missiles or gun based AA systems. These provide localised protection and are often of limited capability. Examples include Gepard, Vulcan, Blowpipe, ZSU-23-4 and SA-7.
  • The medium range surface to air systems with improved capability and that are allocated for point defence and are sometimes allocated for specific operations. Examples include Gaskin, Gecko, Rapier and Roland.
  • Higher level systems which provide a wider umbrella for the divisional or corps. Typical examples include Hawk and SA-6 Gainful.

An ideal air defence incorporates elements from all three. This will decrease the impact of airstrikes, either by reducing the effectiveness or in causing the aircraft attack to be broken off. Some systems will be mobile.

Countering such an air defence can be difficult. It can be countered completely, or simply degrade for a portion of time. Typically the mechanisms to achieve this include:

  • Location through detection using radar location during the electronic warfare phase, followed by air defence suppression, or elimination, by long range divisional artillery fires in the artillery phase.
  • Degradation of capability by radar jamming in the electronic warfare phase, immediately followed by airstrike. This is more difficult for WARPAC nations.
  • Air defence suppression by the employment of fixed wing aircraft using smart bombs or anti-radiation missiles.
  • Suppression of on-table air defence by attack helicopters.
  • A combination of a number of these.

Now let’s look at an example of air defence suppression.

In our most recent game the Soviet defender, using a Naval Infantry Brigade, was subjected to a hasty attack by a West German Brigade. The German main effort comprised two battalions, including a Panzer Battalion equipped with Leopard 2s tanks. This battalion was further supported by Roland platoon and two Gepard platoons. No West German off table SAM could assist the advancing battalions.

With much of the Soviet land based weapon systems challenged by the Leopard capabilities the reduction of these was critical. Therefore the Soviet commander attempted to suppress the West German air defences before launching an air attack on the Leopards. The attacks played out in the following order.

First was an attack by SU-17 Fitters armed with smart bombs. Smart bombs are a stand-off weapon meaning the Gepards were unable to engage. The target was a Roland and Leopard and the aircraft was engaged with Roland at a -2. The artillery suppression were ineffective due to the German vehicle types. With the Roland operational the SU-17 Fitter attack was aborted by effective, or more accurately lucky, missile fire.

Next the Soviets attempted suppression of the massed AA assets of the battalion by BM-21 rocket launchers. The SU-17 smart bomb attack, below, was repeated. This time the aircraft did not abort, however the smart bomb attack was unsuccessful in its attack.

IMG_0116.jpg

The Soviet commander then committed his naval Helix attack helicopters, grouped into two flights, to suppress the AA systems. They can be seen below attacking at long range and were therefore outside Gepard range. One Helix flight was effectively eliminated by Roland platoon, the other failed to successfully attack.

Below, another view of the squadron of Helix helicopters comprising two flights, each model represents 2 to 4 actual aircraft.

IMG_0119.jpg

With the BM-21s reloaded a second rocket strike fell on the West Germans, this time suppressing a Gepard. The remaining Helix conducted another attack, now destroying a second Gepard which had moved into range but was unsuccessful in its own attack. Simultaneously, a Yak-38 Forger attacked Leopard tanks using improved conventional weapons. Below, the Yak-38s attempt an attack run on a West German Panzer Battalion.

IMG_0120.jpg

Fortunately, for the Leopards the Yak was shot down prior to completing its attack run by Roland.

In each attack the West Germans were generally fortunate. They suffered few suppressions from artillery fires and their systems performed well when engaging attacking aircraft or helicopters. The German decision not to support the attack with off-table SAM was flawed, and of course was a result of limited resources. The Soviet failure to jam German radar reduced the effectiveness of the fixed wing aircraft and I am sure will not be repeated. The Soviets are also known to be evaluating their use of improved conventional munitions, aircraft squadrons and smart bombs. A fascinating example of air support and air defence suppression on the table.

Baudenbach Ridge

Last night the Soviet Bear was on the offensive once more. Now, the Soviets were supposed to be facing elements of BAOR but unfortunately the British player had to cancel. While Mrs Thatcher has ordered an investigation on why British forces were not ready to take their place in the line, the glorious French were called on for duty once again. The scenario, developed using the Scenario Generation System, found the Soviets launching a deliberate attack – the French player having forgone the option of a spoiling attack.

As General Pierre Sancelme waited for inevitable Soviet attack he pondered his deployments, and as is often the case, had second thoughts. Then, his mind wandered. Just five days ago he had been with his family at Landau. How quickly times had changed. Now his division were starting to consider themselves veterans. If the Germans and Americans could not stop the Soviet advance, perhaps the French could delay the Soviets while additional French forces moved forward. Certainly casualties over the the past days had been mounting. It was true since the previous action the battered 5th Armoured Division and while some reinforcements had arrived the various regiments remained understrength.

Below, the area of operations. The Soviet forces will enter from the right.

img_0090-1

Again Sancelme opted for three regiments forward. But this time he was determined to fight a more mobile battle with at least one of the regiments repositioning early. With again a considerable divisional room to hold the three forward fighting regiments (battalions) were stretched. Sancelme placed the 153 Regiment d’Infanterie, a VAB equipped infantry regiment, in the centre around the town of Anselfingen, with a further company forward in the village of Pressat. Below, elements of 153 RI deployed around Anselfingen. The village of Pressat in just over the river, and not shown.

img_0091

On the right was 2nd Groupement de Chasseurs, while on the left was 24th Groupement de Chasseurs. Both were mechanised regiments each with two mechanised companies and elements from two tank companies, though understrength and each fielding around 12 AMX-30s each. Divisional artillery assets were limited. Just 12 tubes from 12th Regiment d’Artillerie would be available. Instead, the various regiments would need to rely on their intrinsic 120mm mortars, carefully dispersed to lesson the impact of counter-battery fires.

With a pause in the Soviet advance Sancelme had thrown out small covering forces on the centre and left. Both these sectors were subjected to aggressive reconnaissance. It was likely both areas would be the focus of the initial Soviet assault, though he wondered about his right and how weakly it was held…

At 2pm reports came in of a massed advance against the French left. Two Soviet Motor Rifle Battalions were tasked with securing the ridge and woods northeast of the town of Baudenbach. A Tank Battalion and Divisional Reconnaissance Battalion moved forward further to the right in a turning movement against the French left. Two of the Motor Rifle battalions were directly supported by 2S1s while the advancing regiments had additional fires from divisional 2S3 assets on call. In all the Soviets were advancing on a width of just 2kms and elements of seven artillery battalions in various levels of support.

As expected a series of massed artillery strikes began to hit various French positions. On the left the high ground The ridge running east to west near Baudenbach was hit by concentrated fires by three artillery battalions. This included BM-27 rocket launchers firing improved conventional munitions as well as two army level 240mm mortar battalions. Advanced mechanised platoons were also subjected to concentrated 2S3 fires, a mix of ICM and conventional HE. Despite these horrific fires all advanced elements emerged combat effective from these initial bombardments – though all shaken! Sancelme had reiterated to his regimental commanders the importance of deployment in reverse slope or secondary positions. As a result many positions which were later targets of equally hit by artillery fires were unoccupied.

By 2.30pm and with French positions still subjected to artillery fire Soviet armour moved into range of advanced French positions. 1st Company, 24th Groupement de Chasseurs would engage the Soviet T-80s that advanced by short halts on the ground below for around three hours. Constrained by terrain and harassed by French tank fire and occasional French 155mm artillery fire, the Soviet T-80s milled around in some disorder unable to adequately gain the upper hand while casualties slowly mounted.

Above, 1st Company 24th Groupement de Chasseurs engages Soviet armour. To their left a covering force of French mechanised infantry is deployed in the woods where it was subjected to pre-planned artillery fires.

When 1st Company was initially engaged, and expecting a movement by motorised rifle infantry to support stalled Soviet armour, Sancelme ordered 153rd Regiment d’Infanterie to conduct a spoiling attack. It was to pin the Soviets and support the advanced elements of 24th GC.

Below, 153 RI can be seen conducting its spoiling attack. In the left rear elements of 24th Groupement de Chasseurs can be seen in a reverse slope position behind the first Soviet objective, denoted by the red marker.

Shortly after 2nd Groupement de Chasseurs was ordered to conduct a rapid movement from the right flank to the left deploying to 24th Groupement de Chasseurs’ rear and therefore bolstering the French left rear.

The VAB equipped infantry regiment moved quickly to draw off Soviet infantry. Confused fighting took place along the eastern outskirts of Baudenbach and stretching to within 400m of the positions 1st Company, 24th Groupement de Chasseurs on Baudenbach Ridge.

Unfortunately, the attack by 153 Regiment d’Infanterie was broken up with little gain by Soviet infantry fire, well supported by 152mm artillery fires and in some cases 2S1s firing in direct support. A subsequent order to retire was issued too late and as a result the regiment broke – a result of further casualties during its withdrawal. Survivors would however reform around a kilometre from their original position.

Meanwhile, while one Soviet battalion was held up in the valley two others had pressed forward and were soon engaged against the French second line. Here additional AMX-30s and mechanised infantry exchanged fires with advancing T-80s supported by BMPs.

Above and below, the battle around the French left. Below, the 1st Company of 24th Groupement de Chasseurs has finally been overwhelmed has been overcome and Soviet forces press forward, despite further ATGW fires from other French companies.

Simultaneously, elements of 2nd Groupement de Chasseurs are by now deploying to bolster the French left. Below, AMX-30s and AMX-10s move under the cover of 24th GC’s attached AMX-13 DCA, a self-propelled 30mm AA system.

Despite the arrival of 2nd GC casualties are now mounting for the French. With 153 Regiment d’Infanterie heavily weakened and the 24th Groupement de Chasseurs finally taking significant casualties, a result of four hours of relentless fighting, it was time to break off. As 2nd Groupement de Chasseur was deployed to cover the retirement 24th Groupement de Chasseurs was ordered to disengage after a heroic defence around Baudenbach Ridge. Now the division’s reserve regiments, comprising the three Regiments Cuirassier, would be engaged against the Soviet juggernaut…

Contemplating Defence

Last night’s Modern Spearhead game, a hasty attack by Andrew’s new Soviet Tank Regiment has me pondering yet again how to create an effective defence. Andrew has this wonderful ability to conjure up very different armies. I never really no if I will be fighting T-55s using second line equipment, Naval Infantry supported by PT-76s, helicopters and aircraft, or some new monster such as the T-80s I encountered last night.

I tend to think I can operate a flexible defence, especially with NATO, so that a specific battalion plays can change its role in the defence. An ability to react, reposition battalions and counterattack, are all key requirements. But yesterday’s massed armoured thrust caused me serious problems.

My French defend list comprised three battalions, or regiments in French organisation. Two mechanised, with AMX-30 tanks and AMX-10P mechanised infantry, while the the third was comprised infantry in VABs. Deployment required two battalions forward with a third in reserve and guarding the flank. I expected a pinning attack in the centre and a flanking action against my left flank. Other options, and there were several, could have had seen alternate avenues of advance. In my plan the most likely counterattacks would have been with my reserve or the VAB battalion against an exposed centre.

Above, part of the the French 1st Regiment (Battalion) in defensive positions. The town on the left was taken by Soviet Divisional Reconnaissance Battalion as stage one of a move against the French left. Below, the same position from a different angle showing more of the French centre and forward left, as well as the advancing Soviets.

Unfortunately my defence was almost immediately paralysed. I just didn’t feel I could effectively manoeuvre against a bristling armoured formation which would have seen the outnumbered and advancing AMX-30s stripped out by T-80s and the AMX-10Ps quickly overcome. Manoeuvring the VAB equipped battalion was even worse. Lacking any armour and with fewer Milans their ability to counter armour is much reduced in defence, never mind on the offensive.

Despite what must read like a degree despondency, the game was fascinating. The engagement opened with Soviet shaping of the area of operations with electronic warfare locating French air defences quickly followed by fires by BM-27 rocket launches and 2S5 artillery assets. Their was no Soviet aircraft though so this at least had limited impact. As the divisional reconnaissance moved towards its initial objective three tank battalions each allocated a BMP infantry company and some 2S1 artillery for direct fire support moved forward.

French artillery attempted to suppress the BMPs while the French infantry engaged with Milan. The terribly outnumbered AMX-30s gave a reasonable account of themselves but were silenced by return fire. Then, as the T-80s advanced they were engaged with Milan. Here at least there was some hope as the Soviets, despite heavy artillery fire had considerable difficulties dislodging the French infantry. French artillery continued to fire but their fires were interrupted by relocation – to avoid the expected devastating counter battery fires.

Above, a view from the Soviet lines. The BMPs are suppressed by artillery fires. A 2S1 can be seen behind the advancing T-80s. Below, the advanced French positions have been neutralised and Soviet armour continues forward. French artillery fires now target the T-80s in a desperate attempt to disrupt the attack.

So where does this leave me, or more accurately my French? Reasonably capable against Motor Rifle formations the defend list’s inability to be more than a speed bump to massed armour will certainly see me reevaluating it’s composition and, more importantly perhaps, it’s use…